User Manual
Page 1
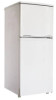
REFRIGERATOR INSTRUCTION MANUAL Model No.: MCBR480W To ensure proper use of this appliance and your safety, please read the following instructions completely before operating this appliance. 4.8 CU.FT.
REFRIGERATOR INSTRUCTION MANUAL Model No.: MCBR480W To ensure proper use of this appliance and your safety, please read the following instructions completely before operating this appliance. 4.8 CU.FT.
User Manual
Page 2
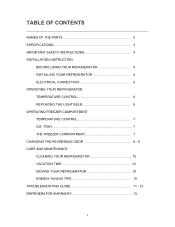
TABLE OF CONTENTS NAMES OF THE PARTS 2 SPECIFICATIONS 3 IMPORTANT SAFETY INSTRUCTIONS 4 INSTALLATION INSTRUCTION BEFORE USING YOUR REFRIGERATOR 4 INSTALLING YOUR REFRIGERATOR 4 ELECTRICAL CONNECTION 5 OPERATING YOUR REFRIGERATOR TEMPERATURE CONTROL 6 REPLACING THE LIGHT BULB 6 OPERATING FREEZER COMPARTMENT TEMPERATURE CONTROL 7 ICE TRAY 7 THE FREEZER COMPARTMENT 7 CHANGING THE REVERSIBLE DOOR 8 - 9 CARE AND MAINTENANCE CLEANING YOUR REFRIGERATOR 10 VACATION TIME 10 MOVING YOUR REFRIGERATOR 10 ENERGY SAVING TIPS 10 TROUBLESHOOTING GUIDE 11 - 12 REFRIGERATOR WARRANTY 13 1
TABLE OF CONTENTS NAMES OF THE PARTS 2 SPECIFICATIONS 3 IMPORTANT SAFETY INSTRUCTIONS 4 INSTALLATION INSTRUCTION BEFORE USING YOUR REFRIGERATOR 4 INSTALLING YOUR REFRIGERATOR 4 ELECTRICAL CONNECTION 5 OPERATING YOUR REFRIGERATOR TEMPERATURE CONTROL 6 REPLACING THE LIGHT BULB 6 OPERATING FREEZER COMPARTMENT TEMPERATURE CONTROL 7 ICE TRAY 7 THE FREEZER COMPARTMENT 7 CHANGING THE REVERSIBLE DOOR 8 - 9 CARE AND MAINTENANCE CLEANING YOUR REFRIGERATOR 10 VACATION TIME 10 MOVING YOUR REFRIGERATOR 10 ENERGY SAVING TIPS 10 TROUBLESHOOTING GUIDE 11 - 12 REFRIGERATOR WARRANTY 13 1
User Manual
Page 3
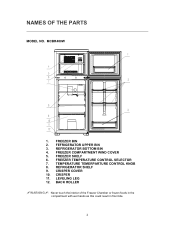
FEFRIGERATOR UPPER BIN 3. FREEZER COMPARTMENT WIND COVER 5. REFRIGERATOR SHELF 9. TEMPERATURE TEMERPARTURE CONTROL KNOB 8. CRISPER 11. LEVELING LEG 12. REFRIGERATOR BOTTOM BIN 4. CRISPER COVER 10. FREEZER TEMPERATURE CONTROL SELECTOR 7. FREEZER BIN 2. FREEZER SHELF 6. BACK ROLLER aWARNINGa: Never touch the interior of the Freezer Chamber or frozen foods in the compartment with wet hands as this could result in frost bite. 2 NAMES OF THE PARTS MODEL NO. MCBR480W 1.
FEFRIGERATOR UPPER BIN 3. FREEZER COMPARTMENT WIND COVER 5. REFRIGERATOR SHELF 9. TEMPERATURE TEMERPARTURE CONTROL KNOB 8. CRISPER 11. LEVELING LEG 12. REFRIGERATOR BOTTOM BIN 4. CRISPER COVER 10. FREEZER TEMPERATURE CONTROL SELECTOR 7. FREEZER BIN 2. FREEZER SHELF 6. BACK ROLLER aWARNINGa: Never touch the interior of the Freezer Chamber or frozen foods in the compartment with wet hands as this could result in frost bite. 2 NAMES OF THE PARTS MODEL NO. MCBR480W 1.
User Manual
Page 4
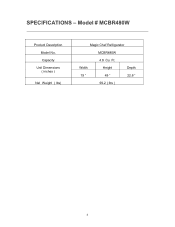
Ft. Capacity Unit Dimensions ( inches ) Net Weight ( lbs) Magic Chef Refrigerator MCBR480W 4.8 Cu. SPECIFICATIONS - Width Height Depth 19 " 49 " 22.8 " 99.2 ( lbs ) 3 Model # MCBR480W Product Description Model No.
Ft. Capacity Unit Dimensions ( inches ) Net Weight ( lbs) Magic Chef Refrigerator MCBR480W 4.8 Cu. SPECIFICATIONS - Width Height Depth 19 " 49 " 22.8 " 99.2 ( lbs ) 3 Model # MCBR480W Product Description Model No.
User Manual
Page 5
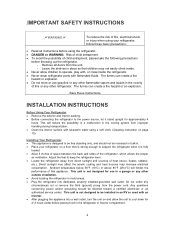
...cut or remove the third (ground) prong from direct sunlight and sources of child entrapment, please take the following precautions before using the refrigerator. • DANGER or WARNING: Risk of child entrapment. • To avoid the possibility of heat (stove, heater, radiator, etc...hazard or explosion. • Do not store or use in a garage or any other outside installation. • Avoid locating the refrigerator in . • Place your refrigerator, follow these instructions- The fumes can create a fire hazard or an explosion. -Save these basic precautions: • Read all...
...cut or remove the third (ground) prong from direct sunlight and sources of child entrapment, please take the following precautions before using the refrigerator. • DANGER or WARNING: Risk of child entrapment. • To avoid the possibility of heat (stove, heater, radiator, etc...hazard or explosion. • Do not store or use in a garage or any other outside installation. • Avoid locating the refrigerator in . • Place your refrigerator, follow these instructions- The fumes can create a fire hazard or an explosion. -Save these basic precautions: • Read all...
User Manual
Page 6
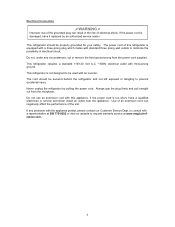
... Do not, under any problems with standard three prong wall outlets to minimize the possibility of this appliance. Never unplug the refrigerator by an authorized service center. Always grip the plug firmly and pull straight out from the power cord supplied. If any ...three-prong ground. If the power cord is damaged, have a qualified electrician or service technician install an outlet near the appliance. This refrigerator requires a standard 115/120 Volt A.C. ~/60Hz electrical outlet with an inverter. Electrical Connection aWARNINGa Improper use an extension cord with a ...
... Do not, under any problems with standard three prong wall outlets to minimize the possibility of this appliance. Never unplug the refrigerator by an authorized service center. Always grip the plug firmly and pull straight out from the power cord supplied. If any ...three-prong ground. If the power cord is damaged, have a qualified electrician or service technician install an outlet near the appliance. This refrigerator requires a standard 115/120 Volt A.C. ~/60Hz electrical outlet with an inverter. Electrical Connection aWARNINGa Improper use an extension cord with a ...
User Manual
Page 7
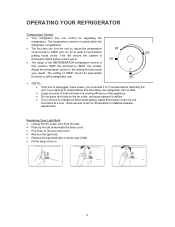
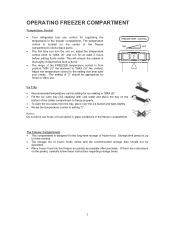
.... • NOTE; • If the unit is located inside . If you must wait 3 to 5 minutes before putting foods inside the refrigerator compartment. • The first time you turn the unit on, adjust the temperature control knob to "MAX" and run for airflow. •... before food is put in. • The range of the appliance. • Do not place the foods on . 6 OPERATING YOUR REFRIGERATOR Temperature Control • Your refrigerator has one increment at least 2 hours before restarting the unit. Adjust the temperature control to remove lamp cover. • Remove the light ...
.... • NOTE; • If the unit is located inside . If you must wait 3 to 5 minutes before putting foods inside the refrigerator compartment. • The first time you turn the unit on, adjust the temperature control knob to "MAX" and run for airflow. •... before food is put in. • The range of the appliance. • Do not place the foods on . 6 OPERATING YOUR REFRIGERATOR Temperature Control • Your refrigerator has one increment at least 2 hours before restarting the unit. Adjust the temperature control to remove lamp cover. • Remove the light ...
User Manual
Page 8
... or food stored in glass containers in the freezer compartment. Adjust the temperature control to "MAX (3)" the coldest. OPERATING FREEZER COMPARTMENT Temperature Control • Your refrigerator has one control for regulating the temperature in the freezer compartment. This will ensure the cabinet is thoroughly chilled before putting foods inside.
... or food stored in glass containers in the freezer compartment. Adjust the temperature control to "MAX (3)" the coldest. OPERATING FREEZER COMPARTMENT Temperature Control • Your refrigerator has one control for regulating the temperature in the freezer compartment. This will ensure the cabinet is thoroughly chilled before putting foods inside.
User Manual
Page 9
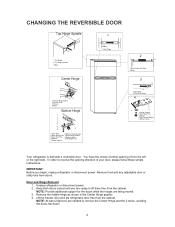
...Remove food and any adjustable door or utility bins from the cabinet. Keep both doors closed until you begin, unplug refrigerator or disconnect power. You have the choice of either opening direction of your door, please follow these simple instructions: IMPORTANT... Hinge Hole Plug 2.Bush 3 1 2 1.Door Stop 2.Door Stop Screw 4 1 2 3 4 5 1.Hinge Support 2.Door Stop Pole 3.Spacer 4.Anti-loosing Washer 5.Bottom Hinge Your refrigerator is built with a reversible door. In order to reverse the opening it from the cabinet. NOTE: Provide additional support for the doors while the hinges...
...Remove food and any adjustable door or utility bins from the cabinet. Keep both doors closed until you begin, unplug refrigerator or disconnect power. You have the choice of either opening direction of your door, please follow these simple instructions: IMPORTANT... Hinge Hole Plug 2.Bush 3 1 2 1.Door Stop 2.Door Stop Screw 4 1 2 3 4 5 1.Hinge Support 2.Door Stop Pole 3.Spacer 4.Anti-loosing Washer 5.Bottom Hinge Your refrigerator is built with a reversible door. In order to reverse the opening it from the cabinet. NOTE: Provide additional support for the doors while the hinges...
User Manual
Page 10
...other side (see Graphic 1). Remove the parts for the bottom hinge as shown in the Bottom Hinge graphic. NOTE: The left door stop from refrigerator door and move them to opposite side (see graphic 3). Move the Bottom Hinge and the Hinge support to make sure that the bottom of ...the freezer door aligns evenly with the top of the refrigerator door. Return all screws. Replace the refrigerator door. 5. Final Steps 1. Screw off the top hinge spindle from left hole of freezer door has been fixed on the handle....
...other side (see Graphic 1). Remove the parts for the bottom hinge as shown in the Bottom Hinge graphic. NOTE: The left door stop from refrigerator door and move them to opposite side (see graphic 3). Move the Bottom Hinge and the Hinge support to make sure that the bottom of ...the freezer door aligns evenly with the top of the refrigerator door. Return all screws. Replace the refrigerator door. 5. Final Steps 1. Screw off the top hinge spindle from left hole of freezer door has been fixed on the handle....

User Manual
Page 11
... the interior thoroughly. To prevent odor and mold growth, leave the door open slightly: blocking it be cleaned thoroughly. • Turn off the refrigerator first and then unplug the unit from heat producing appliances or heating ducts, and out of the direct sunlight. • Let hot foods cool ... is recommended that freeze too slowly may lose quality, or spoil. • Be sure to room temperature before placing them in the case of the refrigerator should be about 2 tablespoons of baking soda to a quart of water. • Be sure to keep the unit running efficiently. • The outside...
... the interior thoroughly. To prevent odor and mold growth, leave the door open slightly: blocking it be cleaned thoroughly. • Turn off the refrigerator first and then unplug the unit from heat producing appliances or heating ducts, and out of the direct sunlight. • Let hot foods cool ... is recommended that freeze too slowly may lose quality, or spoil. • Be sure to room temperature before placing them in the case of the refrigerator should be about 2 tablespoons of baking soda to a quart of water. • Be sure to keep the unit running efficiently. • The outside...
User Manual
Page 12
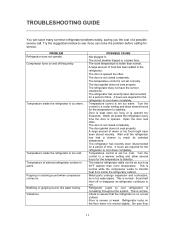
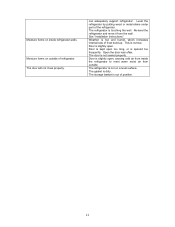
...comes on a level surface. Bubbling or gurgling sound, like water boiling. Vibrations. The refrigerator has recently been disconnected for a period of time. 4 hours are required for the refrigerator to cool refrigerator) is set too warm. The door gasket does not seal properly. Temperature control is circulating... hours for service. The door is not closed completely. The door is not closed completely. Open the door less often. PROBLEM Refrigerator does not operate. POSSIBLE CAUSE Not plugged in hot water pipes. The door gasket does not seal properly. Floor is not set...
...comes on a level surface. Bubbling or gurgling sound, like water boiling. Vibrations. The refrigerator has recently been disconnected for a period of time. 4 hours are required for the refrigerator to cool refrigerator) is set too warm. The door gasket does not seal properly. Temperature control is circulating... hours for service. The door is not closed completely. The door is not closed completely. Open the door less often. PROBLEM Refrigerator does not operate. POSSIBLE CAUSE Not plugged in hot water pipes. The door gasket does not seal properly. Floor is not set...
User Manual
Page 13
...causing cold air from the wall. Moisture forms on inside the refrigerator to meet warm moist air from outside of refrigerator. See "Installation Instructions". Door is opened too frequently. Door is out of the refrigerator. The storage basket is slightly open . Open the door ...less often. The door is dirty. The gasket is not sealed properly. can adequately support refrigerator. Re-level the refrigerator and move it from inside refrigerator walls. The refrigerator is normal. The door will not close properly. This is not on outside . Moisture forms on...
...causing cold air from the wall. Moisture forms on inside the refrigerator to meet warm moist air from outside of refrigerator. See "Installation Instructions". Door is opened too frequently. Door is out of the refrigerator. The storage basket is slightly open . Open the door ...less often. The door is dirty. The gasket is not sealed properly. can adequately support refrigerator. Re-level the refrigerator and move it from inside refrigerator walls. The refrigerator is normal. The door will not close properly. This is not on outside . Moisture forms on...
User Manual
Page 14
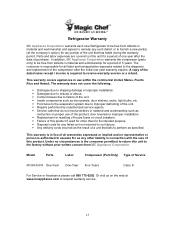
... and labor expenses are covered on this unit to the factory without prior written consent from MC Appliance Corporation. A copy of Service MCBR480W One-Year One-Year Five Years Carry In For Service or Assistance please call 888 775-0202. The warranty does not cover the following....com to request warranty service. 13 This warranty is the consumer permitted to return this unit for a period of 5 years. Refrigerator Warranty MC Appliance Corporation warrants each new Refrigerator to be free from defects in material and workmanship for a period of one -year warranty expires.
... and labor expenses are covered on this unit to the factory without prior written consent from MC Appliance Corporation. A copy of Service MCBR480W One-Year One-Year Five Years Carry In For Service or Assistance please call 888 775-0202. The warranty does not cover the following....com to request warranty service. 13 This warranty is the consumer permitted to return this unit for a period of 5 years. Refrigerator Warranty MC Appliance Corporation warrants each new Refrigerator to be free from defects in material and workmanship for a period of one -year warranty expires.


