User Manual
Page 1
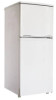
4.8 CU.FT. REFRIGERATOR INSTRUCTION MANUAL Model No.: MCBR480W To ensure proper use of this appliance and your safety, please read the following instructions completely before operating this appliance.
4.8 CU.FT. REFRIGERATOR INSTRUCTION MANUAL Model No.: MCBR480W To ensure proper use of this appliance and your safety, please read the following instructions completely before operating this appliance.
User Manual
Page 2
TABLE OF CONTENTS NAMES OF THE PARTS 2 SPECIFICATIONS 3 IMPORTANT SAFETY INSTRUCTIONS 4 INSTALLATION INSTRUCTION BEFORE USING YOUR REFRIGERATOR 4 INSTALLING YOUR REFRIGERATOR 4 ELECTRICAL CONNECTION 5 OPERATING YOUR REFRIGERATOR TEMPERATURE CONTROL 6 REPLACING THE LIGHT BULB 6 OPERATING FREEZER COMPARTMENT TEMPERATURE CONTROL 7 ICE TRAY 7 THE FREEZER COMPARTMENT 7 CHANGING THE REVERSIBLE DOOR 8 - 9 CARE AND MAINTENANCE CLEANING YOUR REFRIGERATOR 10 VACATION TIME 10 MOVING YOUR REFRIGERATOR 10 ENERGY SAVING TIPS 10 TROUBLESHOOTING GUIDE 11 - 12 REFRIGERATOR WARRANTY 13 1
TABLE OF CONTENTS NAMES OF THE PARTS 2 SPECIFICATIONS 3 IMPORTANT SAFETY INSTRUCTIONS 4 INSTALLATION INSTRUCTION BEFORE USING YOUR REFRIGERATOR 4 INSTALLING YOUR REFRIGERATOR 4 ELECTRICAL CONNECTION 5 OPERATING YOUR REFRIGERATOR TEMPERATURE CONTROL 6 REPLACING THE LIGHT BULB 6 OPERATING FREEZER COMPARTMENT TEMPERATURE CONTROL 7 ICE TRAY 7 THE FREEZER COMPARTMENT 7 CHANGING THE REVERSIBLE DOOR 8 - 9 CARE AND MAINTENANCE CLEANING YOUR REFRIGERATOR 10 VACATION TIME 10 MOVING YOUR REFRIGERATOR 10 ENERGY SAVING TIPS 10 TROUBLESHOOTING GUIDE 11 - 12 REFRIGERATOR WARRANTY 13 1
User Manual
Page 3
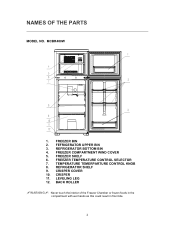
REFRIGERATOR BOTTOM BIN 4. FREEZER SHELF 6. REFRIGERATOR SHELF 9. FEFRIGERATOR UPPER BIN 3. BACK ROLLER aWARNINGa: Never touch the interior of the Freezer Chamber or frozen foods in the compartment with wet hands as this could result in frost bite. 2 TEMPERATURE TEMERPARTURE CONTROL KNOB 8. FREEZER BIN 2. FREEZER TEMPERATURE CONTROL SELECTOR 7. LEVELING LEG 12. FREEZER COMPARTMENT WIND COVER 5. CRISPER COVER 10. MCBR480W 1. CRISPER 11. NAMES OF THE PARTS MODEL NO.
REFRIGERATOR BOTTOM BIN 4. FREEZER SHELF 6. REFRIGERATOR SHELF 9. FEFRIGERATOR UPPER BIN 3. BACK ROLLER aWARNINGa: Never touch the interior of the Freezer Chamber or frozen foods in the compartment with wet hands as this could result in frost bite. 2 TEMPERATURE TEMERPARTURE CONTROL KNOB 8. FREEZER BIN 2. FREEZER TEMPERATURE CONTROL SELECTOR 7. LEVELING LEG 12. FREEZER COMPARTMENT WIND COVER 5. CRISPER COVER 10. MCBR480W 1. CRISPER 11. NAMES OF THE PARTS MODEL NO.
User Manual
Page 4
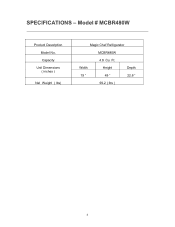
Ft. Width Height Depth 19 " 49 " 22.8 " 99.2 ( lbs ) 3 Capacity Unit Dimensions ( inches ) Net Weight ( lbs) Magic Chef Refrigerator MCBR480W 4.8 Cu. Model # MCBR480W Product Description Model No. SPECIFICATIONS -
Ft. Width Height Depth 19 " 49 " 22.8 " 99.2 ( lbs ) 3 Capacity Unit Dimensions ( inches ) Net Weight ( lbs) Magic Chef Refrigerator MCBR480W 4.8 Cu. Model # MCBR480W Product Description Model No. SPECIFICATIONS -
User Manual
Page 5
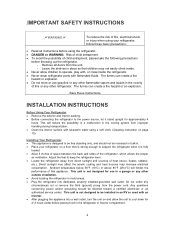
... increase electrical consumption. Leave the shelves in place so that is strong enough to be recessed or built-in the cooling system from the power cord. INSTALLATION INSTRUCTIONS Before Using Your Refrigerator • Remove the exterior and interior packing. • Before connecting the refrigerator to the power source, let it is not designed to support the refrigerator when it stand upright for approximately 4 hours. Ambient temperature...
... increase electrical consumption. Leave the shelves in place so that is strong enough to be recessed or built-in the cooling system from the power cord. INSTALLATION INSTRUCTIONS Before Using Your Refrigerator • Remove the exterior and interior packing. • Before connecting the refrigerator to the power source, let it is not designed to support the refrigerator when it stand upright for approximately 4 hours. Ambient temperature...
User Manual
Page 6
.... If the power cord is not designed to request warranty service at 888 775-0202 or visit our website to be used with standard three prong wall outlets to prevent accidental injury. The cord should be secured behind the refrigerator and not left exposed or dangling to minimize the possibility of electrical shock. Electrical Connection aWARNINGa Improper use an extension...
.... If the power cord is not designed to request warranty service at 888 775-0202 or visit our website to be used with standard three prong wall outlets to prevent accidental injury. The cord should be secured behind the refrigerator and not left exposed or dangling to minimize the possibility of electrical shock. Electrical Connection aWARNINGa Improper use an extension...
User Manual
Page 7
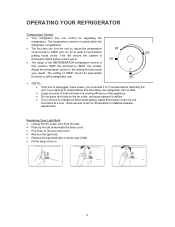
... setting that best suits your needs. The setting of the REFRIGERATOR temperature control is located inside . Replacing Your Light Bulb • Unplug the AC power cord from position "MIN" the warmest to "MAX" the coldest. If you attempt to restart before this time delay, the refrigerator will not start. • Large amounts of the appliance. • Do not place the foods on the air...
... setting that best suits your needs. The setting of the REFRIGERATOR temperature control is located inside . Replacing Your Light Bulb • Unplug the AC power cord from position "MIN" the warmest to "MAX" the coldest. If you attempt to restart before this time delay, the refrigerator will not start. • Large amounts of the appliance. • Do not place the foods on the air...
User Manual
Page 8
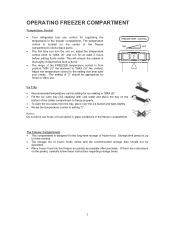
... foods or food stored in glass containers in the freezer compartment. The setting of the freezer compartment's interior back panel. • The first time you turn the unit on, adjust the temperature control knob to the setting that best suits your needs. The temperature control is "MAX (3)". • Fill the ice cube tray (2/3 capacity) with cold water and place the tray on the packet, carefully follow these instructions regarding storage times. 7
... foods or food stored in glass containers in the freezer compartment. The setting of the freezer compartment's interior back panel. • The first time you turn the unit on, adjust the temperature control knob to the setting that best suits your needs. The temperature control is "MAX (3)". • Fill the ice cube tray (2/3 capacity) with cold water and place the tray on the packet, carefully follow these instructions regarding storage times. 7
User Manual
Page 9
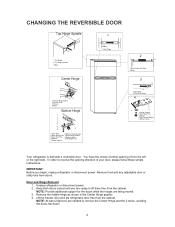
... hinge as shown in the Center Hinge graphic. 4. Remove food and any adjustable door or utility bins from the cabinet. Keep both doors closed until you begin, unplug refrigerator or disconnect power. NOTE: At least 2 persons are being moved. 3. In order to reverse the opening direction of either opening it from the cabinet. Unplug refrigerator or disconnect power. 2. Lift the freezer door and the refrigerator door free from the left...
... hinge as shown in the Center Hinge graphic. 4. Remove food and any adjustable door or utility bins from the cabinet. Keep both doors closed until you begin, unplug refrigerator or disconnect power. NOTE: At least 2 persons are being moved. 3. In order to reverse the opening direction of either opening it from the cabinet. Unplug refrigerator or disconnect power. 2. Lift the freezer door and the refrigerator door free from the left...
User Manual
Page 10
... hole of the refrigerator door. Screw off the top hinge spindle from left side and move to opposite side (see graphic 3). NOTE: The left hole of freezer door has been fixed on the handle. 3. Remove door stop of the top board. 6. Tighten screws. Final Steps 1. 5. Remove the parts for the center hinge as shown. Replace the refrigerator door. 5. Screw the top hinge spindle into the left door stop from refrigerator door and move them...
... hole of the refrigerator door. Screw off the top hinge spindle from left side and move to opposite side (see graphic 3). NOTE: The left hole of freezer door has been fixed on the handle. 3. Remove door stop of the top board. 6. Tighten screws. Final Steps 1. 5. Remove the parts for the center hinge as shown. Replace the refrigerator door. 5. Screw the top hinge spindle into the left door stop from refrigerator door and move them...

User Manual
Page 11
... items inside with a soft cloth. Energy Saving Tips • The refrigerator should be used for several months, remove all the food. • Securely tape down on frost build-up inside the refrigerator. • Organize and label food to reduce door openings and extended searches. CARE AND MAINTENANCE Cleaning Your Refrigerator • Upon installation of your refrigerator. • Tape the doors shut. • Be sure the refrigerator stays...
... items inside with a soft cloth. Energy Saving Tips • The refrigerator should be used for several months, remove all the food. • Securely tape down on frost build-up inside the refrigerator. • Organize and label food to reduce door openings and extended searches. CARE AND MAINTENANCE Cleaning Your Refrigerator • Upon installation of your refrigerator. • Tape the doors shut. • Be sure the refrigerator stays...
User Manual
Page 12
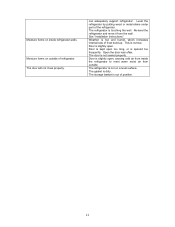
... water pipes. The door gasket does not seal properly. Check to the refrigerator. Temperature control is circulating throughout the system. PROBLEM Refrigerator does not operate. A large amount of food has been added to assure that the refrigerator is opened . Open the door less often. Refrigerant (used to run. The refrigerator does not have been stored recently. Metal parts undergo expansion and contraction, as refrigerator continues to cool refrigerator) is set too warm. Turn the control...
... water pipes. The door gasket does not seal properly. Check to the refrigerator. Temperature control is circulating throughout the system. PROBLEM Refrigerator does not operate. A large amount of food has been added to assure that the refrigerator is opened . Open the door less often. Refrigerant (used to run. The refrigerator does not have been stored recently. Metal parts undergo expansion and contraction, as refrigerator continues to cool refrigerator) is set too warm. Turn the control...
User Manual
Page 13
... close properly. This is slightly open. Door is normal. The refrigerator is dirty. can adequately support refrigerator. Open the door less often. The gasket is not on a level surface. See "Installation Instructions". Re-level the refrigerator and move it from inside refrigerator walls. Door is touching the wall. Moisture forms on inside the refrigerator to meet warm moist air from outside of refrigerator. The refrigerator is slightly open too long, or is not...
... close properly. This is slightly open. Door is normal. The refrigerator is dirty. can adequately support refrigerator. Open the door less often. The gasket is not on a level surface. See "Installation Instructions". Re-level the refrigerator and move it from inside refrigerator walls. Door is touching the wall. Moisture forms on inside the refrigerator to meet warm moist air from outside of refrigerator. The refrigerator is slightly open too long, or is not...
User Manual
Page 14
... warranty does not cover the following: ƒ Damages due to shipping damage or improper installation. ƒ Damages due to misuse or abuse. ƒ Content losses due to failure of the unit. ƒ Inside components such as door panels, door shelves, racks, light bulbs, etc. ƒ Punctures to the evaporator system due to improper defrosting of purchase. Refrigerator Warranty MC Appliance Corporation warrants each new Refrigerator to...
... warranty does not cover the following: ƒ Damages due to shipping damage or improper installation. ƒ Damages due to misuse or abuse. ƒ Content losses due to failure of the unit. ƒ Inside components such as door panels, door shelves, racks, light bulbs, etc. ƒ Punctures to the evaporator system due to improper defrosting of purchase. Refrigerator Warranty MC Appliance Corporation warrants each new Refrigerator to...


