User Manual
Page 1
4.5 CU.FT. AUTO-DEFROST REFRIGERATOR INSTRUCTION MANUAL Model No.: MCBR405W MCBR405B To ensure proper use of this appliance and your safety, please read the following instructions completely before operating this appliance.
4.5 CU.FT. AUTO-DEFROST REFRIGERATOR INSTRUCTION MANUAL Model No.: MCBR405W MCBR405B To ensure proper use of this appliance and your safety, please read the following instructions completely before operating this appliance.
User Manual
Page 2
TABLE OF CONTENTS NAMES OF THE PARTS 2 SPECIFICATIONS 2 IMPORTANT SAFETY INSTRUCTIONS 3 INSTALLATION INSTRUCTIONS BEFORE USING YOUR REFRIGERATOR 3 INSTALLING YOUR REFRIGERATOR 3-4 ELECTRICAL CONNECTION 4 OPERATING YOUR REFRIGERATOR TEMPERATURE CONTROL 5 CHANGING THE REVERSIBLE DOOR 6 CARE AND MAINTENANCE CLEANING YOUR REFRIGERATOR 7 VACATION TIME 7 MOVING YOUR REFRIGERATOR 7 ENERGY SAVING TIPS 7 LIGHT REPLACEMENT 7 TROUBLESHOOTING GUIDE 8-9 REFRIGERATOR WARRANTY 10 1
TABLE OF CONTENTS NAMES OF THE PARTS 2 SPECIFICATIONS 2 IMPORTANT SAFETY INSTRUCTIONS 3 INSTALLATION INSTRUCTIONS BEFORE USING YOUR REFRIGERATOR 3 INSTALLING YOUR REFRIGERATOR 3-4 ELECTRICAL CONNECTION 4 OPERATING YOUR REFRIGERATOR TEMPERATURE CONTROL 5 CHANGING THE REVERSIBLE DOOR 6 CARE AND MAINTENANCE CLEANING YOUR REFRIGERATOR 7 VACATION TIME 7 MOVING YOUR REFRIGERATOR 7 ENERGY SAVING TIPS 7 LIGHT REPLACEMENT 7 TROUBLESHOOTING GUIDE 8-9 REFRIGERATOR WARRANTY 10 1

User Manual
Page 3
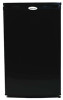
Model # MCBR405W/B Product Description Model No. Width Depth Height 19.9" 20.7" 33.4" 68 ( lbs ) 2 Capacity Unit Dimensions ( inches ) Net Weight ( lbs) Magic Chef Refrigerator MCBR405W/B 4.5 Cu. Ft. NAMES OF THE PARTS MODEL NO.: MCBR405W/B A) Chiller Compartment B) Full Range temperature control C) Adjustable shelves D) Crisper E) Can Dispenser F) 2 Liters Bottle Rack aWARNINGa: Never touch the interior of the Freezer Chamber or frozen foods in the compartment with wet hands as this could result in frost bite. SPECIFICATIONS -
Model # MCBR405W/B Product Description Model No. Width Depth Height 19.9" 20.7" 33.4" 68 ( lbs ) 2 Capacity Unit Dimensions ( inches ) Net Weight ( lbs) Magic Chef Refrigerator MCBR405W/B 4.5 Cu. Ft. NAMES OF THE PARTS MODEL NO.: MCBR405W/B A) Chiller Compartment B) Full Range temperature control C) Adjustable shelves D) Crisper E) Can Dispenser F) 2 Liters Bottle Rack aWARNINGa: Never touch the interior of the Freezer Chamber or frozen foods in the compartment with wet hands as this could result in frost bite. SPECIFICATIONS -
User Manual
Page 4
... all doors from improper handling during transportation. • Clean the interior surface with , or crawl inside . • Never allow children to operate, play with lukewarm water using a soft cloth. (Cleaning instruction on a floor that children may increase electrical consumption. Ambient temperature below 50°F (10°C) or above 85°F (29.4°C) will reduce the possibility of a malfunction in the cooling system from...
... all doors from improper handling during transportation. • Clean the interior surface with , or crawl inside . • Never allow children to operate, play with lukewarm water using a soft cloth. (Cleaning instruction on a floor that children may increase electrical consumption. Ambient temperature below 50°F (10°C) or above 85°F (29.4°C) will reduce the possibility of a malfunction in the cooling system from...
User Manual
Page 5
... to request warranty service at www.mcappliance.com. 4 Use of an extension cord can result in the refrigerator or freezer compartment. Electrical Connection aWARNINGa Improper use an extension cord with three-prong ground. This refrigerator is too short, have it replaced by pulling the power cord. to consult with an inverter. The power cord of electrical shock. If any circumstances, cut or remove the...
... to request warranty service at www.mcappliance.com. 4 Use of an extension cord can result in the refrigerator or freezer compartment. Electrical Connection aWARNINGa Improper use an extension cord with three-prong ground. This refrigerator is too short, have it replaced by pulling the power cord. to consult with an inverter. The power cord of electrical shock. If any circumstances, cut or remove the...
User Manual
Page 6
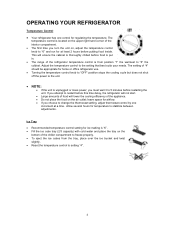
The temperature control is "6". • Fill the ice cube tray (2/3 capacity) with cold water and place the tray on the bottom of the interior compartment. • The first time you turn the unit on, adjust the temperature control knob to "6" and run for ice making is located on the air outlet; Ice Tray • Recommended temperature control setting for at a time. This will lower the cooling efficiency of the appliance. • Do not place...
The temperature control is "6". • Fill the ice cube tray (2/3 capacity) with cold water and place the tray on the bottom of the interior compartment. • The first time you turn the unit on, adjust the temperature control knob to "6" and run for ice making is located on the air outlet; Ice Tray • Recommended temperature control setting for at a time. This will lower the cooling efficiency of the appliance. • Do not place...
User Manual
Page 7
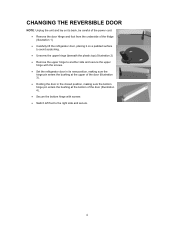
... the power cord. • Remove the door Hinge and foot from the underside of the fridge (Illustration 1). • Carefully lift the refrigerator door, placing it on a padded surface to avoid scratching. • Unscrew the upper hinge (beneath the plastic top) (Illustration 2) • Remove the upper hinge to another side and secure the upper hinge with the screws. • Set the refrigerator door in its new position, making...
... the power cord. • Remove the door Hinge and foot from the underside of the fridge (Illustration 1). • Carefully lift the refrigerator door, placing it on a padded surface to avoid scratching. • Unscrew the upper hinge (beneath the plastic top) (Illustration 2) • Remove the upper hinge to another side and secure the upper hinge with the screws. • Set the refrigerator door in its new position, making...
User Manual
Page 8
... close the door as soon as it may hurt your finger if improperly removed. • Turn the light counterclockwise to remove it, and install the new light. • Install the light cover along the notch and make sure the cover was stocked well. 7 The unit should not be accessible to run longer. Clean and dry the interior thoroughly. Energy Saving Tips • The refrigerator should be located in the...
... close the door as soon as it may hurt your finger if improperly removed. • Turn the light counterclockwise to remove it, and install the new light. • Install the light cover along the notch and make sure the cover was stocked well. 7 The unit should not be accessible to run longer. Clean and dry the interior thoroughly. Energy Saving Tips • The refrigerator should be located in the...
User Manual
Page 9
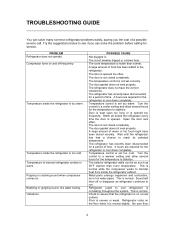
... set too warm. Compressor turns on a level surface. POSSIBLE CAUSE Not plugged in hot water pipes. The room temperature is not closed completely. The door gasket does not seal properly. Turn the control to a cooler setting and allow several hours for the temperature to stabilize. The door gasket does not seal properly. This is normal. TROUBLESHOOTING GUIDE You can solve the problem before calling for service. This is normal. Temperature inside the refrigerator...
... set too warm. Compressor turns on a level surface. POSSIBLE CAUSE Not plugged in hot water pipes. The room temperature is not closed completely. The door gasket does not seal properly. Turn the control to a cooler setting and allow several hours for the temperature to stabilize. The door gasket does not seal properly. This is normal. TROUBLESHOOTING GUIDE You can solve the problem before calling for service. This is normal. Temperature inside the refrigerator...
User Manual
Page 10
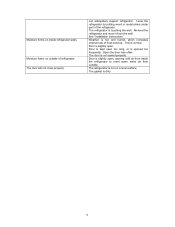
... normal. Open the door less often. See "Installation Instructions". This is opened too frequently. The refrigerator is dirty. 9 The gasket is touching the wall. can adequately support refrigerator. Door is not sealed properly. Level the refrigerator by putting wood or metal shims under part of frost build-up. The refrigerator is slightly open . Moisture forms on inside the refrigerator to meet warm moist air from outside of refrigerator. The door will...
... normal. Open the door less often. See "Installation Instructions". This is opened too frequently. The refrigerator is dirty. 9 The gasket is touching the wall. can adequately support refrigerator. Door is not sealed properly. Level the refrigerator by putting wood or metal shims under part of frost build-up. The refrigerator is slightly open . Moisture forms on inside the refrigerator to meet warm moist air from outside of refrigerator. The door will...
User Manual
Page 11
The warranty does not cover the following: ƒ Damages due to shipping damage or improper installation. ƒ Damages due to misuse or abuse. ƒ Content losses due to failure of the unit. ƒ Inside components such as door panels, door shelves, racks, light bulbs, etc. ƒ Punctures to the evaporator system due to improper defrosting of the unit. ƒ Repairs performed by unauthorized service agents...
The warranty does not cover the following: ƒ Damages due to shipping damage or improper installation. ƒ Damages due to misuse or abuse. ƒ Content losses due to failure of the unit. ƒ Inside components such as door panels, door shelves, racks, light bulbs, etc. ƒ Punctures to the evaporator system due to improper defrosting of the unit. ƒ Repairs performed by unauthorized service agents...


