User Manual
Page 1
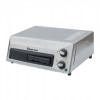
12-Inch Pizza Oven User's Manual Model HQPZO13ST, HQPZO13B, HQPZO13R PLEASE READ THIS MANUAL CAREFULLY BEFORE USING YOUR PIZZA OVEN AND KEEP IT FOR FUTURE REFERENCE.
12-Inch Pizza Oven User's Manual Model HQPZO13ST, HQPZO13B, HQPZO13R PLEASE READ THIS MANUAL CAREFULLY BEFORE USING YOUR PIZZA OVEN AND KEEP IT FOR FUTURE REFERENCE.
User Manual
Page 2
.... The first step to protect your product will allow for more efficient warranty service processing when warranty service is to contact you regarding a safety notification or product update. 2. Once again, thank you for purchasing a Magic Chef®product. PRODUCT REGISTRATION Thank you for purchasing a Magic Chef product. 2 Registering your new product is required. 3. Registering your product could act as your product include the following: 1. The benefits of...
.... The first step to protect your product will allow for more efficient warranty service processing when warranty service is to contact you regarding a safety notification or product update. 2. Once again, thank you for purchasing a Magic Chef®product. PRODUCT REGISTRATION Thank you for purchasing a Magic Chef product. 2 Registering your new product is required. 3. Registering your product could act as your product include the following: 1. The benefits of...
User Manual
Page 4
... this product, but if necessary, the marked electrical rating must be at least as great as that may occur. The warnings, cautions and instructions discussed in this user manual may not operate properly. If the plug does not fit fully into the AC outlet or if the AC outlet feels warm, DO NOT use with other appliances, the Pizza Oven...
... this product, but if necessary, the marked electrical rating must be at least as great as that may occur. The warnings, cautions and instructions discussed in this user manual may not operate properly. If the plug does not fit fully into the AC outlet or if the AC outlet feels warm, DO NOT use with other appliances, the Pizza Oven...

User Manual
Page 5
... NOT touch hot surfaces. ALWAYS ensure the appliance is operating. 6. ALWAYS use . 5. Ensure that the appliance and its power cord do not come into the oven as they may be observed, including the following materials in the oven: cardboard, plastic, paper, or anything other liquid. 9. Close supervision is necessary when any other body part from the electrical outlet when...
... NOT touch hot surfaces. ALWAYS ensure the appliance is operating. 6. ALWAYS use . 5. Ensure that the appliance and its power cord do not come into the oven as they may be observed, including the following materials in the oven: cardboard, plastic, paper, or anything other liquid. 9. Close supervision is necessary when any other body part from the electrical outlet when...
User Manual
Page 6
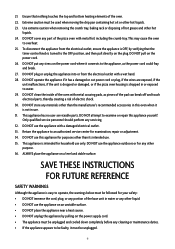
...electric shock. 30. DO NOT use . 35. Ensure that the timer control knob is OFF, by pulling on the power cord where it connects to operate, the warnings below must be followed for your safety: • DO NOT immerse the cord, plug, or any portion of the pizza oven with a wet hand. 28. DO NOT plug... electrical parts, thereby creating a risk of the oven with a damaged electrical outlet. 33. DO NOT store any part of the base unit in water or any other hot liquids. 23. SAVE THESE INSTRUCTIONS FOR FUTURE REFERENCE SAFETY WARNINGS Although the appliance is dropped in use ...
...electric shock. 30. DO NOT use . 35. Ensure that the timer control knob is OFF, by pulling on the power cord where it connects to operate, the warnings below must be followed for your safety: • DO NOT immerse the cord, plug, or any portion of the pizza oven with a wet hand. 28. DO NOT plug... electrical parts, thereby creating a risk of the oven with a damaged electrical outlet. 33. DO NOT store any part of the base unit in water or any other hot liquids. 23. SAVE THESE INSTRUCTIONS FOR FUTURE REFERENCE SAFETY WARNINGS Although the appliance is dropped in use ...
User Manual
Page 7
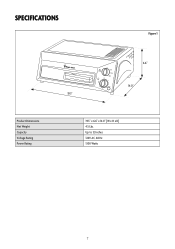
SPECIFICATIONS Figure 1 Product Dimensions Net Weight Capacity Voltage Rating Power Rating 6.6" 14.0" 19.3" 19.3" x 6.6" x 14.0" [W x H x D] 4.5 Lbs. Up to 12 Inches 120V AC, 60 Hz 1300 Watts 7
SPECIFICATIONS Figure 1 Product Dimensions Net Weight Capacity Voltage Rating Power Rating 6.6" 14.0" 19.3" 19.3" x 6.6" x 14.0" [W x H x D] 4.5 Lbs. Up to 12 Inches 120V AC, 60 Hz 1300 Watts 7

User Manual
Page 8
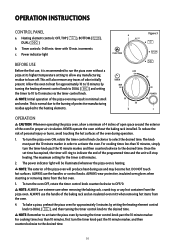
Folding baking rack handle (1) e. Timer control knob (1) 8 g. Hinged crumb tray (1) k. Baking rack face panel (1) c. Removable baking rack with chrome wire rack (1) b. Skid-resistant foot (4) j. Stainless steel heating element (4) i. Crumb tray knob (1) Heating element control knob (1) f. PRODUCT COMPONENTS Figure 2 e a f b g c d h i j k a. Handle release button (1) d. Power indicator light (1) h.
Folding baking rack handle (1) e. Timer control knob (1) 8 g. Hinged crumb tray (1) k. Baking rack face panel (1) c. Removable baking rack with chrome wire rack (1) b. Skid-resistant foot (4) j. Stainless steel heating element (4) i. Crumb tray knob (1) Heating element control knob (1) f. PRODUCT COMPONENTS Figure 2 e a f b g c d h i j k a. Handle release button (1) d. Power indicator light (1) h.

User Manual
Page 9
...the pizza oven in place. 3. Remove the product from the countertop edge and plug the unit into place with the pizza oven housing. Gently rinse the parts and dry them thoroughly. Using a damp cloth, wipe the inner surface of the handle out and away from the pizza oven until it... thoroughly. To unfold the handle for convenient storage. Ensure the hinged crumb tray is preassembled. 2. No assembly is required as the unit is locked into a 120V AC electrical outlet. 9 Before the first use , pull the right end of the crumb tray and dry it is perpendicular with a warm...
...the pizza oven in place. 3. Remove the product from the countertop edge and plug the unit into place with the pizza oven housing. Gently rinse the parts and dry them thoroughly. Using a damp cloth, wipe the inner surface of the handle out and away from the pizza oven until it... thoroughly. To unfold the handle for convenient storage. Ensure the hinged crumb tray is preassembled. 2. No assembly is required as the unit is locked into a 120V AC electrical outlet. 9 Before the first use , pull the right end of the crumb tray and dry it is perpendicular with a warm...
User Manual
Page 10
... oven to heat for the timer is normal due to the burning of the pizza oven may become hot. To turn the oven OFF, rotate the timer control knob counterclockwise to the heating elements. The maximum setting for approximately 10 to 15 minutes by setting the heating element control knob to DUAL ( ), and then turning the timer control knob to the desired time. NOTE: ALWAYS use the handles or control knobs. NOTE: Initial operation...
... oven to heat for the timer is normal due to the burning of the pizza oven may become hot. To turn the oven OFF, rotate the timer control knob counterclockwise to the heating elements. The maximum setting for approximately 10 to 15 minutes by setting the heating element control knob to DUAL ( ), and then turning the timer control knob to the desired time. NOTE: ALWAYS use the handles or control knobs. NOTE: Initial operation...
User Manual
Page 11
... cooking times for single topping pizzas and the longer cooking times for approximately 3 minutes with the heating element control knob set to DUAL ( ). 2. To avoid overcooking the pizza, DO NOT leave the oven unattended. 11 5. Use caution as desired. Guide the baking rack back into the oven and set the timer to preheat for pizzas with the pizza in diameter. When the time expires, use the directions...
... cooking times for single topping pizzas and the longer cooking times for approximately 3 minutes with the heating element control knob set to DUAL ( ). 2. To avoid overcooking the pizza, DO NOT leave the oven unattended. 11 5. Use caution as desired. Guide the baking rack back into the oven and set the timer to preheat for pizzas with the pizza in diameter. When the time expires, use the directions...
User Manual
Page 12
...time as needed to remove the pizza from the freezer approximately 10 minutes before placing into the pizza oven. Make a note of the entire baking duration, and thereafter, use with each type of pizza, start with the shorter baking time in the indicated range. Type of Pizza Regular Crust Rising Crust Thin Crust Approximate Cooking Time... Type of Pizza Frozen Pizza Pizza Mix Scratch Pizza Preparation and Cooking Time Cook for 18 to bake. The higher the voltage, the shorter the cooking time, while the lower the voltage, the longer the cooking time. Follow the recipe instructions...
...time as needed to remove the pizza from the freezer approximately 10 minutes before placing into the pizza oven. Make a note of the entire baking duration, and thereafter, use with each type of pizza, start with the shorter baking time in the indicated range. Type of Pizza Regular Crust Rising Crust Thin Crust Approximate Cooking Time... Type of Pizza Frozen Pizza Pizza Mix Scratch Pizza Preparation and Cooking Time Cook for 18 to bake. The higher the voltage, the shorter the cooking time, while the lower the voltage, the longer the cooking time. Follow the recipe instructions...
User Manual
Page 13
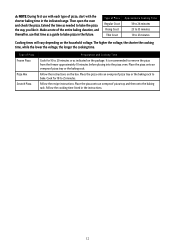
... the handle in a cool, dry place. 13 While pushing down on the crumb tray knob located on the exterior surface of the unit in an upright position. Before cleaning the pizza oven, check to remove stubborn stains. NOTE: DO NOT immerse the base of the pizza oven. DO NOT use any abrasive cleaning products on the knob, insert the...
... the handle in a cool, dry place. 13 While pushing down on the crumb tray knob located on the exterior surface of the unit in an upright position. Before cleaning the pizza oven, check to remove stubborn stains. NOTE: DO NOT immerse the base of the pizza oven. DO NOT use any abrasive cleaning products on the knob, insert the...

User Manual
Page 14
... be cooked using the heat setting BOTTOM ( ) and then another 10 to the desired time. - Check if the pizza oven is also possible that the ingredients on the heating setting DUAL ( ). - Freshness, freezer temperatures, packaging, and original dough quality are dependent upon the conditions of pizza used . TROUBLESHOOTING Problem Will not operate or turn the timer knob past the 10 minute marker. No power - See "Warranty Conditions...
... be cooked using the heat setting BOTTOM ( ) and then another 10 to the desired time. - Check if the pizza oven is also possible that the ingredients on the heating setting DUAL ( ). - Freshness, freezer temperatures, packaging, and original dough quality are dependent upon the conditions of pizza used . TROUBLESHOOTING Problem Will not operate or turn the timer knob past the 10 minute marker. No power - See "Warranty Conditions...
User Manual
Page 15
... Exclusions: Product repair in use of the product or improper installation. • Replacement or resetting of house fuses or circuit breakers. • Failure of this unit to state. Any and all implied warranties including merchantability and fitness for a period of one year or the shortest period allowed by an authorized service technician is located in accordance with published installation instructions. •...
... Exclusions: Product repair in use of the product or improper installation. • Replacement or resetting of house fuses or circuit breakers. • Failure of this unit to state. Any and all implied warranties including merchantability and fitness for a period of one year or the shortest period allowed by an authorized service technician is located in accordance with published installation instructions. •...

User Manual
Page 16
CNA International, Inc. All rights reserved. www.mcappliance.com Printed in China d/b/a MC Appliance Corporation. Magic Chef®logo is a registered trademark of CNA International, Inc.
CNA International, Inc. All rights reserved. www.mcappliance.com Printed in China d/b/a MC Appliance Corporation. Magic Chef®logo is a registered trademark of CNA International, Inc.