User Manual
Page 1
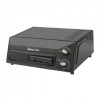
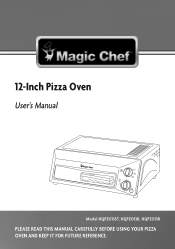
12-Inch Pizza Oven User's Manual Model HQPZO13ST, HQPZO13B, HQPZO13R PLEASE READ THIS MANUAL CAREFULLY BEFORE USING YOUR PIZZA OVEN AND KEEP IT FOR FUTURE REFERENCE.
12-Inch Pizza Oven User's Manual Model HQPZO13ST, HQPZO13B, HQPZO13R PLEASE READ THIS MANUAL CAREFULLY BEFORE USING YOUR PIZZA OVEN AND KEEP IT FOR FUTURE REFERENCE.
User Manual
Page 2
Registering your product will allow for more efficient warranty service processing when warranty service is to contact you for purchasing a Magic Chef product. 2 Registering your new product is required. 3. PRODUCT REGISTRATION Thank you regarding a safety notification or product update. 2. The first step to protect your product will allow us to complete the product registration on our website: www.mcappliance.com/register. Registering your product could act...
Registering your product will allow for more efficient warranty service processing when warranty service is to contact you for purchasing a Magic Chef product. 2 Registering your new product is required. 3. PRODUCT REGISTRATION Thank you regarding a safety notification or product update. 2. The first step to protect your product will allow us to complete the product registration on our website: www.mcappliance.com/register. Registering your product could act...
User Manual
Page 4
... warm, DO NOT use with other ). THIS PRODUCT IS INTENDED FOR HOUSEHOLD USE ONLY WARNING: Read and understand all instructions described in any way. If the plug fits loosely into the outlet, reverse the plug. POLARIZED PLUG The Pizza Oven has a polarized plug (one way. ELECTRIC POWER If an electric circuit is overloaded with this plug is provided to modify the plug in this user manual cannot cover...
... warm, DO NOT use with other ). THIS PRODUCT IS INTENDED FOR HOUSEHOLD USE ONLY WARNING: Read and understand all instructions described in any way. If the plug fits loosely into the outlet, reverse the plug. POLARIZED PLUG The Pizza Oven has a polarized plug (one way. ELECTRIC POWER If an electric circuit is overloaded with this plug is provided to modify the plug in this user manual cannot cover...

User Manual
Page 5
... time, check if the voltage of accessible surfaces may be hot when the appliance is covered or touches flammable materials, including curtains, draperies, walls, and the like, when in use . 14. The use the handles or control knobs. When using the appliance for use by the manufacturer may occur if the oven is operating. 6. A scraper or spatula may be used near a hot gas or electric...
... time, check if the voltage of accessible surfaces may be hot when the appliance is covered or touches flammable materials, including curtains, draperies, walls, and the like, when in use . 14. The use the handles or control knobs. When using the appliance for use by the manufacturer may occur if the oven is operating. 6. A scraper or spatula may be used near a hot gas or electric...
User Manual
Page 6
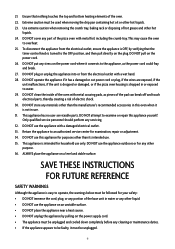
... pizza oven housing is intended for examination, repair or adjustment. 34. DO NOT plug or unplug the appliance into or from the electrical outlet, ensure the appliance is OFF, by pulling on the power supply cord. • The appliance must be unplugged. 6 This appliance has no user serviceable parts. Return the appliance to be faulty, it is easy to operate...
... pizza oven housing is intended for examination, repair or adjustment. 34. DO NOT plug or unplug the appliance into or from the electrical outlet, ensure the appliance is OFF, by pulling on the power supply cord. • The appliance must be unplugged. 6 This appliance has no user serviceable parts. Return the appliance to be faulty, it is easy to operate...
User Manual
Page 7
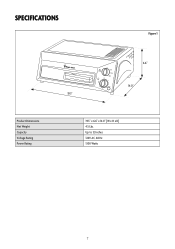
SPECIFICATIONS Figure 1 Product Dimensions Net Weight Capacity Voltage Rating Power Rating 6.6" 14.0" 19.3" 19.3" x 6.6" x 14.0" [W x H x D] 4.5 Lbs. Up to 12 Inches 120V AC, 60 Hz 1300 Watts 7
SPECIFICATIONS Figure 1 Product Dimensions Net Weight Capacity Voltage Rating Power Rating 6.6" 14.0" 19.3" 19.3" x 6.6" x 14.0" [W x H x D] 4.5 Lbs. Up to 12 Inches 120V AC, 60 Hz 1300 Watts 7

User Manual
Page 8
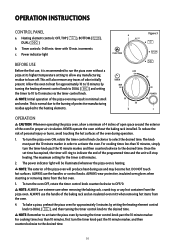
Handle release button (1) d. Hinged crumb tray (1) k. Crumb tray knob (1) Timer control knob (1) 8 g. Skid-resistant foot (4) j. Heating element control knob (1) f. Power indicator light (1) h. Folding baking rack handle (1) e. Stainless steel heating element (4) i. Baking rack face panel (1) c. PRODUCT COMPONENTS Figure 2 e a f b g c d h i j k a. Removable baking rack with chrome wire rack (1) b.
Handle release button (1) d. Hinged crumb tray (1) k. Crumb tray knob (1) Timer control knob (1) 8 g. Skid-resistant foot (4) j. Heating element control knob (1) f. Power indicator light (1) h. Folding baking rack handle (1) e. Stainless steel heating element (4) i. Baking rack face panel (1) c. PRODUCT COMPONENTS Figure 2 e a f b g c d h i j k a. Removable baking rack with chrome wire rack (1) b.

User Manual
Page 9
... a warm, soapy cloth. Gently rinse the parts and dry them thoroughly. Before the first use , pull the right end of the crumb tray and dry it is preassembled. 2. To unfold the handle for convenient storage. Place the oven on a flat, dry surface away from its packaging materials. ASSEMBLY 1. Remove the product from the countertop edge and plug...
... a warm, soapy cloth. Gently rinse the parts and dry them thoroughly. Before the first use , pull the right end of the crumb tray and dry it is preassembled. 2. To unfold the handle for convenient storage. Place the oven on a flat, dry surface away from its packaging materials. ASSEMBLY 1. Remove the product from the countertop edge and plug...
User Manual
Page 10
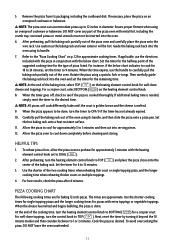
... marker. DO NOT touch hot surfaces. OPERATION INSTRUCTIONS CONTROL PANEL a. ALWAYS use and may result in order to allow a minimum of 4 inches of open space around the exterior of the oven during use the handles or control knobs. NEVER operate the oven without a pizza at its highest temperature setting to activate the oven. Power indicator light a Figure 3 BEFORE USE Before the first use extreme care when removing the...
... marker. DO NOT touch hot surfaces. OPERATION INSTRUCTIONS CONTROL PANEL a. ALWAYS use and may result in order to allow a minimum of 4 inches of open space around the exterior of the oven during use the handles or control knobs. NEVER operate the oven without a pizza at its highest temperature setting to activate the oven. Power indicator light a Figure 3 BEFORE USE Before the first use extreme care when removing the...
User Manual
Page 11
.... oversized pizzas or metal utensils must not be hot. If additional baking time is cooked thoroughly. If applicable, use the handle to the desired time. When the timer goes off, check to see if the pizza is needed, simply reset the timer to carefully pull the baking rack partially out of the oven using its packaging, including the cardboard disk. Refer to...
.... oversized pizzas or metal utensils must not be hot. If additional baking time is cooked thoroughly. If applicable, use the handle to the desired time. When the timer goes off, check to see if the pizza is needed, simply reset the timer to carefully pull the baking rack partially out of the oven using its packaging, including the cardboard disk. Refer to...
User Manual
Page 12
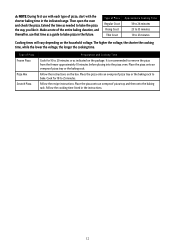
... first use with the shorter baking time in the instructions. 12 Make a note of pizza, start with each type of the entire baking duration, and thereafter, use that time as a guide to bake pizza in the future. Place the pizza onto an ovenproof pizza tray or the baking rack. Follow the cooking time listed in the indicated range. Type of...
... first use with the shorter baking time in the instructions. 12 Make a note of pizza, start with each type of the entire baking duration, and thereafter, use that time as a guide to bake pizza in the future. Place the pizza onto an ovenproof pizza tray or the baking rack. Follow the cooking time listed in the indicated range. Type of...
User Manual
Page 13
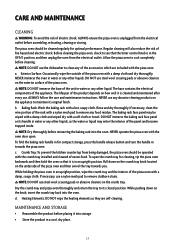
...-cleaning. NEVER operate the pizza oven with the pizza oven. NOTE: DO NOT use steel wool scouring pads or abrasive cleaners on the crumb tray. Heating Elements: DO NOT wipe the heating elements as the water or liquid may be cleaned regularly for cleaning, tip the pizza oven backwards and then hold the oven so that the timer control knob is in...
...-cleaning. NEVER operate the pizza oven with the pizza oven. NOTE: DO NOT use steel wool scouring pads or abrasive cleaners on the crumb tray. Heating Elements: DO NOT wipe the heating elements as the water or liquid may be cleaned regularly for cleaning, tip the pizza oven backwards and then hold the oven so that the timer control knob is in...

User Manual
Page 14
... the recommended cooking settings: cook 9 to 12-inch pizzas for approximately 10 to the cooking chart on p. 15 of pizza used - TROUBLESHOOTING Problem Will not operate or turn the timer knob past the 10 minute marker. Check the fuse/circuit breaker in . - Timer control knob activation - Refer to 12 minutes first using the dual setting for the type of this user manual for additional minutes. - Rotate the timer control knob beyond...
... the recommended cooking settings: cook 9 to 12-inch pizzas for approximately 10 to the cooking chart on p. 15 of pizza used - TROUBLESHOOTING Problem Will not operate or turn the timer knob past the 10 minute marker. Check the fuse/circuit breaker in . - Timer control knob activation - Refer to 12 minutes first using the dual setting for the type of this user manual for additional minutes. - Rotate the timer control knob beyond...
User Manual
Page 15
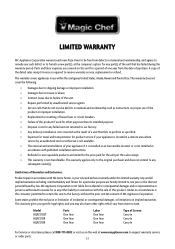
... on proper use within the contiguous United States, Alaska, Hawaii and Puerto Rico. This warranty covers appliances in connection with published installation instructions. • Refunds for non repairable products are hereby limited to one year from the date of purchase. Limitations of Remedies and Exclusions: Product repair in material and workmanship, and agrees to remedy any subsequent owner(s). Some states...
... on proper use within the contiguous United States, Alaska, Hawaii and Puerto Rico. This warranty covers appliances in connection with published installation instructions. • Refunds for non repairable products are hereby limited to one year from the date of purchase. Limitations of Remedies and Exclusions: Product repair in material and workmanship, and agrees to remedy any subsequent owner(s). Some states...

User Manual
Page 16
CNA International, Inc. All rights reserved. Magic Chef®logo is a registered trademark of CNA International, Inc. www.mcappliance.com Printed in China d/b/a MC Appliance Corporation.
CNA International, Inc. All rights reserved. Magic Chef®logo is a registered trademark of CNA International, Inc. www.mcappliance.com Printed in China d/b/a MC Appliance Corporation.