
User Manual
Page 1
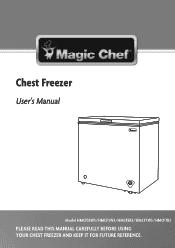
Chest Freezer User's Manual Model HMCF35W3/HMCF5W3/HMCF5B3/HMCF7W3/HMCF7B3 PLEASE READ THIS MANUAL CAREFULLY BEFORE USING YOUR CHEST FREEZER AND KEEP IT FOR FUTURE REFERENCE.
Chest Freezer User's Manual Model HMCF35W3/HMCF5W3/HMCF5B3/HMCF7W3/HMCF7B3 PLEASE READ THIS MANUAL CAREFULLY BEFORE USING YOUR CHEST FREEZER AND KEEP IT FOR FUTURE REFERENCE.
User Manual
Page 2
... following: 1. Registering your new product is required. 3. Product Registration Thank you for purchasing a Magic Chef product. The benefits of registering your proof of purchase in the event of insurance loss. Once again, thank you for more efficient warranty service processing when warranty service is to contact you regarding a safety notification or product update. 2. The first...
... following: 1. Registering your new product is required. 3. Product Registration Thank you for purchasing a Magic Chef product. The benefits of registering your proof of purchase in the event of insurance loss. Once again, thank you for more efficient warranty service processing when warranty service is to contact you regarding a safety notification or product update. 2. The first...
User Manual
Page 3
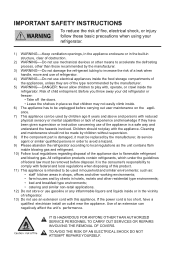
... CARRY OUT SERVICES OR REPAIRS INVOLVING THE REMOVAL OF COVERS. All refrigeration products contain refrigerants, which under the guidelines of federal law must be replaced by the manufacturer. 5) WARNING----DANGER: Never allow children to play with the appliance. IMPORTANT SAFETY INSTRUCTIONS To reduce the risk of fire, electrical shock, or injury follow these basic precautions when using your old refrigerator or freezer: •...
... CARRY OUT SERVICES OR REPAIRS INVOLVING THE REMOVAL OF COVERS. All refrigeration products contain refrigerants, which under the guidelines of federal law must be replaced by the manufacturer. 5) WARNING----DANGER: Never allow children to play with the appliance. IMPORTANT SAFETY INSTRUCTIONS To reduce the risk of fire, electrical shock, or injury follow these basic precautions when using your old refrigerator or freezer: •...
User Manual
Page 4
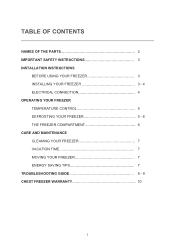
TABLE OF CONTENTS NAMES OF THE PARTS IMPORTANT SAFETY INSTRUCTIONS INSTALLATION INSTRUCTIONS BEFORE USING YOUR FREEZER INSTALLING YOUR FREEZER ELECTRICAL CONNECTION OPERATING YOUR FREEZER TEMPERATURE CONTROL DEFROSTING YOUR FREEZER THE FREEZER COMPARTMENT CARE AND MAINTENANCE CLEANING YOUR FREEZER VACATION TIME MOVING YOUR FREEZER ENERGY SAVING TIPS TROUBLESHOOTING GUIDE CHEST FREEZER WARRANTY 2 3 . 3 3 - 4 4 .. 5 . .. 5 - 6 . 6 7 . 7 7 . 7 . 8-9 10 1
TABLE OF CONTENTS NAMES OF THE PARTS IMPORTANT SAFETY INSTRUCTIONS INSTALLATION INSTRUCTIONS BEFORE USING YOUR FREEZER INSTALLING YOUR FREEZER ELECTRICAL CONNECTION OPERATING YOUR FREEZER TEMPERATURE CONTROL DEFROSTING YOUR FREEZER THE FREEZER COMPARTMENT CARE AND MAINTENANCE CLEANING YOUR FREEZER VACATION TIME MOVING YOUR FREEZER ENERGY SAVING TIPS TROUBLESHOOTING GUIDE CHEST FREEZER WARRANTY 2 3 . 3 3 - 4 4 .. 5 . .. 5 - 6 . 6 7 . 7 7 . 7 . 8-9 10 1
User Manual
Page 5
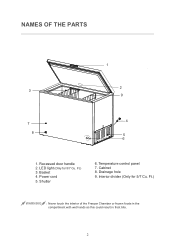
Power cord 5. Cabinet 8. NAMES OF THE PARTS 1 2 3 9 4 7 8 5 6 1. Interior divider (Only for 5/7 Cu. Ft.) WARNING : Never touch the interior of the Freezer Chamber or frozen foods in the compartment with wet hands as this could result in frost bite. 2 Drainage hole 9. Ft.) 3. LED light (Only for 5/7 Cu. Shutter 6. Basket 4. Recessed door handle 2. Temperature control panel 7.
Power cord 5. Cabinet 8. NAMES OF THE PARTS 1 2 3 9 4 7 8 5 6 1. Interior divider (Only for 5/7 Cu. Ft.) WARNING : Never touch the interior of the Freezer Chamber or frozen foods in the compartment with wet hands as this could result in frost bite. 2 Drainage hole 9. Ft.) 3. LED light (Only for 5/7 Cu. Shutter 6. Basket 4. Recessed door handle 2. Temperature control panel 7.
User Manual
Page 6
... and sides of the following precautions: Remove the freezer top and DO NOT remove the internal basket. Adjust the feet to comply with lukewarm water using the freezer. Leave the basket in moist areas. 3 Ft.) 1 Instruction Manual Before connecting the freezer to the power source, let it is the consumer's responsibility to keep the freezer level. Never clean freezer parts with , or crawl inside . Clean the interior surface with federal and local regulations...
... and sides of the following precautions: Remove the freezer top and DO NOT remove the internal basket. Adjust the feet to comply with lukewarm water using the freezer. Leave the basket in moist areas. 3 Ft.) 1 Instruction Manual Before connecting the freezer to the power source, let it is the consumer's responsibility to keep the freezer level. Never clean freezer parts with , or crawl inside . Clean the interior surface with federal and local regulations...
User Manual
Page 7
... Of Fire Or Explosion Due To Puncture Of Refrigerant Tubing; After plugging the appliance into dedicated, properly installed-grounded wall outlet. Never unplug the freezer by an authorized service center. Flammable Refrigerant Used. Follow Handling Instructions Carefully. Any questions concerning power and/or grounding should be Followed CAUTION - The power cord for 2~3 hours before placing food in the freezer compartment. DANGER - Risk Of Fire Or Explosion...
... Of Fire Or Explosion Due To Puncture Of Refrigerant Tubing; After plugging the appliance into dedicated, properly installed-grounded wall outlet. Never unplug the freezer by an authorized service center. Flammable Refrigerant Used. Follow Handling Instructions Carefully. Any questions concerning power and/or grounding should be Followed CAUTION - The power cord for 2~3 hours before placing food in the freezer compartment. DANGER - Risk Of Fire Or Explosion...
User Manual
Page 8
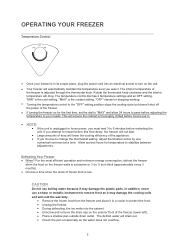
... . Turning the temperature control to your freezer is the coldest setting, "OFF" stands for temperature to remove frost as it in a cooler to change the thermostat setting, adjust thermostat control by one numerical increment at a time. NOTE: If the unit is put in its proper place, plug the power cord into the cabinet. If you select. If you must wait 3 to 5 minutes before adjusting the temperature to the "OFF" setting position stops the cooling...
... . Turning the temperature control to your freezer is the coldest setting, "OFF" stands for temperature to remove frost as it in a cooler to change the thermostat setting, adjust thermostat control by one numerical increment at a time. NOTE: If the unit is put in its proper place, plug the power cord into the cabinet. If you select. If you must wait 3 to 5 minutes before adjusting the temperature to the "OFF" setting position stops the cooling...
User Manual
Page 9
... months. Adjust the temperature control knob to set the freezer to "MAX". The instructions regarding storage times. Allow the cabinet to cool for the organization of the freezer. Leaving the door open will help speed the process. Adjust the temperature control knob to preferred temperature. Pre-packed commercially frozen food should be exceeded. Clean the interior of odd-shaped items. To reach other packages in the freezer just slide the basket to one...
... months. Adjust the temperature control knob to set the freezer to "MAX". The instructions regarding storage times. Allow the cabinet to cool for the organization of the freezer. Leaving the door open will help speed the process. Adjust the temperature control knob to preferred temperature. Pre-packed commercially frozen food should be exceeded. Clean the interior of odd-shaped items. To reach other packages in the freezer just slide the basket to one...
User Manual
Page 10
... door gasket (seal) clean to room temperature before placing them in the freezer. Clean and dry the interior thoroughly. Securely tape down on frost build-up inside the freezer. Let hot foods cool to keep the unit odor free and running efficiently. Remove as many items as needed at one time, and close the door as soon as possible. 7 Moving Your Freezer Unplug the freezer. Tape the doors shut. Organize and label food...
... door gasket (seal) clean to room temperature before placing them in the freezer. Clean and dry the interior thoroughly. Securely tape down on frost build-up inside the freezer. Let hot foods cool to keep the unit odor free and running efficiently. Remove as many items as needed at one time, and close the door as soon as possible. 7 Moving Your Freezer Unplug the freezer. Tape the doors shut. Organize and label food...
User Manual
Page 11
... under part of time. 4 hours are required for service. The circuit breaker tripped or a blown fuse. A large amount of food has been added to reach its selected temperature. The door gasket does not seal properly. Turn the control to a cooler setting and allow several hours for the freezer to run. The door is hotter than room temperature. This is opened . This is warm. Freezer rocks on a level surface. PROBLEM Freezer does not operate. Temperature of...
... under part of time. 4 hours are required for service. The circuit breaker tripped or a blown fuse. A large amount of food has been added to reach its selected temperature. The door gasket does not seal properly. Turn the control to a cooler setting and allow several hours for the freezer to run. The door is hotter than room temperature. This is opened . This is warm. Freezer rocks on a level surface. PROBLEM Freezer does not operate. Temperature of...
User Manual
Page 12
... increases internal rate of frost build-up. Weather is dirty. Door is slightly open too long, or is opened too frequently. Door is slightly open, causing cold air from inside freezer walls. The door is not on a level surface. Moisture forms on outside . The door will not close properly. The freezer is not sealed properly. Moisture forms on inside the freezer to meet warm moist air from outside of freezer. See "Installation Instructions". This...
... increases internal rate of frost build-up. Weather is dirty. Door is slightly open too long, or is opened too frequently. Door is slightly open, causing cold air from inside freezer walls. The door is not on a level surface. Moisture forms on outside . The door will not close properly. The freezer is not sealed properly. Moisture forms on inside the freezer to meet warm moist air from outside of freezer. See "Installation Instructions". This...
User Manual
Page 13
.... In the event the unit requires replacement or refund under this product if used for other liability in connection with published installation instructions. • Refunds for failed unit not returned to our factory. • Any delivery/installation costs incurred as door panels, door shelves, racks, light bulbs, etc. • Punctures to the evaporator system due to receive warranty service. Parts and labor expenses are covered on...
.... In the event the unit requires replacement or refund under this product if used for other liability in connection with published installation instructions. • Refunds for failed unit not returned to our factory. • Any delivery/installation costs incurred as door panels, door shelves, racks, light bulbs, etc. • Punctures to the evaporator system due to receive warranty service. Parts and labor expenses are covered on...

User Manual
Page 14
www.mcappliance.com Printed in China d/b/a MC Appliance Corporation. All rights reserved. Magic Chef®logo is a registered trademark of CNA International, Inc. CNA International, Inc.
www.mcappliance.com Printed in China d/b/a MC Appliance Corporation. All rights reserved. Magic Chef®logo is a registered trademark of CNA International, Inc. CNA International, Inc.


