User Manual
Page 3
...THE INTERIOR LIGHT ... REFRIGERATOR WARRANTY . 3 .. 3 . 4 ... 4 .. 4 5 .. 6 6 .. . 6 .. . 6 7 .. 8 - 9 10 . . 10 10 . . 10 . . 11 - 12 . 13 2 TABLE OF CONTENTS NAMES OF THE PARTS SPECIFICATIONS IMPORTANT SAFETY INSTRUCTIONS INSTALLATION INSTRUCTION BEFORE USING YOUR REFRIGERATOR INSTALLING YOUR REFRIGERATOR ELECTRICAL CONNECTION OPERATING YOUR REFRIGERATOR TEMPERATURE CONTROL ICE TRAY .. CHANGING THE REVERSIBLE DOOR CARE AND MAINTENANCE CLEANING YOUR REFRIGERATOR VACATION TIME MOVING YOUR REFRIGERATOR ENERGY SAVING TIPS TROUBLESHOOTING GUIDE...
...THE INTERIOR LIGHT ... REFRIGERATOR WARRANTY . 3 .. 3 . 4 ... 4 .. 4 5 .. 6 6 .. . 6 .. . 6 7 .. 8 - 9 10 . . 10 10 . . 10 . . 11 - 12 . 13 2 TABLE OF CONTENTS NAMES OF THE PARTS SPECIFICATIONS IMPORTANT SAFETY INSTRUCTIONS INSTALLATION INSTRUCTION BEFORE USING YOUR REFRIGERATOR INSTALLING YOUR REFRIGERATOR ELECTRICAL CONNECTION OPERATING YOUR REFRIGERATOR TEMPERATURE CONTROL ICE TRAY .. CHANGING THE REVERSIBLE DOOR CARE AND MAINTENANCE CLEANING YOUR REFRIGERATOR VACATION TIME MOVING YOUR REFRIGERATOR ENERGY SAVING TIPS TROUBLESHOOTING GUIDE...
User Manual
Page 4
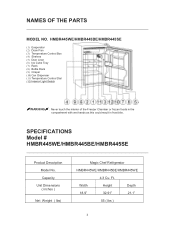
... OF THE PARTS MODEL NO. Capacity Unit Dimensions ( inches ) Net Weight ( lbs) Magic Chef Refrigerator HMBR445WE/HMBR445BE/HMBR445WE 4.3 Cu. Width Height Depth 18.9" 32.91" 21.1" 55 ( lbs ) 3 SPECIFICATIONS Model # HMBR445WE/HMBR445BE/HMBR445SE Product Description Model No. HMBR445WE/HMBR445BE/HMBR445SE (1) Evaporator (2) Drain Pan (3) Temperature Control Box (4) Shelves (5) Door Liner (6) Ice Cube Tray (7) Rack (8) Bottle Rack (9) Crisper (10) Can Dispenser (11) Temperature Control Dial (12) Interior Light Switch WARNING : Never touch the interior of the Freezer Chamber or...
... OF THE PARTS MODEL NO. Capacity Unit Dimensions ( inches ) Net Weight ( lbs) Magic Chef Refrigerator HMBR445WE/HMBR445BE/HMBR445WE 4.3 Cu. Width Height Depth 18.9" 32.91" 21.1" 55 ( lbs ) 3 SPECIFICATIONS Model # HMBR445WE/HMBR445BE/HMBR445SE Product Description Model No. HMBR445WE/HMBR445BE/HMBR445SE (1) Evaporator (2) Drain Pan (3) Temperature Control Box (4) Shelves (5) Door Liner (6) Ice Cube Tray (7) Rack (8) Bottle Rack (9) Crisper (10) Can Dispenser (11) Temperature Control Dial (12) Interior Light Switch WARNING : Never touch the interior of the Freezer Chamber or...

User Manual
Page 5
... crawl inside . • Never allow the unit to keep the refrigerator level. • Locate the refrigerator away from improper handling during transportation. • Clean the interior surface with lukewarm water using a soft cloth. (Cleaning instruction on page 9) Installing Your Refrigerator • This appliance is designed to be free standing only, and should be removed before throwing out the refrigerator. - It is the consumer's responsibility to the power source...
... crawl inside . • Never allow the unit to keep the refrigerator level. • Locate the refrigerator away from improper handling during transportation. • Clean the interior surface with lukewarm water using a soft cloth. (Cleaning instruction on page 9) Installing Your Refrigerator • This appliance is designed to be free standing only, and should be removed before throwing out the refrigerator. - It is the consumer's responsibility to the power source...
User Manual
Page 6
..., please contact our Customer Service Dept. Electrical Connection WARNING Improper use an extension cord with standard three prong wall outlets to minimize the possibility of electrical shock. If the power cord is equipped with a three-prong plug which mates with this refrigerator is too short, have it replaced by pulling the power cord. Never unplug the refrigerator by an authorized service center. If...
..., please contact our Customer Service Dept. Electrical Connection WARNING Improper use an extension cord with standard three prong wall outlets to minimize the possibility of electrical shock. If the power cord is equipped with a three-prong plug which mates with this refrigerator is too short, have it replaced by pulling the power cord. Never unplug the refrigerator by an authorized service center. If...
User Manual
Page 7
... temperature control is unplugged, loses power; Adjust the temperature control to defrost. If there are instructions on , adjust the temperature control knob to "7" and run for home or office refrigerator use hot water or other electric heating devices to change the thermostat setting, adjust thermostat control by one control for regulating the temperature. Set the thermostat dial to "0" to the setting that best suits your needs. Remove all contents from position "1" to stabilize between adjustments. This will lower the cooling efficiency...
... temperature control is unplugged, loses power; Adjust the temperature control to defrost. If there are instructions on , adjust the temperature control knob to "7" and run for home or office refrigerator use hot water or other electric heating devices to change the thermostat setting, adjust thermostat control by one control for regulating the temperature. Set the thermostat dial to "0" to the setting that best suits your needs. Remove all contents from position "1" to stabilize between adjustments. This will lower the cooling efficiency...
User Manual
Page 9
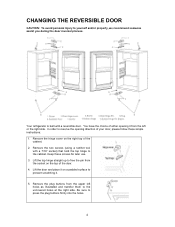
... use. 3. Keep these simple instructions: 1. Remove the plug buttons from the left holes as illustrated and transfer them to reserve the opening it . 5. In order to the uncovered holes at the right side. Be sure to yourself and/or property, we recommend someone assist you during the door reversal process. CHANGING THE REVERSIBLE DOOR CAUTION: To avoid personal injury to press the plug buttons...
... use. 3. Keep these simple instructions: 1. Remove the plug buttons from the left holes as illustrated and transfer them to reserve the opening it . 5. In order to the uncovered holes at the right side. Be sure to yourself and/or property, we recommend someone assist you during the door reversal process. CHANGING THE REVERSIBLE DOOR CAUTION: To avoid personal injury to press the plug buttons...
User Manual
Page 10
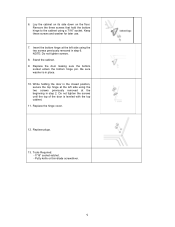
... left side using the two screws previously removed at the left side using a 7/16" socket. Do not tighten the screws until the top of the door is in step 6. 6. Be sure washer is leveled with the top cabinet. 11. NOTE: Do not tighten screws. 8. Replace the door making sure the bottom socket enters the bottom hinge pin. Stand the cabinet. 9. Replace the hinge cover...
... left side using the two screws previously removed at the left side using a 7/16" socket. Do not tighten the screws until the top of the door is in step 6. 6. Be sure washer is leveled with the top cabinet. 11. NOTE: Do not tighten screws. 8. Replace the door making sure the bottom socket enters the bottom hinge pin. Stand the cabinet. 9. Replace the hinge cover...

User Manual
Page 11
... inside your new appliance, it open slightly to run longer. To prevent odor and mold growth, leave the door open slightly: blocking it is recommended that freeze too slowly may lose quality, or spoil. • Be sure to child's play. • Short vacations: Leave the refrigerator operating during transportation. CARE AND MAINTENANCE Cleaning Your Refrigerator • Upon installation of your refrigerator. • Tape the doors shut...
... inside your new appliance, it open slightly to run longer. To prevent odor and mold growth, leave the door open slightly: blocking it is recommended that freeze too slowly may lose quality, or spoil. • Be sure to child's play. • Short vacations: Leave the refrigerator operating during transportation. CARE AND MAINTENANCE Cleaning Your Refrigerator • Upon installation of your refrigerator. • Tape the doors shut...
User Manual
Page 12
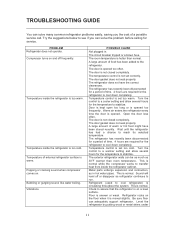
... than normal. Refrigerant (used to cool down completely. POSSIBLE CAUSE Not plugged in hot water pipes. The door is warm. The door is not closed completely. The door is not closed completely. This is set correctly. Vibrations. This is circulating throughout the system. The refrigerator has recently been disconnected for a period of a possible service call. Temperature control is normal. Open the door less often. TROUBLESHOOTING GUIDE You can...
... than normal. Refrigerant (used to cool down completely. POSSIBLE CAUSE Not plugged in hot water pipes. The door is warm. The door is not closed completely. The door is not closed completely. This is set correctly. Vibrations. This is circulating throughout the system. The refrigerator has recently been disconnected for a period of a possible service call. Temperature control is normal. Open the door less often. TROUBLESHOOTING GUIDE You can...
User Manual
Page 14
... 775-0202. Model Parts Labor Compressor (Part Only) Type of the unit. Inside components such as door panels, door shelves, racks, light bulbs, etc. The warranty does not cover the following: Damages due to misuse or abuse. Liability under this unit to the factory without prior written consent from MC Appliance Corporation. Refrigerator Warranty Unless otherwise prohibited, MC Appliance Corporation warrants each new refrigerator to be free from defects...
... 775-0202. Model Parts Labor Compressor (Part Only) Type of the unit. Inside components such as door panels, door shelves, racks, light bulbs, etc. The warranty does not cover the following: Damages due to misuse or abuse. Liability under this unit to the factory without prior written consent from MC Appliance Corporation. Refrigerator Warranty Unless otherwise prohibited, MC Appliance Corporation warrants each new refrigerator to be free from defects...

User Manual 2
Page 3
CHANGING THE REVERSIBLE DOOR CARE AND MAINTENANCE CLEANING YOUR REFRIGERATOR VACATION TIME MOVING YOUR REFRIGERATOR ENERGY SAVING TIPS TROUBLESHOOTING GUIDE . TABLE OF CONTENTS NAMES OF THE PARTS SPECIFICATIONS IMPORTANT SAFETY INSTRUCTIONS INSTALLATION INSTRUCTION BEFORE USING YOUR REFRIGERATOR INSTALLING YOUR REFRIGERATOR ELECTRICAL CONNECTION OPERATING YOUR REFRIGERATOR TEMPERATURE CONTROL ICE TRAY .. THE CHILLER COMPARTMENT HOW TO DEFROST HOW TO CHANGE THE INTERIOR LIGHT ... REFRIGERATOR WARRANTY . 3 .. 3 . 4 ... 4 .. 4 5 .. 6 6 .. . 6 .. . 6 7 .. ...
CHANGING THE REVERSIBLE DOOR CARE AND MAINTENANCE CLEANING YOUR REFRIGERATOR VACATION TIME MOVING YOUR REFRIGERATOR ENERGY SAVING TIPS TROUBLESHOOTING GUIDE . TABLE OF CONTENTS NAMES OF THE PARTS SPECIFICATIONS IMPORTANT SAFETY INSTRUCTIONS INSTALLATION INSTRUCTION BEFORE USING YOUR REFRIGERATOR INSTALLING YOUR REFRIGERATOR ELECTRICAL CONNECTION OPERATING YOUR REFRIGERATOR TEMPERATURE CONTROL ICE TRAY .. THE CHILLER COMPARTMENT HOW TO DEFROST HOW TO CHANGE THE INTERIOR LIGHT ... REFRIGERATOR WARRANTY . 3 .. 3 . 4 ... 4 .. 4 5 .. 6 6 .. . 6 .. . 6 7 .. ...
User Manual 2
Page 4
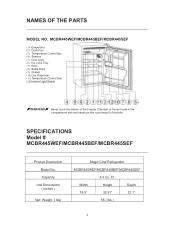
...Height Depth 18.9" 32.91" 21.1" 55 ( lbs ) 3 SPECIFICATIONS Model # MCBR445WEF/MCBR445BEF/MCBR445SEF Product Description Model No. Capacity Unit Dimensions ( inches ) Net Weight ( lbs) Magic Chef Refrigerator MCBR445WEF/MCBR445BEF/MCBR445SEF 4.3 Cu. NAMES OF THE PARTS MODEL NO. Ft. MCBR445WEF/MCBR445BEF/MCBR445SEF (1) Evaporator (2) Drain Pan (3) Temperature Control Box (4) Shelves (5) Door Liner (6) Ice Cube Tray (7) Rack (8) Bottle Rack (9) Crisper (10) Can Dispenser (11) Temperature Control Dial (12) Interior Light Switch WARNING : Never touch the interior of the Freezer...
...Height Depth 18.9" 32.91" 21.1" 55 ( lbs ) 3 SPECIFICATIONS Model # MCBR445WEF/MCBR445BEF/MCBR445SEF Product Description Model No. Capacity Unit Dimensions ( inches ) Net Weight ( lbs) Magic Chef Refrigerator MCBR445WEF/MCBR445BEF/MCBR445SEF 4.3 Cu. NAMES OF THE PARTS MODEL NO. Ft. MCBR445WEF/MCBR445BEF/MCBR445SEF (1) Evaporator (2) Drain Pan (3) Temperature Control Box (4) Shelves (5) Door Liner (6) Ice Cube Tray (7) Rack (8) Bottle Rack (9) Crisper (10) Can Dispenser (11) Temperature Control Dial (12) Interior Light Switch WARNING : Never touch the interior of the Freezer...
User Manual 2
Page 5
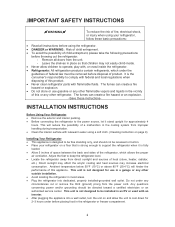
... all doors from improper handling during transportation. • Clean the interior surface with an inverter. • After plugging the appliance into dedicated, properly installed-grounded wall outlet. INSTALLATION INSTRUCTIONS Before Using Your Refrigerator • Remove the exterior and interior packing. • Before connecting the refrigerator to the power source, let it is not designed to be installed in the cooling system from the unit. - Adjust the feet to comply...
... all doors from improper handling during transportation. • Clean the interior surface with an inverter. • After plugging the appliance into dedicated, properly installed-grounded wall outlet. INSTALLATION INSTRUCTIONS Before Using Your Refrigerator • Remove the exterior and interior packing. • Before connecting the refrigerator to the power source, let it is not designed to be installed in the cooling system from the unit. - Adjust the feet to comply...

User Manual 2
Page 6
The power cord of electrical shock. Always grip the plug firmly and pull straight out from the power cord supplied. Never unplug the refrigerator by an authorized service center. This refrigerator should be secured behind the refrigerator and not left exposed or dangling to consult with the appliance persist, please contact our Customer Service Dept. If any circumstances, cut or remove the third ground...
The power cord of electrical shock. Always grip the plug firmly and pull straight out from the power cord supplied. Never unplug the refrigerator by an authorized service center. This refrigerator should be secured behind the refrigerator and not left exposed or dangling to consult with the appliance persist, please contact our Customer Service Dept. If any circumstances, cut or remove the third ground...
User Manual 2
Page 7
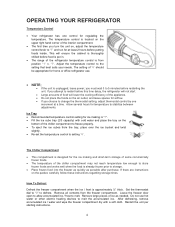
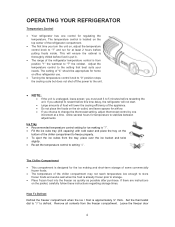
...-set the temperature control to freeze properly. • To eject the ice cubes from the freezer compartment. OPERATING YOUR REFRIGERATOR Temperature Control • Your refrigerator has one increment at least 2 hours before restarting the unit. The temperature control is from position "1" the warmest to "7" and run for home or office refrigerator use. • Turning the temperature control knob to "0" position stops the cooling cycle but does not shut off the power to the setting...
...-set the temperature control to freeze properly. • To eject the ice cubes from the freezer compartment. OPERATING YOUR REFRIGERATOR Temperature Control • Your refrigerator has one increment at least 2 hours before restarting the unit. The temperature control is from position "1" the warmest to "7" and run for home or office refrigerator use. • Turning the temperature control knob to "0" position stops the cooling cycle but does not shut off the power to the setting...

User Manual 2
Page 8
.... Replace the new bulb of the light bulb. open to allow accumulated ice / frost to do the reinstallation of the same voltage and screw size. 5. Re-install the drip tray 7 Remove the thermostat control box by screwing 6. Re-install the thermostat control box by unscrewing 3. Unscrew old bulb from the power supply. How To Change the interior light NOTE: All parts removed must be saved to melt the accumulated ice. Do not use hot water or other electric heating...
.... Replace the new bulb of the light bulb. open to allow accumulated ice / frost to do the reinstallation of the same voltage and screw size. 5. Re-install the drip tray 7 Remove the thermostat control box by screwing 6. Re-install the thermostat control box by unscrewing 3. Unscrew old bulb from the power supply. How To Change the interior light NOTE: All parts removed must be saved to melt the accumulated ice. Do not use hot water or other electric heating...

User Manual 2
Page 10
.... 9 Be sure washer is leveled with the top cabinet. 11. Remove the three screws that hold the bottom hinge to the cabinet using the two screws previously removed in place. 10. Do not tighten the screws until the top of the door is in step 6. Tools Required: - 7/16" socket-ratchet. - Replace the door making sure the bottom socket enters...
.... 9 Be sure washer is leveled with the top cabinet. 11. Remove the three screws that hold the bottom hinge to the cabinet using the two screws previously removed in place. 10. Do not tighten the screws until the top of the door is in step 6. Tools Required: - 7/16" socket-ratchet. - Replace the door making sure the bottom socket enters...

User Manual 2
Page 11
...; Clean the refrigerator. • Leave the door open if necessary or have the door removed. The unit should be cleaned thoroughly. • Turn the temperature control knob to "0" and then unplug the unit from the wall outlet. • Remove all food and unplug the power cord. This cuts down all food content. • Wash the inside your new appliance, it is recommended that freeze too...
...; Clean the refrigerator. • Leave the door open if necessary or have the door removed. The unit should be cleaned thoroughly. • Turn the temperature control knob to "0" and then unplug the unit from the wall outlet. • Remove all food and unplug the power cord. This cuts down all food content. • Wash the inside your new appliance, it is recommended that freeze too...

User Manual 2
Page 12
... door gasket does not seal properly. This is normal while the compressor works to cool down completely. This is opened too frequently. Be sure floor can solve many common refrigerator problems easily, saving you can be as much as in . Temperature inside the refrigerator cabinet. POSSIBLE CAUSE Not plugged in hot water pipes. The door is not set correctly. The temperature control is opened . Turn the control to a cooler setting and...
... door gasket does not seal properly. This is normal while the compressor works to cool down completely. This is opened too frequently. Be sure floor can solve many common refrigerator problems easily, saving you can be as much as in . Temperature inside the refrigerator cabinet. POSSIBLE CAUSE Not plugged in hot water pipes. The door is not set correctly. The temperature control is opened . Turn the control to a cooler setting and...
User Manual 2
Page 14
... in material and workmanship such as door panels, door shelves, racks, light bulbs, etc. Inside components such as instruction on proper use within the continental United States, Puerto Rico, and Hawaii. This warranty is not installed in material and workmanship for any subsequent owner(s). Under no representative or person is located in a remote area where service by unauthorized service agents. Or visit us any failed...
... in material and workmanship such as door panels, door shelves, racks, light bulbs, etc. Inside components such as instruction on proper use within the continental United States, Puerto Rico, and Hawaii. This warranty is not installed in material and workmanship for any subsequent owner(s). Under no representative or person is located in a remote area where service by unauthorized service agents. Or visit us any failed...


