

User Manual
Page 3
... OF CONTENTS NAMES OF THE PARTS SPECIFICATIONS IMPORTANT SAFETY INSTRUCTIONS INSTALLATION INSTRUCTION BEFORE USING YOUR REFRIGERATOR INSTALLING YOUR REFRIGERATOR ELECTRICAL CONNECTION OPERATING YOUR REFRIGERATOR TEMPERATURE CONTROL ICE TRAY .. REFRIGERATOR WARRANTY . 3 .. 3 . 4 ... 4 .. 4 5 .. 6 6 .. . 6 .. . 6 7 . . . . 8 . 8 8 . 8 9-10 11 2 THE CHILLER COMPARTMENT HOW TO DEFROST HOW TO CHANGE THE INTERIOR LIGHT ... CARE AND MAINTENANCE CLEANING YOUR REFRIGERATOR VACATION TIME MOVING YOUR REFRIGERATOR ENERGY SAVING TIPS TROUBLESHOOTING GUIDE .
... OF CONTENTS NAMES OF THE PARTS SPECIFICATIONS IMPORTANT SAFETY INSTRUCTIONS INSTALLATION INSTRUCTION BEFORE USING YOUR REFRIGERATOR INSTALLING YOUR REFRIGERATOR ELECTRICAL CONNECTION OPERATING YOUR REFRIGERATOR TEMPERATURE CONTROL ICE TRAY .. REFRIGERATOR WARRANTY . 3 .. 3 . 4 ... 4 .. 4 5 .. 6 6 .. . 6 .. . 6 7 . . . . 8 . 8 8 . 8 9-10 11 2 THE CHILLER COMPARTMENT HOW TO DEFROST HOW TO CHANGE THE INTERIOR LIGHT ... CARE AND MAINTENANCE CLEANING YOUR REFRIGERATOR VACATION TIME MOVING YOUR REFRIGERATOR ENERGY SAVING TIPS TROUBLESHOOTING GUIDE .
User Manual
Page 4
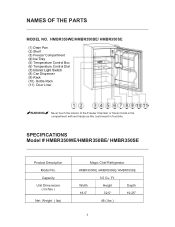
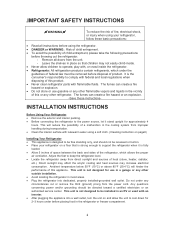
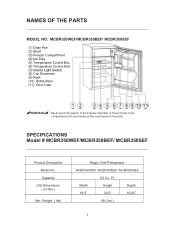
Capacity Unit Dimensions ( inches ) Net Weight ( lbs) Magic Chef Refrigerator HMBR350WE /HMBR350BE/ HMBR350SE 3.5 Cu. Width Height Depth 18.5" 32.5" 19.25" 48 ( lbs ) 3 NAMES OF THE PARTS MODEL NO. Ft. HMBR350WE/HMBR350BE/ HMBR350SE (1) Drain Pan (2) Shelf (3) Freezer Compartment (4) Ice Tray (5) Temperature Control Box (6) Temperature Control Dial (7) Interior Light Switch (8) Can Dispenser (9) Rack (10) Bottle Rack (11) Door Liner WARNING : Never touch the interior of the Freezer Chamber or frozen foods in the compartment with wet hands as...
Capacity Unit Dimensions ( inches ) Net Weight ( lbs) Magic Chef Refrigerator HMBR350WE /HMBR350BE/ HMBR350SE 3.5 Cu. Width Height Depth 18.5" 32.5" 19.25" 48 ( lbs ) 3 NAMES OF THE PARTS MODEL NO. Ft. HMBR350WE/HMBR350BE/ HMBR350SE (1) Drain Pan (2) Shelf (3) Freezer Compartment (4) Ice Tray (5) Temperature Control Box (6) Temperature Control Dial (7) Interior Light Switch (8) Can Dispenser (9) Rack (10) Bottle Rack (11) Door Liner WARNING : Never touch the interior of the Freezer Chamber or frozen foods in the compartment with wet hands as...
User Manual
Page 5
... of this product. • Never clean refrigerator parts with lukewarm water using a soft cloth. (Cleaning instruction on a floor that children may increase electrical consumption. The fumes can create a fire hazard or an explosion. -Save these basic precautions: • Read all doors from the power cord. Adjust the feet to cool down for use gasoline or any circumstances cut or remove the third (ground) prong from...
... of this product. • Never clean refrigerator parts with lukewarm water using a soft cloth. (Cleaning instruction on a floor that children may increase electrical consumption. The fumes can create a fire hazard or an explosion. -Save these basic precautions: • Read all doors from the power cord. Adjust the feet to cool down for use gasoline or any circumstances cut or remove the third (ground) prong from...

User Manual
Page 6
.../120 Volt A.C. ~/60Hz electrical outlet with this refrigerator is not designed to request warranty service at www.mcappliance.com. 5 If any circumstances, cut or remove the third ground prong from the receptacle. Electrical Connection WARNING Improper use an extension cord with three-prong ground. Always grip the plug firmly and pull straight out from the power cord supplied. Use of an extension...
.../120 Volt A.C. ~/60Hz electrical outlet with this refrigerator is not designed to request warranty service at www.mcappliance.com. 5 If any circumstances, cut or remove the third ground prong from the receptacle. Electrical Connection WARNING Improper use an extension cord with three-prong ground. Always grip the plug firmly and pull straight out from the power cord supplied. Use of an extension...
User Manual
Page 7
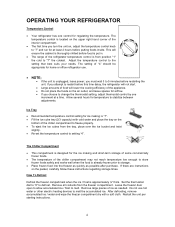
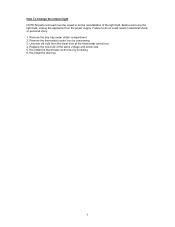
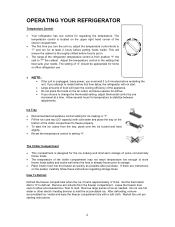
..., the refrigerator will not start. • Large amounts of food will ensure the cabinet is thoroughly chilled before food is unplugged, loses power; If there are instructions on , adjust the temperature control knob to change the thermostat setting, adjust thermostat control by one control for temperature to melt the accumulated ice. After defrosting, remove accumulated ice / water and wipe the freezer compartment dry with cold water and place the tray on the air outlet...
..., the refrigerator will not start. • Large amounts of food will ensure the cabinet is thoroughly chilled before food is unplugged, loses power; If there are instructions on , adjust the temperature control knob to change the thermostat setting, adjust thermostat control by one control for temperature to melt the accumulated ice. After defrosting, remove accumulated ice / water and wipe the freezer compartment dry with cold water and place the tray on the air outlet...
User Manual
Page 8
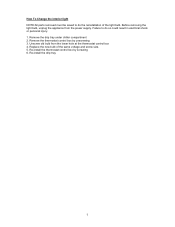
Before removing the light bulb, unplug the appliance from the lower hole at the thermostat control box 4. Replace the new bulb of the light bulb. Remove the drip tray under chiller compartment 2. Re-install the thermostat control box by unscrewing 3. Remove the thermostat control box by screwing 6. How To Change the interior light NOTE:All parts removed must be saved to do the reinstallation of the same voltage and screw size. 5. Failure to do so could result in electrical shock or personal injury. 1. Re-install the drip tray 7 Unscrew old bulb from the power supply.
Before removing the light bulb, unplug the appliance from the lower hole at the thermostat control box 4. Replace the new bulb of the light bulb. Remove the drip tray under chiller compartment 2. Re-install the thermostat control box by unscrewing 3. Remove the thermostat control box by screwing 6. How To Change the interior light NOTE:All parts removed must be saved to do the reinstallation of the same voltage and screw size. 5. Failure to do so could result in electrical shock or personal injury. 1. Re-install the drip tray 7 Unscrew old bulb from the power supply.

User Manual
Page 9
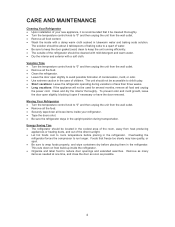
... the door open if necessary or have the door removed. Clean and dry the interior thoroughly. Foods that it is recommended that freeze too slowly may lose quality, or spoil. • Be sure to room temperature before placing them in the refrigerator. Moving Your Refrigerator • Turn the temperature control knob to run longer. CARE AND MAINTENANCE Cleaning Your Refrigerator • Upon installation of your refrigerator. • Tape the doors shut...
... the door open if necessary or have the door removed. Clean and dry the interior thoroughly. Foods that it is recommended that freeze too slowly may lose quality, or spoil. • Be sure to room temperature before placing them in the refrigerator. Moving Your Refrigerator • Turn the temperature control knob to run longer. CARE AND MAINTENANCE Cleaning Your Refrigerator • Upon installation of your refrigerator. • Tape the doors shut...

User Manual
Page 10
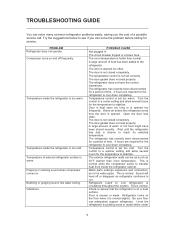
... the temperature to cool refrigerator) is moved slightly. Floor is warm. Temperature inside the refrigerator is opened too frequently. The temperature control is not closed completely. Turn the control to a cooler setting and allow several hours for the temperature to assure that the refrigerator is normal. Door is kept open too long or is too cold. Warm air enters the refrigerator every time the door is set too cold. Temperature control is opened too often. Level the refrigerator by...
... the temperature to cool refrigerator) is moved slightly. Floor is warm. Temperature inside the refrigerator is opened too frequently. The temperature control is not closed completely. Turn the control to a cooler setting and allow several hours for the temperature to assure that the refrigerator is normal. Door is kept open too long or is too cold. Warm air enters the refrigerator every time the door is set too cold. Temperature control is opened too often. Level the refrigerator by...

User Manual
Page 11
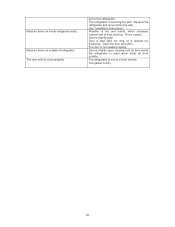
... wall. Door is kept open . The gasket is not on a level surface. See "Installation Instructions". Door is slightly open too long, or is slightly open, causing cold air from inside refrigerator walls. Moisture forms on outside . The refrigerator is dirty. 10 The refrigerator is normal. Moisture forms on inside the refrigerator to meet warm moist air from outside of refrigerator. This is touching the wall. Open the door less often. The door is...
... wall. Door is kept open . The gasket is not on a level surface. See "Installation Instructions". Door is slightly open too long, or is slightly open, causing cold air from inside refrigerator walls. Moisture forms on outside . The refrigerator is dirty. 10 The refrigerator is normal. Moisture forms on inside the refrigerator to meet warm moist air from outside of refrigerator. This is touching the wall. Open the door less often. The door is...
User Manual
Page 12
... / invoice is limited to repair, replacement or refund. Service calls that do not involve defects in connection with published installation instructions. This warranty is responsible for all warranties expressed or implied and no circumstances is limited to the actual purchase price paid by unauthorized service agents. Model Parts Labor Compressor (Part Only) Type of house fuses or circuit breakers. Inside components such as specified. Any...
... / invoice is limited to repair, replacement or refund. Service calls that do not involve defects in connection with published installation instructions. This warranty is responsible for all warranties expressed or implied and no circumstances is limited to the actual purchase price paid by unauthorized service agents. Model Parts Labor Compressor (Part Only) Type of house fuses or circuit breakers. Inside components such as specified. Any...
User Manual 2
Page 3
CARE AND MAINTENANCE CLEANING YOUR REFRIGERATOR VACATION TIME MOVING YOUR REFRIGERATOR ENERGY SAVING TIPS TROUBLESHOOTING GUIDE . REFRIGERATOR WARRANTY . 3 .. 3 . 4 ... 4 .. 4 5 .. 6 .. 6 .. . 6 .. . 6 7 . . . . 8 . 8 8 . 8 9-10 11 2 TABLE OF CONTENTS NAMES OF THE PARTS SPECIFICATIONS IMPORTANT SAFETY INSTRUCTIONS INSTALLATION INSTRUCTION BEFORE USING YOUR REFRIGERATOR INSTALLING YOUR REFRIGERATOR ELECTRICAL CONNECTION OPERATING YOUR REFRIGERATOR TEMPERATURE CONTROL ICE TRAY THE CHILLER COMPARTMENT HOW TO DEFROST HOW TO CHANGE THE INTERIOR LIGHT ...
CARE AND MAINTENANCE CLEANING YOUR REFRIGERATOR VACATION TIME MOVING YOUR REFRIGERATOR ENERGY SAVING TIPS TROUBLESHOOTING GUIDE . REFRIGERATOR WARRANTY . 3 .. 3 . 4 ... 4 .. 4 5 .. 6 .. 6 .. . 6 .. . 6 7 . . . . 8 . 8 8 . 8 9-10 11 2 TABLE OF CONTENTS NAMES OF THE PARTS SPECIFICATIONS IMPORTANT SAFETY INSTRUCTIONS INSTALLATION INSTRUCTION BEFORE USING YOUR REFRIGERATOR INSTALLING YOUR REFRIGERATOR ELECTRICAL CONNECTION OPERATING YOUR REFRIGERATOR TEMPERATURE CONTROL ICE TRAY THE CHILLER COMPARTMENT HOW TO DEFROST HOW TO CHANGE THE INTERIOR LIGHT ...
User Manual 2
Page 4
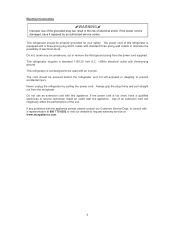
Capacity Unit Dimensions ( inches ) Net Weight ( lbs) Magic Chef Refrigerator MCBR350WEF /MCBR350BEF/ MCBR350SEF 3.5 Cu. Width Height Depth 18.5" 32.5" 19.25" 48 ( lbs ) 3 Ft. NAMES OF THE PARTS MODEL NO. MCBR350WEF/MCBR350BEF/ MCBR350SEF (1) Drain Pan (2) Shelf (3) Freezer Compartment (4) Ice Tray (5) Temperature Control Box (6) Temperature Control Dial (7) Interior Light Switch (8) Can Dispenser (9) Rack (10) Bottle Rack (11) Door Liner WARNING : Never touch the interior of the Freezer Chamber or frozen foods in the compartment with wet...
Capacity Unit Dimensions ( inches ) Net Weight ( lbs) Magic Chef Refrigerator MCBR350WEF /MCBR350BEF/ MCBR350SEF 3.5 Cu. Width Height Depth 18.5" 32.5" 19.25" 48 ( lbs ) 3 Ft. NAMES OF THE PARTS MODEL NO. MCBR350WEF/MCBR350BEF/ MCBR350SEF (1) Drain Pan (2) Shelf (3) Freezer Compartment (4) Ice Tray (5) Temperature Control Box (6) Temperature Control Dial (7) Interior Light Switch (8) Can Dispenser (9) Rack (10) Bottle Rack (11) Door Liner WARNING : Never touch the interior of the Freezer Chamber or frozen foods in the compartment with wet...

User Manual 2
Page 5
.... (Cleaning instruction on a floor that children may increase electrical consumption. INSTALLATION INSTRUCTIONS Before Using Your Refrigerator • Remove the exterior and interior packing. • Before connecting the refrigerator to keep the refrigerator level. • Locate the refrigerator away from improper handling during transportation. • Clean the interior surface with , or crawl inside . • Never allow the unit to be directed toward a certified electrician or an authorized service center. Ambient temperature below...
.... (Cleaning instruction on a floor that children may increase electrical consumption. INSTALLATION INSTRUCTIONS Before Using Your Refrigerator • Remove the exterior and interior packing. • Before connecting the refrigerator to keep the refrigerator level. • Locate the refrigerator away from improper handling during transportation. • Clean the interior surface with , or crawl inside . • Never allow the unit to be directed toward a certified electrician or an authorized service center. Ambient temperature below...
User Manual 2
Page 6
... be secured behind the refrigerator and not left exposed or dangling to be properly grounded for your safety. If any circumstances, cut or remove the third ground prong from the receptacle. Electrical Connection WARNING Improper use an extension cord with this refrigerator is too short, have it replaced by pulling the power cord. If the power cord is not designed...
... be secured behind the refrigerator and not left exposed or dangling to be properly grounded for your safety. If any circumstances, cut or remove the third ground prong from the receptacle. Electrical Connection WARNING Improper use an extension cord with this refrigerator is too short, have it replaced by pulling the power cord. If the power cord is not designed...
User Manual 2
Page 7
... the refrigerator temperature control is approximately ¼" thick. After defrosting, remove accumulated ice / water and wipe the freezer compartment dry with cold water and place the tray on , adjust the temperature control knob to setting "4". Adjust the temperature control to defrost. How To Defrost Defrost the freezer compartment when the ice / frost is from the freezer compartment. Leave the freezer door open to allow accumulated ice / frost to melt the accumulated ice. The temperature control is located on the packet, carefully follow these instructions...
... the refrigerator temperature control is approximately ¼" thick. After defrosting, remove accumulated ice / water and wipe the freezer compartment dry with cold water and place the tray on , adjust the temperature control knob to setting "4". Adjust the temperature control to defrost. How To Defrost Defrost the freezer compartment when the ice / frost is from the freezer compartment. Leave the freezer door open to allow accumulated ice / frost to melt the accumulated ice. The temperature control is located on the packet, carefully follow these instructions...
User Manual 2
Page 8
Remove the drip tray under chiller compartment 2. Remove the thermostat control box by screwing 6. How To Change the interior light NOTE:All parts removed must be saved to do the reinstallation of the same voltage and screw size. 5. Re-install the drip tray 7 Unscrew old bulb from the power supply. Replace the new bulb of the light bulb. Re-install the thermostat control box by unscrewing 3. Failure to do so could result in electrical shock or personal injury. 1. Before removing the light bulb, unplug the appliance from the lower hole at the thermostat control box 4.
Remove the drip tray under chiller compartment 2. Remove the thermostat control box by screwing 6. How To Change the interior light NOTE:All parts removed must be saved to do the reinstallation of the same voltage and screw size. 5. Re-install the drip tray 7 Unscrew old bulb from the power supply. Replace the new bulb of the light bulb. Re-install the thermostat control box by unscrewing 3. Failure to do so could result in electrical shock or personal injury. 1. Before removing the light bulb, unplug the appliance from the lower hole at the thermostat control box 4.
User Manual 2
Page 9
... soda to a quart of water. • Be sure to keep the door gasket (seal) clean to keep the unit running efficiently. • The outside of the refrigerator should be used for several months, remove all food and unplug the power cord. Clean and dry the interior thoroughly. CARE AND MAINTENANCE Cleaning Your Refrigerator • Upon installation of your refrigerator. • Tape the doors shut. • Be sure the...
... soda to a quart of water. • Be sure to keep the door gasket (seal) clean to keep the unit running efficiently. • The outside of the refrigerator should be used for several months, remove all food and unplug the power cord. Clean and dry the interior thoroughly. CARE AND MAINTENANCE Cleaning Your Refrigerator • Upon installation of your refrigerator. • Tape the doors shut. • Be sure the...
User Manual 2
Page 10
... problem before calling for service. PROBLEM Refrigerator does not operate. Temperature inside the refrigerator cabinet. Bubbling or gurgling sound, like water boiling. A large amount of a possible service call. The door is normal. This is not closed completely. Level the refrigerator by putting wood or metal shims under 9 Temperature of time. 4 hours are required for the temperature to cool down completely. The room temperature is warm. Turn the control to a cooler setting...
... problem before calling for service. PROBLEM Refrigerator does not operate. Temperature inside the refrigerator cabinet. Bubbling or gurgling sound, like water boiling. A large amount of a possible service call. The door is normal. This is not closed completely. Level the refrigerator by putting wood or metal shims under 9 Temperature of time. 4 hours are required for the temperature to cool down completely. The room temperature is warm. Turn the control to a cooler setting...
User Manual 2
Page 11
... rate of frost build-up. Weather is not sealed properly. The refrigerator is not on outside . This is opened too frequently. The door will not close properly. Re-level the refrigerator and move it from inside refrigerator walls. Door is kept open , causing cold air from the wall. Door is dirty. 10 Moisture forms on inside the refrigerator to meet warm moist air from outside of refrigerator. The gasket...
... rate of frost build-up. Weather is not sealed properly. The refrigerator is not on outside . This is opened too frequently. The door will not close properly. Re-level the refrigerator and move it from inside refrigerator walls. Door is kept open , causing cold air from the wall. Door is dirty. 10 Moisture forms on inside the refrigerator to meet warm moist air from outside of refrigerator. The gasket...
User Manual 2
Page 12
... 5 years. The warranty does not cover the following: Damages due to failure of the unit. This warranty is in lieu of all labor and transportation expenses related to improper defrosting of the unit. Service calls that fails to perform as door panels, door shelves, racks, light bulbs, etc. This warranty is not installed in accordance with the sale of this product. Repairs performed by...
... 5 years. The warranty does not cover the following: Damages due to failure of the unit. This warranty is in lieu of all labor and transportation expenses related to improper defrosting of the unit. Service calls that fails to perform as door panels, door shelves, racks, light bulbs, etc. This warranty is not installed in accordance with the sale of this product. Repairs performed by...


