
User Manual
Page 1
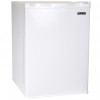
2.6 CU.FT. COMPACT REFRIGERATOR INSTRUCTION MANUAL Model No.: HMBR265WE HMBR265BE HMBR265SE To ensure proper use of this appliance and your safety, please read the following instructions completely before operating this appliance.
2.6 CU.FT. COMPACT REFRIGERATOR INSTRUCTION MANUAL Model No.: HMBR265WE HMBR265BE HMBR265SE To ensure proper use of this appliance and your safety, please read the following instructions completely before operating this appliance.
User Manual
Page 2
... our website at www.mcappliance.com/register.The benefits of purchase. In the event that warranty service is required, registering your new product is to contact you regarding a safety notification or product update 2. Product Registration Copy Thank you for purchasing a Magic Chef product. Registering your product include the following. 1. The first step in protecting your product...
... our website at www.mcappliance.com/register.The benefits of purchase. In the event that warranty service is required, registering your new product is to contact you regarding a safety notification or product update 2. Product Registration Copy Thank you for purchasing a Magic Chef product. Registering your product include the following. 1. The first step in protecting your product...
User Manual
Page 3
TABLE OF CONTENTS NAMES OF THE PARTS 2 SPECIFICATIONS 3 IMPORTANT SAFETY INSTRUCTIONS 4 INSTALLATION INSTRUCTION BEFORE USING YOUR REFRIGERATOR 4 INSTALLING YOUR REFRIGERATOR 4 ELECTRICAL CONNECTION 5 OPERATING YOUR REFRIGERATOR TEMPERATURE CONTROL 6 MAKING THE ICE CUBES 6 HOW TO DEFROST 7 ASSEMBLING LEGS 7 DOOR REVERSAL INSTRUCTION 8 CARE AND MAINTENANCE CLEANING YOUR REFRIGERATOR 9 VACATION TIME 9 MOVING YOUR REFRIGERATOR 9 ENERGY SAVING TIPS 9 TROUBLESHOOTING GUIDE 10 REFRIGERATOR WARRANTY 11 1
TABLE OF CONTENTS NAMES OF THE PARTS 2 SPECIFICATIONS 3 IMPORTANT SAFETY INSTRUCTIONS 4 INSTALLATION INSTRUCTION BEFORE USING YOUR REFRIGERATOR 4 INSTALLING YOUR REFRIGERATOR 4 ELECTRICAL CONNECTION 5 OPERATING YOUR REFRIGERATOR TEMPERATURE CONTROL 6 MAKING THE ICE CUBES 6 HOW TO DEFROST 7 ASSEMBLING LEGS 7 DOOR REVERSAL INSTRUCTION 8 CARE AND MAINTENANCE CLEANING YOUR REFRIGERATOR 9 VACATION TIME 9 MOVING YOUR REFRIGERATOR 9 ENERGY SAVING TIPS 9 TROUBLESHOOTING GUIDE 10 REFRIGERATOR WARRANTY 11 1
User Manual
Page 4
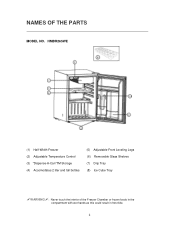
NAMES OF THE PARTS MODEL NO. HMBR265WE (1) Half-Width Freezer (2) Adjustable Temperature Control (3) "Dispense-A-Can"TM Storage (4) Accomodates 2 liter and tall bottles (5) Adjustable Front Leveling Legs (6) Removable Glass Shelves (7) Drip Tray (8) Ice Cube Tray aWARNINGa: Never touch the interior of the Freezer Chamber or frozen foods in the compartment with wet hands as this could result in frost bite. 2
NAMES OF THE PARTS MODEL NO. HMBR265WE (1) Half-Width Freezer (2) Adjustable Temperature Control (3) "Dispense-A-Can"TM Storage (4) Accomodates 2 liter and tall bottles (5) Adjustable Front Leveling Legs (6) Removable Glass Shelves (7) Drip Tray (8) Ice Cube Tray aWARNINGa: Never touch the interior of the Freezer Chamber or frozen foods in the compartment with wet hands as this could result in frost bite. 2
User Manual
Page 5
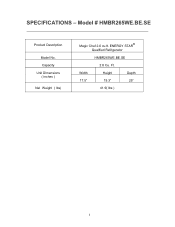
Model # HMBR265WE.BE.SE Product Description Model No. Width Height Depth 17.5" 19.3" 25" 41.9( lbs ) 3 Capacity Unit Dimensions ( inches ) Net Weight ( lbs) Magic Chef 2.6 cu.ft. SPECIFICATIONS - ENERGY STAR® Qualified Refrigerator HMBR265WE.BE.SE 2.6 Cu. Ft.
Model # HMBR265WE.BE.SE Product Description Model No. Width Height Depth 17.5" 19.3" 25" 41.9( lbs ) 3 Capacity Unit Dimensions ( inches ) Net Weight ( lbs) Magic Chef 2.6 cu.ft. SPECIFICATIONS - ENERGY STAR® Qualified Refrigerator HMBR265WE.BE.SE 2.6 Cu. Ft.
User Manual
Page 6
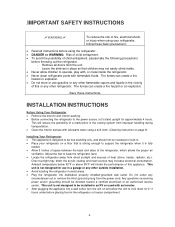
... operate, play with, or crawl inside the refrigerator. • Never clean refrigerator parts with lukewarm water using a soft cloth. (Cleaning instruction on page 9) Installing Your Refrigerator • This appliance is not designed to be installed in an RV or used with an inverter. • After plugging the appliance into dedicated, properly installed-grounded wall outlet. Leave the shelves in the cooling system from improper handling during transportation. • Clean the interior...
... operate, play with, or crawl inside the refrigerator. • Never clean refrigerator parts with lukewarm water using a soft cloth. (Cleaning instruction on page 9) Installing Your Refrigerator • This appliance is not designed to be installed in an RV or used with an inverter. • After plugging the appliance into dedicated, properly installed-grounded wall outlet. Leave the shelves in the cooling system from improper handling during transportation. • Clean the interior...
User Manual
Page 7
... the refrigerator and not left exposed or dangling to minimize the possibility of this appliance. If the power cord is too short, have it replaced by pulling the power cord. This refrigerator requires a standard 115V~ / 60Hz electrical outlet with three-prong ground. Do not use of the grounded plug can negatively affect the performance of electrical shock. Electrical Connection aWARNINGa Improper use an...
... the refrigerator and not left exposed or dangling to minimize the possibility of this appliance. If the power cord is too short, have it replaced by pulling the power cord. This refrigerator requires a standard 115V~ / 60Hz electrical outlet with three-prong ground. Do not use of the grounded plug can negatively affect the performance of electrical shock. Electrical Connection aWARNINGa Improper use an...
User Manual
Page 8
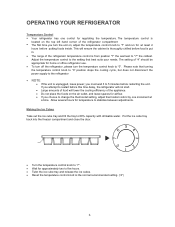
... office refrigerator use. • To turn off the refrigerator, please turn the unit on the air outlet, and leave spaces for airflow. • If you must wait 3 to "0". Put the ice cube tray back into the freezer compartment and close the door. 5 6 • Turn the temperature control knob to "7". • Wait for temperature to "7" the coldest. Please note that best suits your needs. Making the Ice Cubes...
... office refrigerator use. • To turn off the refrigerator, please turn the unit on the air outlet, and leave spaces for airflow. • If you must wait 3 to "0". Put the ice cube tray back into the freezer compartment and close the door. 5 6 • Turn the temperature control knob to "7". • Wait for temperature to "7" the coldest. Please note that best suits your needs. Making the Ice Cubes...
User Manual
Page 9
... level your refrigerator. • Leveling legs can be adjusted by turning them clockwise to raise your refrigerator or by turning them counterclockwise to Defrost Defrost whenever frost on the wall of your refrigerator. After defrosting, empty water from the freezer compartment. The refrigerator door will void the warranty). After properly placing your refrigerator in warm water. 7 Make sure the drip tray is in the refrigerator. To defrost faster, keep the door open and place a bowl of warm water...
... level your refrigerator. • Leveling legs can be adjusted by turning them clockwise to raise your refrigerator or by turning them counterclockwise to Defrost Defrost whenever frost on the wall of your refrigerator. After defrosting, empty water from the freezer compartment. The refrigerator door will void the warranty). After properly placing your refrigerator in warm water. 7 Make sure the drip tray is in the refrigerator. To defrost faster, keep the door open and place a bowl of warm water...
User Manual
Page 10
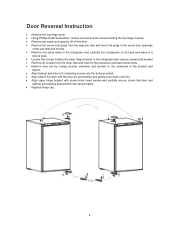
Door Reversal Instruction • Remove the top hinge cover. • Using Phillips Head Screwdriver, loosen and remove the screws holding the top hinge in place. • Remove top hinge and carefully lift off the door. • Remove the screw hole plugs from the opposite side and insert the plugs in the screw hole openings of the just removed screws. • Remove any loose items in the refrigerator and carefully turn refrigerator on its back...
Door Reversal Instruction • Remove the top hinge cover. • Using Phillips Head Screwdriver, loosen and remove the screws holding the top hinge in place. • Remove top hinge and carefully lift off the door. • Remove the screw hole plugs from the opposite side and insert the plugs in the screw hole openings of the just removed screws. • Remove any loose items in the refrigerator and carefully turn refrigerator on its back...
User Manual
Page 11
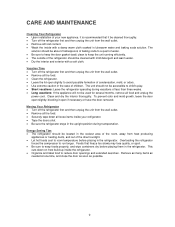
... a quart of water. • Be sure to keep the door gasket (seal) clean to keep the unit running efficiently. • The outside of the refrigerator should be accessible to room temperature before placing them in the refrigerator. Foods that it be used for several months, remove all food and unplug the power cord. Vacation Time • Turn off the refrigerator first and then...
... a quart of water. • Be sure to keep the door gasket (seal) clean to keep the unit running efficiently. • The outside of the refrigerator should be accessible to room temperature before placing them in the refrigerator. Foods that it be used for several months, remove all food and unplug the power cord. Vacation Time • Turn off the refrigerator first and then...
User Manual
Page 12
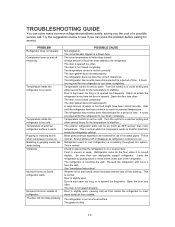
... set too warm. Temperature control is not closed completely. Sound will not close properly. Be sure floor can adequately support refrigerator. See "Installation Instructions". The door is too cold. Try the suggestions below to stabilize. Temperature inside the refrigerator cabinet. Temperature control is opened too frequently. Turn the control to a cooler setting and allow several hours for service. Open the door less often. Wait until the refrigerator has had a chance to stabilize. The door gasket...
... set too warm. Temperature control is not closed completely. Sound will not close properly. Be sure floor can adequately support refrigerator. See "Installation Instructions". The door is too cold. Try the suggestions below to stabilize. Temperature inside the refrigerator cabinet. Temperature control is opened too frequently. Turn the control to a cooler setting and allow several hours for service. Open the door less often. Wait until the refrigerator has had a chance to stabilize. The door gasket...
User Manual
Page 13
.... Model Parts Labor Compressor (Part Only) Type of purchase. Parts and labor expenses are covered on this product if used for any subsequent owner(s). The warranty does not cover the following: Damages due to any part(s) of the unit. This warranty is not available or the unit cannot be free from MC Appliance Corp. Refrigerator Warranty Unless otherwise prohibited, MC Appliance Corp. Punctures to the evaporator system...
.... Model Parts Labor Compressor (Part Only) Type of purchase. Parts and labor expenses are covered on this product if used for any subsequent owner(s). The warranty does not cover the following: Damages due to any part(s) of the unit. This warranty is not available or the unit cannot be free from MC Appliance Corp. Refrigerator Warranty Unless otherwise prohibited, MC Appliance Corp. Punctures to the evaporator system...


