
User Manual
Page 1
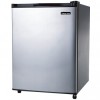
COMPACT REFRIGERATOR INSTRUCTION MANUAL Model No.: HMBR265WE HMBR265BE HMBR265SE To ensure proper use of this appliance and your safety, please read the following instructions completely before operating this appliance. 2.6 CU.FT.
COMPACT REFRIGERATOR INSTRUCTION MANUAL Model No.: HMBR265WE HMBR265BE HMBR265SE To ensure proper use of this appliance and your safety, please read the following instructions completely before operating this appliance. 2.6 CU.FT.
User Manual
Page 2
... include the following. 1. Product Registration Copy Thank you for purchasing a Magic Chef product. In the event that warranty service is to contact you regarding a safety notification or product update 2. Registering your product will allow for more efficient warranty service processing.. 3. The first step in protecting your new product is required, registering your product will allow us to complete...
... include the following. 1. Product Registration Copy Thank you for purchasing a Magic Chef product. In the event that warranty service is to contact you regarding a safety notification or product update 2. Registering your product will allow for more efficient warranty service processing.. 3. The first step in protecting your new product is required, registering your product will allow us to complete...
User Manual
Page 3
TABLE OF CONTENTS NAMES OF THE PARTS 2 SPECIFICATIONS 3 IMPORTANT SAFETY INSTRUCTIONS 4 INSTALLATION INSTRUCTION BEFORE USING YOUR REFRIGERATOR 4 INSTALLING YOUR REFRIGERATOR 4 ELECTRICAL CONNECTION 5 OPERATING YOUR REFRIGERATOR TEMPERATURE CONTROL 6 MAKING THE ICE CUBES 6 HOW TO DEFROST 7 ASSEMBLING LEGS 7 DOOR REVERSAL INSTRUCTION 8 CARE AND MAINTENANCE CLEANING YOUR REFRIGERATOR 9 VACATION TIME 9 MOVING YOUR REFRIGERATOR 9 ENERGY SAVING TIPS 9 TROUBLESHOOTING GUIDE 10 REFRIGERATOR WARRANTY 11 1
TABLE OF CONTENTS NAMES OF THE PARTS 2 SPECIFICATIONS 3 IMPORTANT SAFETY INSTRUCTIONS 4 INSTALLATION INSTRUCTION BEFORE USING YOUR REFRIGERATOR 4 INSTALLING YOUR REFRIGERATOR 4 ELECTRICAL CONNECTION 5 OPERATING YOUR REFRIGERATOR TEMPERATURE CONTROL 6 MAKING THE ICE CUBES 6 HOW TO DEFROST 7 ASSEMBLING LEGS 7 DOOR REVERSAL INSTRUCTION 8 CARE AND MAINTENANCE CLEANING YOUR REFRIGERATOR 9 VACATION TIME 9 MOVING YOUR REFRIGERATOR 9 ENERGY SAVING TIPS 9 TROUBLESHOOTING GUIDE 10 REFRIGERATOR WARRANTY 11 1
User Manual
Page 4
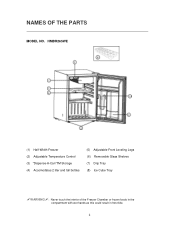
NAMES OF THE PARTS MODEL NO. HMBR265WE (1) Half-Width Freezer (2) Adjustable Temperature Control (3) "Dispense-A-Can"TM Storage (4) Accomodates 2 liter and tall bottles (5) Adjustable Front Leveling Legs (6) Removable Glass Shelves (7) Drip Tray (8) Ice Cube Tray aWARNINGa: Never touch the interior of the Freezer Chamber or frozen foods in the compartment with wet hands as this could result in frost bite. 2
NAMES OF THE PARTS MODEL NO. HMBR265WE (1) Half-Width Freezer (2) Adjustable Temperature Control (3) "Dispense-A-Can"TM Storage (4) Accomodates 2 liter and tall bottles (5) Adjustable Front Leveling Legs (6) Removable Glass Shelves (7) Drip Tray (8) Ice Cube Tray aWARNINGa: Never touch the interior of the Freezer Chamber or frozen foods in the compartment with wet hands as this could result in frost bite. 2
User Manual
Page 5
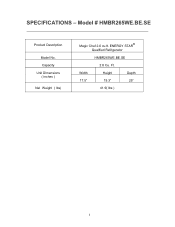
Capacity Unit Dimensions ( inches ) Net Weight ( lbs) Magic Chef 2.6 cu.ft. Ft. SPECIFICATIONS - ENERGY STAR® Qualified Refrigerator HMBR265WE.BE.SE 2.6 Cu. Model # HMBR265WE.BE.SE Product Description Model No. Width Height Depth 17.5" 19.3" 25" 41.9( lbs ) 3
Capacity Unit Dimensions ( inches ) Net Weight ( lbs) Magic Chef 2.6 cu.ft. Ft. SPECIFICATIONS - ENERGY STAR® Qualified Refrigerator HMBR265WE.BE.SE 2.6 Cu. Model # HMBR265WE.BE.SE Product Description Model No. Width Height Depth 17.5" 19.3" 25" 41.9( lbs ) 3
User Manual
Page 6
... free standing only, and should be directed toward a certified electrician or an authorized service center. Any questions concerning power and/or grounding should not be installed in a garage or any circumstances cut or remove the third (ground) prong from direct sunlight and sources of heat (stove, heater, radiator, etc.). Adjust the feet to keep the refrigerator level. • Locate the refrigerator...
... free standing only, and should be directed toward a certified electrician or an authorized service center. Any questions concerning power and/or grounding should not be installed in a garage or any circumstances cut or remove the third (ground) prong from direct sunlight and sources of heat (stove, heater, radiator, etc.). Adjust the feet to keep the refrigerator level. • Locate the refrigerator...
User Manual
Page 7
Electrical Connection aWARNINGa Improper use an extension cord with an inverter. This refrigerator should be secured behind the refrigerator and not left exposed or dangling to be properly grounded for your safety. This refrigerator is damaged, have a qualified electrician or service technician install an outlet near the appliance. Always grip the plug firmly and pull straight out from the power cord supplied. Do...
Electrical Connection aWARNINGa Improper use an extension cord with an inverter. This refrigerator should be secured behind the refrigerator and not left exposed or dangling to be properly grounded for your safety. This refrigerator is damaged, have a qualified electrician or service technician install an outlet near the appliance. Always grip the plug firmly and pull straight out from the power cord supplied. Do...
User Manual
Page 8
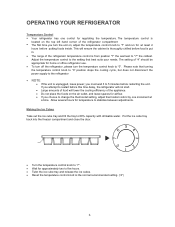
... that best suits your needs. Making the Ice Cubes Take out the ice cube tray and fill the tray to the setting that turning the temperature control knob to "0" position stops the cooling cycle, but does not disconnect the power supply to the normal recommended setting. ("4") 6 3 4 7 0 1 2 Adjust the temperature control to 80% capacity with drinkable water. The temperature control is located on , adjust the temperature control knob to change the thermostat setting, adjust thermostat control by one control for approximately two to...
... that best suits your needs. Making the Ice Cubes Take out the ice cube tray and fill the tray to the setting that turning the temperature control knob to "0" position stops the cooling cycle, but does not disconnect the power supply to the normal recommended setting. ("4") 6 3 4 7 0 1 2 Adjust the temperature control to 80% capacity with drinkable water. The temperature control is located on , adjust the temperature control knob to change the thermostat setting, adjust thermostat control by one control for approximately two to...
User Manual
Page 9
... wall of warm water in the refrigerator. Defrosting usually takes a few hours. Make sure the drip tray is in place and unplug the unit. After defrosting, empty water from the freezer compartment. The refrigerator door will void the warranty). We recommend using a plastic scraper. To defrost faster, keep the door open and place a bowl of the freezer compartment becomes 1/8" thick. Never us a sharp or metallic instrument to remove frost...
... wall of warm water in the refrigerator. Defrosting usually takes a few hours. Make sure the drip tray is in place and unplug the unit. After defrosting, empty water from the freezer compartment. The refrigerator door will void the warranty). We recommend using a plastic scraper. To defrost faster, keep the door open and place a bowl of the freezer compartment becomes 1/8" thick. Never us a sharp or metallic instrument to remove frost...
User Manual
Page 10
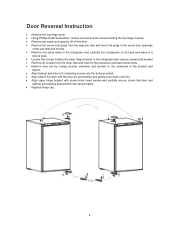
Door Reversal Instruction • Remove the top hinge cover. • Using Phillips Head Screwdriver, loosen and remove the screws holding the top hinge in place. • Remove top hinge and carefully lift off the door. • Remove the screw hole plugs from the opposite side and insert the plugs in the screw hole openings of the just removed screws. • Remove any loose items in the refrigerator and carefully turn refrigerator on its back...
Door Reversal Instruction • Remove the top hinge cover. • Using Phillips Head Screwdriver, loosen and remove the screws holding the top hinge in place. • Remove top hinge and carefully lift off the door. • Remove the screw hole plugs from the opposite side and insert the plugs in the screw hole openings of the just removed screws. • Remove any loose items in the refrigerator and carefully turn refrigerator on its back...
User Manual
Page 11
... cool to keep the door gasket (seal) clean to room temperature before placing them in the refrigerator. Foods that it open slightly to reduce door openings and extended searches. Overloading the refrigerator forces the compressor to wrap foods properly, and wipe containers dry before placing in the coolest area of the room, away from the wall outlet. • Remove all loose items inside...
... cool to keep the door gasket (seal) clean to room temperature before placing them in the refrigerator. Foods that it open slightly to reduce door openings and extended searches. Overloading the refrigerator forces the compressor to wrap foods properly, and wipe containers dry before placing in the coolest area of the room, away from the wall outlet. • Remove all loose items inside...
User Manual
Page 12
.... PROBLEM Refrigerator does not operate. Bubbling or gurgling sound, like water boiling. Open the door less often. Refrigerant (used to meet warm moist air from inside the refrigerator cabinet. This is hotter than room temperature. Door is slightly open too long or is dirty. 10 Try the suggestions below to cool down completely. Compressor turns on a level surface. The room temperature is normal. The door is uneven or weak. The door gasket does...
.... PROBLEM Refrigerator does not operate. Bubbling or gurgling sound, like water boiling. Open the door less often. Refrigerant (used to meet warm moist air from inside the refrigerator cabinet. This is hotter than room temperature. Door is slightly open too long or is dirty. 10 Try the suggestions below to cool down completely. Compressor turns on a level surface. The room temperature is normal. The door is uneven or weak. The door gasket does...
User Manual
Page 13
... workmanship such as door panels, door shelves, racks, light bulbs, etc. Inside components such as instruction on proper use within the continental United States, Puerto Rico and Hawaii, and Canada. Punctures to the evaporator system due to repair, replacement or refund. Service calls that do not involve defects in connection with published installation instructions. Failure of this product if used for a period of this warranty is not available...
... workmanship such as door panels, door shelves, racks, light bulbs, etc. Inside components such as instruction on proper use within the continental United States, Puerto Rico and Hawaii, and Canada. Punctures to the evaporator system due to repair, replacement or refund. Service calls that do not involve defects in connection with published installation instructions. Failure of this product if used for a period of this warranty is not available...


