User Manual
Page 2
... allow for more efficient warranty service processing when warranty service is to protect your proof of purchase in the event of registering your product will allow us to contact you for purchasing a Magic Chef® product. ENG - 2 The benefits of insurance loss. Registering your product include the following: 1. The first step to complete the product registration on our website: www.mcappliance.com...
... allow for more efficient warranty service processing when warranty service is to protect your proof of purchase in the event of registering your product will allow us to contact you for purchasing a Magic Chef® product. ENG - 2 The benefits of insurance loss. Registering your product include the following: 1. The first step to complete the product registration on our website: www.mcappliance.com...
User Manual
Page 3
... PARTS SPECIFICATIONS IMPORTANT SAFETY INSTRUCTIONS INSTALLATION INSTRUCTIONS BEFORE USING YOUR APPLIANCE FREESTANDING INSTALLATION BUILT-IN INSTALLATION ELECTRICAL CONNECTION APPLIANCE FEATURES DUAL TEMPERATURE ZONES INTERIOR LIGHT ENGAGED WINE SHELVES TO REMOVE A SHELF TO REPLACE A SHELF UPPER ZONE LOWER ZONE OPERATING YOUR APPLIANCE TEMPERATURE CONTROL AND DISPLAY INDICATOR LIGHTS STANDBY LOCK AND UNLOCK TEMPERATURE SETTING INTERIOR LIGHT AUTOMATIC DEFROST CARE AND MAINTENANCE CLEANING YOUR APPLIANCE VACATION TIME MOVING YOUR APPLIANCE ENERGY SAVING TIPS TROUBLESHOOTING GUIDE WARRANTY...
... PARTS SPECIFICATIONS IMPORTANT SAFETY INSTRUCTIONS INSTALLATION INSTRUCTIONS BEFORE USING YOUR APPLIANCE FREESTANDING INSTALLATION BUILT-IN INSTALLATION ELECTRICAL CONNECTION APPLIANCE FEATURES DUAL TEMPERATURE ZONES INTERIOR LIGHT ENGAGED WINE SHELVES TO REMOVE A SHELF TO REPLACE A SHELF UPPER ZONE LOWER ZONE OPERATING YOUR APPLIANCE TEMPERATURE CONTROL AND DISPLAY INDICATOR LIGHTS STANDBY LOCK AND UNLOCK TEMPERATURE SETTING INTERIOR LIGHT AUTOMATIC DEFROST CARE AND MAINTENANCE CLEANING YOUR APPLIANCE VACATION TIME MOVING YOUR APPLIANCE ENERGY SAVING TIPS TROUBLESHOOTING GUIDE WARRANTY...
User Manual
Page 4
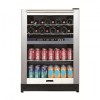
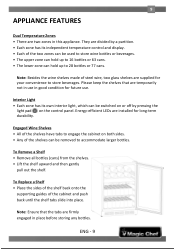
ENG - 4 Depth includes door handle. 4 PARTS 1) Interior Light 2) Direct Current (DC) Electric Fan 3) Inner Rear 4) Zone Partition 5) Temperature Control & Display 6) Wire Shelf / Glass Shelf* storage use SPECIFICATIONS 7) Door Handle 8) Partition Gasket 9) Tempered Glass Door *Shelves are available for either wine, beverage, or combination Product Description Unit Dimensions (inches) Net Weight (lbs) Wine and Beverage Center Width Height Depth 23.4" 34.4" 24.4" 108.4 lbs Note: Height includes door cap;
ENG - 4 Depth includes door handle. 4 PARTS 1) Interior Light 2) Direct Current (DC) Electric Fan 3) Inner Rear 4) Zone Partition 5) Temperature Control & Display 6) Wire Shelf / Glass Shelf* storage use SPECIFICATIONS 7) Door Handle 8) Partition Gasket 9) Tempered Glass Door *Shelves are available for either wine, beverage, or combination Product Description Unit Dimensions (inches) Net Weight (lbs) Wine and Beverage Center Width Height Depth 23.4" 34.4" 24.4" 108.4 lbs Note: Height includes door cap;
User Manual
Page 6
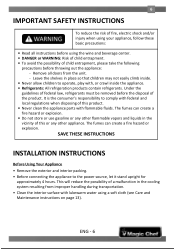
... easily climb inside the appliance. Refrigerants: All refrigeration products contain refrigerants. 6 IMPORTANT SAFETY INSTRUCTIONS To reduce the risk of fire, electric shock and/or injury when using your appliance, follow these basic precautions: Read all doors from improper handling during transportation. • Clean the interior surface with lukewarm water using the wine and beverage center. DANGER or WARNING: Risk of...
... easily climb inside the appliance. Refrigerants: All refrigeration products contain refrigerants. 6 IMPORTANT SAFETY INSTRUCTIONS To reduce the risk of fire, electric shock and/or injury when using your appliance, follow these basic precautions: Read all doors from improper handling during transportation. • Clean the interior surface with lukewarm water using the wine and beverage center. DANGER or WARNING: Risk of...

User Manual
Page 7
... an authorized service center. Locate Outlet 6″Max. 24″Min. 24″Mix. 20-4/5″ 34-2/5″ 24-2/5″ Including Handle 23-2/5″ Figure A - 7 Freestanding Installation • This appliance is designed to be built-in or freestanding. • Locate the appliance away from the power cord. This unit is not designed for approximately 3-4 hours before placing wine bottles or beverage cans...
... an authorized service center. Locate Outlet 6″Max. 24″Min. 24″Mix. 20-4/5″ 34-2/5″ 24-2/5″ Including Handle 23-2/5″ Figure A - 7 Freestanding Installation • This appliance is designed to be built-in or freestanding. • Locate the appliance away from the power cord. This unit is not designed for approximately 3-4 hours before placing wine bottles or beverage cans...

User Manual
Page 8
... left exposed or hanging. • Never unplug the appliance by pulling the power cord. 8 Electrical Connection Improper use of an extension cord can result in the risk of electric shock. The power cord of the unit. Or, visit our website at 888 775-0202 to request warranty service. ENG - 8 If the power cord is damaged, please contact an authorized service center. • This appliance should be used...
... left exposed or hanging. • Never unplug the appliance by pulling the power cord. 8 Electrical Connection Improper use of an extension cord can result in the risk of electric shock. The power cord of the unit. Or, visit our website at 888 775-0202 to request warranty service. ENG - 8 If the power cord is damaged, please contact an authorized service center. • This appliance should be used...
User Manual
Page 9
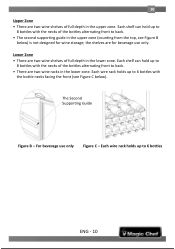
... the control panel. Note: Ensure that are installed for future use. ENG - 9 Interior Light • Each zone has its independent temperature control and display. • Each of the cabinet and push back until the shelf tabs slide into place. To Replace a Shelf • Place the sides of the shelf back onto the supporting guides of the two zones can hold up to store beverages. To Remove a Shelf •...
... the control panel. Note: Ensure that are installed for future use. ENG - 9 Interior Light • Each zone has its independent temperature control and display. • Each of the cabinet and push back until the shelf tabs slide into place. To Replace a Shelf • Place the sides of the shelf back onto the supporting guides of the two zones can hold up to store beverages. To Remove a Shelf •...
User Manual
Page 10
... wire rack holds up to 8 bottles with the bottle necks facing the front (see Figure B below ). For beverage use only. Each wire rack holds up to 6 bottles with the necks of the bottles alternating front to back. • There are two wine shelves of the bottles alternating front to back. • The second supporting guide in the upper zone. 10 Upper Zone • There are for wine storage; Each shelf can...
... wire rack holds up to 8 bottles with the bottle necks facing the front (see Figure B below ). For beverage use only. Each wire rack holds up to 6 bottles with the necks of the bottles alternating front to back. • There are two wine shelves of the bottles alternating front to back. • The second supporting guide in the upper zone. 10 Upper Zone • There are for wine storage; Each shelf can...
User Manual
Page 11
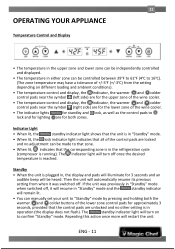
... setting from the setting depending on to confirm "Standby" mode. Indicator Light • When lit, the standby indicator light shows that the unit is in "Standby" mode. • When lit, the lock indicator light indicates that the corresponding zone is in the refrigeration cycle (compressor is in operation (the display does not flash). 11 OPERATING YOUR APPLIANCE Temperature Control and Display • The temperature in the upper zone and lower zone...
... setting from the setting depending on to confirm "Standby" mode. Indicator Light • When lit, the standby indicator light shows that the unit is in "Standby" mode. • When lit, the lock indicator light indicates that the corresponding zone is in the refrigeration cycle (compressor is in operation (the display does not flash). 11 OPERATING YOUR APPLIANCE Temperature Control and Display • The temperature in the upper zone and lower zone...

User Manual
Page 12
... beverage center from being adjusted. • The temperature in the upper & lower zones can be set between Celsius and Fahrenheit by pressing the lock pad for approximately 3 seconds. When adjusting the temperature, the temperature display will indicate the current temperature of one degree per half second. • Once you that the control panel is locked. Once the display stops flashing the temperature display will flash to indicate that zone. Interior Light • To turn...
... beverage center from being adjusted. • The temperature in the upper & lower zones can be set between Celsius and Fahrenheit by pressing the lock pad for approximately 3 seconds. When adjusting the temperature, the temperature display will indicate the current temperature of one degree per half second. • Once you that the control panel is locked. Once the display stops flashing the temperature display will flash to indicate that zone. Interior Light • To turn...

User Manual
Page 13
... located in the coolest area of direct sunlight. Vacation Time • Short vacations: Leave the appliance operating during compressor operation will be automatically defrosted in a compressor off cycle. • When defrosting is in process, the indicators for both zones will run. • Defrost water will turn off, and the circulation fans for 3 weeks or more, remove all content and unplug the power cord...
... located in the coolest area of direct sunlight. Vacation Time • Short vacations: Leave the appliance operating during compressor operation will be automatically defrosted in a compressor off cycle. • When defrosting is in process, the indicators for both zones will run. • Defrost water will turn off, and the circulation fans for 3 weeks or more, remove all content and unplug the power cord...

User Manual
Page 14
... warm moist air from the wall. The unit vibrates. Contact the Customer Service Department for further assistance. The door is slightly open. The door is kept open too long or is opened too frequently. The temperature inside the appliance to cool down completely. The temperature control is opened . 14 TROUBLESHOOTING GUIDE You can solve many common appliance problems easily, saving...
... warm moist air from the wall. The unit vibrates. Contact the Customer Service Department for further assistance. The door is slightly open. The door is kept open too long or is opened too frequently. The temperature inside the appliance to cool down completely. The temperature control is opened . 14 TROUBLESHOOTING GUIDE You can solve many common appliance problems easily, saving...
User Manual
Page 15
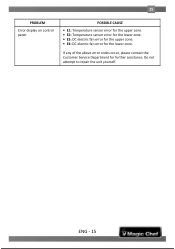
Do not attempt to repair the unit yourself. ENG - 15 15 PROBLEM Error display on control panel POSSIBLE CAUSE E1: Temperature sensor error for the upper zone. E2: Temperature sensor error for the lower zone. E3: DC electric fan error for the upper zone. E4: DC electric fan error for further assistance. If any of the above error codes occur, please contact the Customer Service Department for the lower zone.
Do not attempt to repair the unit yourself. ENG - 15 15 PROBLEM Error display on control panel POSSIBLE CAUSE E1: Temperature sensor error for the upper zone. E2: Temperature sensor error for the lower zone. E3: DC electric fan error for the upper zone. E4: DC electric fan error for further assistance. If any of the above error codes occur, please contact the Customer Service Department for the lower zone.
User Manual
Page 16
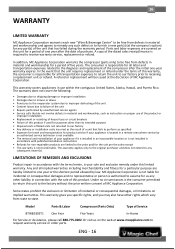
... to request warranty service or order parts. Model Parts & Labor Compressor (Parts Only) Type of MC Appliance Corporation. This warranty covers appliances in use of the product or improper installation • Replacement or resetting of house fuses or circuit breakers • Failure of this product if used for purposes other rights which vary from state to the diagnosis and replacement of the compressor after the date of purchase. In the...
... to request warranty service or order parts. Model Parts & Labor Compressor (Parts Only) Type of MC Appliance Corporation. This warranty covers appliances in use of the product or improper installation • Replacement or resetting of house fuses or circuit breakers • Failure of this product if used for purposes other rights which vary from state to the diagnosis and replacement of the compressor after the date of purchase. In the...

User Manual
Page 17
www.mcappliance.com Printed in China Magic Chef® is a registered trademark of CNA International, Inc. d/b/a MC Appliance Corporation. All rights reserved. CNA International, Inc.
www.mcappliance.com Printed in China Magic Chef® is a registered trademark of CNA International, Inc. d/b/a MC Appliance Corporation. All rights reserved. CNA International, Inc.

User Manual
Page 18
Modelo BTWB530ST1
Modelo BTWB530ST1


