
Manual - English (for the UK)
Page 3
Table of Contents i eXplorist 400 GPS Receiver 1 Features of the Magellan eXplorist GPS Receiver 1 Button Descriptions 2 Installing and Charging the Battery 4 Installing an Optional SD Card 5 Connecting to a Personal Computer 5 Using the eXplorist 400 6 Going to a Destination 6 Saving Your Position 7 Tracing Your Steps 8 Additional Features 9 Summary 9 Starting Up 10 Turning the eXplorist On 10 Turning the eXplorist Off 10 Changing...
Table of Contents i eXplorist 400 GPS Receiver 1 Features of the Magellan eXplorist GPS Receiver 1 Button Descriptions 2 Installing and Charging the Battery 4 Installing an Optional SD Card 5 Connecting to a Personal Computer 5 Using the eXplorist 400 6 Going to a Destination 6 Saving Your Position 7 Tracing Your Steps 8 Additional Features 9 Summary 9 Starting Up 10 Turning the eXplorist On 10 Turning the eXplorist Off 10 Changing...
Manual - English (for the UK)
Page 8
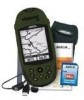
eXplorist 400 GPS Receiver 1 Features of the Magellan eXplorist GPS receiver: • Built-in background map (8 MB) • High-definition grayscale display • Preloaded points of interest • Rugged design, rubber-protected • 8 MB of usable memory • Superior tracking with 14 parallel channels • Rechargeable Li-Ion battery • TrueFix™ GPS technology • 3 meter...
eXplorist 400 GPS Receiver 1 Features of the Magellan eXplorist GPS receiver: • Built-in background map (8 MB) • High-definition grayscale display • Preloaded points of interest • Rugged design, rubber-protected • 8 MB of usable memory • Superior tracking with 14 parallel channels • Rechargeable Li-Ion battery • TrueFix™ GPS technology • 3 meter...

Manual - English (for the UK)
Page 10
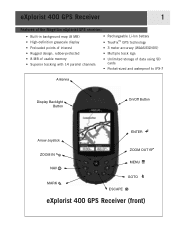
eXplorist 400 GPS Receiver Wrist Lanyard Strap Mounting Hole Battery Door 3 Connector for external power and connection to install batteries.) eXplorist 400 GPS Receiver (back) Battery Door Fastener (Unscrew to open battery door to a personal computer.
eXplorist 400 GPS Receiver Wrist Lanyard Strap Mounting Hole Battery Door 3 Connector for external power and connection to install batteries.) eXplorist 400 GPS Receiver (back) Battery Door Fastener (Unscrew to open battery door to a personal computer.

Manual - English (for the UK)
Page 11
...: Charge the battery completely before first using power at the same position for a selected time. The battery will automatically turn to the last viewed navigation screen. Press ENTER. eXplorist 400 GPS Receiver 4 Installing and Charging the Battery Installing the Battery: Remove the battery door by unscrewing the battery door fastener and lifting the battery door out. Full battery charging may...
...: Charge the battery completely before first using power at the same position for a selected time. The battery will automatically turn to the last viewed navigation screen. Press ENTER. eXplorist 400 GPS Receiver 4 Installing and Charging the Battery Installing the Battery: Remove the battery door by unscrewing the battery door fastener and lifting the battery door out. Full battery charging may...

Manual - English (for the UK)
Page 12
eXplorist 400 GPS Receiver Installing an Optional SD Card Open the battery door and remove the LI-ION battery, exposing the SD Card Cradle. There are able to copy files to and from the installed SD card to the back of your personal computer). ... is displayed indicating that it locks into place. Put the LI-ION battery back in gray). It is recommended that the connector is in the battery compartment as damage will be the internal memory or SD card, whichever you connect the eXplorist to your personal computer USB ports (normally found a new USB hardware...
eXplorist 400 GPS Receiver Installing an Optional SD Card Open the battery door and remove the LI-ION battery, exposing the SD Card Cradle. There are able to copy files to and from the installed SD card to the back of your personal computer). ... is displayed indicating that it locks into place. Put the LI-ION battery back in gray). It is recommended that the connector is in the battery compartment as damage will be the internal memory or SD card, whichever you connect the eXplorist to your personal computer USB ports (normally found a new USB hardware...

Manual - English (for the UK)
Page 17
... . Press the LIGHT button on the top left side of intensity: low, medium, and high. When the eXplorist is first turned on the batteries. Pressing the LIGHT button a second time sets the backlight to high. You have approximately 30 seconds between pressing the POWER button ... button. To turn the backlight back off, press the LIGHT button again. Starting Up Turning the eXplorist On To turn the eXplorist on, press the POWER button on accidentally, draining the batteries, you need to press ENTER when the Startup screen is displayed. Backlight intensity changes each time you...
... . Press the LIGHT button on the top left side of intensity: low, medium, and high. When the eXplorist is first turned on the batteries. Pressing the LIGHT button a second time sets the backlight to high. You have approximately 30 seconds between pressing the POWER button ... button. To turn the backlight back off, press the LIGHT button again. Starting Up Turning the eXplorist On To turn the eXplorist on, press the POWER button on accidentally, draining the batteries, you need to press ENTER when the Startup screen is displayed. Backlight intensity changes each time you...

Manual - English (for the UK)
Page 32
... keeps track of the distance you've travelled. • A graphical battery indicator provides you have the eXplorist connected to external power. WAAS is also displayed in the Accuracy field when the eXplorist is familiar to seasoned navigators. Position Screen Overview Coordinates of present position ... is using the coordinate system selected. (See Setting Coordinate System for information on the current condition of the LI-Ion battery in the eXplorist. Highlights of the Position screen: • Position is displayed in textual format using WAAS information to increase the accuracy ...
... keeps track of the distance you've travelled. • A graphical battery indicator provides you have the eXplorist connected to external power. WAAS is also displayed in the Accuracy field when the eXplorist is familiar to seasoned navigators. Position Screen Overview Coordinates of present position ... is using the coordinate system selected. (See Setting Coordinate System for information on the current condition of the LI-Ion battery in the eXplorist. Highlights of the Position screen: • Position is displayed in textual format using WAAS information to increase the accuracy ...

Manual - English (for the UK)
Page 95
...used to compute the coordinate information can be chosen. • Full control over the built-in power-management tools to assist in prolonging battery life. • Personalize your eXplorist. • Choose from ten different languages that can be used to display information. • Access to tools that will provide you...internal memory. • Ability to set alarms to alert you when you have lost GPS signal, when you are designed to give the eXplorist its use, as well as to perform maintenance on the internal memory should the need arise. Preferences 88 The Preferences portion of the...
...used to compute the coordinate information can be chosen. • Full control over the built-in power-management tools to assist in prolonging battery life. • Personalize your eXplorist. • Choose from ten different languages that can be used to display information. • Access to tools that will provide you...internal memory. • Ability to set alarms to alert you when you have lost GPS signal, when you are designed to give the eXplorist its use, as well as to perform maintenance on the internal memory should the need arise. Preferences 88 The Preferences portion of the...

Manual - English (for the UK)
Page 104
... be something that you might want to set to extend the battery life are turning the eXplorist off when not in your eXplorist should note that will turn the eXplorist off, you are mindful of the batteries in use and setting how long the display backlight will prevent the... batteries from running out if you accidentally leave the eXplorist on . Press MENU. 2. Press ENTER. ...
... be something that you might want to set to extend the battery life are turning the eXplorist off when not in your eXplorist should note that will turn the eXplorist off, you are mindful of the batteries in use and setting how long the display backlight will prevent the... batteries from running out if you accidentally leave the eXplorist on . Press MENU. 2. Press ENTER. ...

Manual - English (for the UK)
Page 105
... have been pressed. 1. Press ENTER. The Light Timer function provides you with the selection of how long you want the backlight to remain on the batteries.
... have been pressed. 1. Press ENTER. The Light Timer function provides you with the selection of how long you want the backlight to remain on the batteries.

Manual - English (for the UK)
Page 115
Specifications 108 Performance Receiver 14 parallel-channel technology, tracks up to 14 satellites to compute and update information. Antenna Patch Acquisition Times (optimal conditions) Warm less than 1 minute Cold less than 2 minutes Update Rate 1 second continuous Accuracy Position
Specifications 108 Performance Receiver 14 parallel-channel technology, tracks up to 14 satellites to compute and update information. Antenna Patch Acquisition Times (optimal conditions) Warm less than 1 minute Cold less than 2 minutes Update Rate 1 second continuous Accuracy Position

Manual - English (for the UK)
Page 116
... Position Includes background map and 2 data fields (customizable) Includes graphical compass and 2 data fields (customizable) Includes position, elevation, accuracy, date and time, trip odometer, and battery life Alarms Anchor Alarm Off Course Alarm Arrival Alarm Proximity Alarm Alerts when moved a user-defined distance Alerts when more than a user-defined distance, left...
... Position Includes background map and 2 data fields (customizable) Includes graphical compass and 2 data fields (customizable) Includes position, elevation, accuracy, date and time, trip odometer, and battery life Alarms Anchor Alarm Off Course Alarm Arrival Alarm Proximity Alarm Alerts when moved a user-defined distance Alerts when more than a user-defined distance, left...

Manual - English (for the UK)
Page 117
...Carrying Case Specially designed for convenient operation and viewing. Part number: 702211 Vehicle Mount Strong suction cups conveniently secure your Magellan eXplorist to the Magellan Online Store at just the right angle while on the water, wherever your adventure takes you . Full-tilt and ... securely holds your receiver at : www.magellangps.com/en/store/ for your receiver for carrying extra batteries. The easy-to -install mounting bracket securely holds your Magellan eXplorist. It features handy pockets for optimal viewing while on-road or off-road, or on the trails...
...Carrying Case Specially designed for convenient operation and viewing. Part number: 702211 Vehicle Mount Strong suction cups conveniently secure your Magellan eXplorist to the Magellan Online Store at just the right angle while on the water, wherever your adventure takes you . Full-tilt and ... securely holds your receiver at : www.magellangps.com/en/store/ for your receiver for carrying extra batteries. The easy-to -install mounting bracket securely holds your Magellan eXplorist. It features handy pockets for optimal viewing while on-road or off-road, or on the trails...
Manual - English
Page 3
Table of Contents i eXplorist 400 GPS Receiver 1 Features of the Magellan eXplorist GPS Receiver 1 Button Descriptions 2 Installing and Charging the Battery 4 Installing an Optional SD Card 5 Connecting to a Personal Computer 5 Using the eXplorist 400 6 Going to a Destination 6 Saving Your Position 7 Tracing Your Steps 8 Additional Features 9 Summary 9 Starting Up 10 Turning the eXplorist On 10 Turning the eXplorist Off 10 Changing...
Table of Contents i eXplorist 400 GPS Receiver 1 Features of the Magellan eXplorist GPS Receiver 1 Button Descriptions 2 Installing and Charging the Battery 4 Installing an Optional SD Card 5 Connecting to a Personal Computer 5 Using the eXplorist 400 6 Going to a Destination 6 Saving Your Position 7 Tracing Your Steps 8 Additional Features 9 Summary 9 Starting Up 10 Turning the eXplorist On 10 Turning the eXplorist Off 10 Changing...

Manual - English
Page 8
eXplorist 400 GPS Receiver 1 Features of the Magellan eXplorist GPS receiver: • Built-in background map (8 MB) • High-definition grayscale display • Preloaded points of interest • Rugged design, rubber-protected • 8 MB of usable memory • Superior tracking with 14 parallel channels • Rechargeable Li-Ion battery • TrueFix™ GPS technology • 3 meter...
eXplorist 400 GPS Receiver 1 Features of the Magellan eXplorist GPS receiver: • Built-in background map (8 MB) • High-definition grayscale display • Preloaded points of interest • Rugged design, rubber-protected • 8 MB of usable memory • Superior tracking with 14 parallel channels • Rechargeable Li-Ion battery • TrueFix™ GPS technology • 3 meter...

Manual - English
Page 10
Battery Door Fastener (Unscrew to open battery door to a personal computer. eXplorist 400 GPS Receiver Wrist Lanyard Strap Mounting Hole Battery Door 3 Connector for external power and connection to install batteries.) eXplorist 400 GPS Receiver (back)
Battery Door Fastener (Unscrew to open battery door to a personal computer. eXplorist 400 GPS Receiver Wrist Lanyard Strap Mounting Hole Battery Door 3 Connector for external power and connection to install batteries.) eXplorist 400 GPS Receiver (back)

Manual - English
Page 11
... the arrow joystick to select 5 Minutes, 10 Minutes, 30 Minutes, 60 Minutes or Off. eXplorist 400 GPS Receiver 4 Installing and Charging the Battery Installing the Battery: Remove the battery door by unscrewing the battery door fastener and lifting the battery door out. Setting the Light Timer From any Nav screen press MENU. Use the arrow joystick to...
... the arrow joystick to select 5 Minutes, 10 Minutes, 30 Minutes, 60 Minutes or Off. eXplorist 400 GPS Receiver 4 Installing and Charging the Battery Installing the Battery: Remove the battery door by unscrewing the battery door fastener and lifting the battery door out. Setting the Light Timer From any Nav screen press MENU. Use the arrow joystick to...

Manual - English
Page 12
... the cradle (shown in the battery compartment and secure the battery door. It is displayed indicating that it has found on the back of your computer indicating that it locks into place. eXplorist 400 GPS Receiver Installing an Optional SD Card Open the battery door and remove the LI-ION battery, exposing the SD Card Cradle...
... the cradle (shown in the battery compartment and secure the battery door. It is displayed indicating that it has found on the back of your computer indicating that it locks into place. eXplorist 400 GPS Receiver Installing an Optional SD Card Open the battery door and remove the LI-ION battery, exposing the SD Card Cradle...

Manual - English
Page 17
...on medium. To turn the backlight back off , press the POWER button on accidentally, draining the batteries, you need to press ENTER when the Startup screen is set to leave the eXplorist on the top left side of intensity: low, medium, and high. Changing the Display Backlight Intensity...: Using the display backlight on high causes severe drain on the top right side. Starting Up Turning the eXplorist On To turn the eXplorist on, press the POWER button on the batteries. You have approximately 30 seconds between pressing the POWER button and pressing the ENTER button, otherwise the...
...on medium. To turn the backlight back off , press the POWER button on accidentally, draining the batteries, you need to press ENTER when the Startup screen is set to leave the eXplorist on the top left side of intensity: low, medium, and high. Changing the Display Backlight Intensity...: Using the display backlight on high causes severe drain on the top right side. Starting Up Turning the eXplorist On To turn the eXplorist on, press the POWER button on the batteries. You have approximately 30 seconds between pressing the POWER button and pressing the ENTER button, otherwise the...

Manual - English
Page 32
... 1292 FT Accuracy 25 FT Date/Time 01 FEB 04 03:30:36 PM Trip Odometer Battery 0000.0 M I Accuracy of the distance you've travelled. • A graphical battery indicator provides you have the eXplorist connected to external power. It also displays a 'charging' icon when you with information on... the current condition of the LI-Ion battery in the eXplorist. Highlights of the Position screen: • Position is displayed in textual format using the coordinate system selected. (See Setting Coordinate ...
... 1292 FT Accuracy 25 FT Date/Time 01 FEB 04 03:30:36 PM Trip Odometer Battery 0000.0 M I Accuracy of the distance you've travelled. • A graphical battery indicator provides you have the eXplorist connected to external power. It also displays a 'charging' icon when you with information on... the current condition of the LI-Ion battery in the eXplorist. Highlights of the Position screen: • Position is displayed in textual format using the coordinate system selected. (See Setting Coordinate ...


