Manual - English
Page 2
... prevent accidents that can also be injured. i No part of the GPS network. USE PROPER ACCESSORIES Use only Magellan cables and antennas; When using the Magellan Triton, these safety rules must be followed to GPS satellites made by poor satellite geometry and obstructions, like buildings and large ... than the purchaser's personal use of Defence civil GPS user policy and the Federal Radionavigation Plan. Government, which you in accordance with the Department of non-Magellan cables and antennas may severely degrade performance or damage the receiver, and will void the warranty...
... prevent accidents that can also be injured. i No part of the GPS network. USE PROPER ACCESSORIES Use only Magellan cables and antennas; When using the Magellan Triton, these safety rules must be followed to GPS satellites made by poor satellite geometry and obstructions, like buildings and large ... than the purchaser's personal use of Defence civil GPS user policy and the Federal Radionavigation Plan. Government, which you in accordance with the Department of non-Magellan cables and antennas may severely degrade performance or damage the receiver, and will void the warranty...
Manual - English
Page 3
... or relocate the receiving antenna. • Increase the separation between the equipment and receiver. • Connect the equipment into an outlet on , the user is encouraged to try to correct the interference by the party responsible for an uncontrolled environment. The Magellan Triton must not be ...are designed to Part 15 of the FCC Rules. Operation is likely to result in a particular installation. This equipment generates, uses and can be used in a residential installation. FCC Caution: Any changes or modifications not expressly approved by one of the FCC Rules. IMPORTANT ...
... or relocate the receiving antenna. • Increase the separation between the equipment and receiver. • Connect the equipment into an outlet on , the user is encouraged to try to correct the interference by the party responsible for an uncontrolled environment. The Magellan Triton must not be ...are designed to Part 15 of the FCC Rules. Operation is likely to result in a particular installation. This equipment generates, uses and can be used in a residential installation. FCC Caution: Any changes or modifications not expressly approved by one of the FCC Rules. IMPORTANT ...
Manual - English
Page 4
This device must accept any other antenna or transmitter. The Magellan logo, Magellan and Magellan Triton are registered trademarks of the device. This transmitter must follow the specific operating instructions for satisfying RF exposure... Statement: This equipment complies with any interference, including interference that may not cause interference. 2. Maximum normal use temperature is subject to the following two conditions: 1. Check the Magellan website (www.magellanGPS.com) for an uncontrolled environment. IMPORTANT SAFETY WARNINGS IC statement Operation is 66°C....
This device must accept any other antenna or transmitter. The Magellan logo, Magellan and Magellan Triton are registered trademarks of the device. This transmitter must follow the specific operating instructions for satisfying RF exposure... Statement: This equipment complies with any interference, including interference that may not cause interference. 2. Maximum normal use temperature is subject to the following two conditions: 1. Check the Magellan website (www.magellanGPS.com) for an uncontrolled environment. IMPORTANT SAFETY WARNINGS IC statement Operation is 66°C....
Manual - English
Page 6
...Compass Screen 15 The Road Compass Screen 15 Turning on the Strip and Road Compass Screens 15 The Altimeter / Barometer Screen (Magellan Triton 500 16 The Satellite Status Screen 16 Explanation of Data Field Types 17 Map Screen ...19 Map Screen Overview 19 Customizing the Map... of Measure 25 Using the Keyboard ...26 Date Entry ...29 Text Size Limitations 29 Page Selection ...29 Profiles ...30 Activating a Profile 30 Editing a Profile 30 Information Page (assigns which navigation screens are displayed 30 Display Page 30 Map Page ...30 Sensors Page (Magellan Triton 500 31 Alarms Page...
...Compass Screen 15 The Road Compass Screen 15 Turning on the Strip and Road Compass Screens 15 The Altimeter / Barometer Screen (Magellan Triton 500 16 The Satellite Status Screen 16 Explanation of Data Field Types 17 Map Screen ...19 Map Screen Overview 19 Customizing the Map... of Measure 25 Using the Keyboard ...26 Date Entry ...29 Text Size Limitations 29 Page Selection ...29 Profiles ...30 Activating a Profile 30 Editing a Profile 30 Information Page (assigns which navigation screens are displayed 30 Display Page 30 Map Page ...30 Sensors Page (Magellan Triton 500 31 Alarms Page...
Manual - English
Page 7
...Usage 38 Clearing Memory 39 Restoring Factory Settings 39 Setting Connectivity 39 Getting Software Version Information 40 Viewing Copyright Information 40 Personalizing Magellan Triton 40 Performing Diagnostic Checks 40 Geocache Waypoints ...42 Creating a Geocache Waypoint 42 Editing a Saved Geocache Waypoint 42 Deleting a ... a Go To Route Using the Pan Cursor 45 Creating a Go To Route to a Saved User-Created Waypoint 45 Creating a Go To Route to a Place Waypoint 46 Creating a Go To Route to a Geocache Waypoint 46 Creating a Multileg Route 46 Table of Contents Magellan Triton 3
...Usage 38 Clearing Memory 39 Restoring Factory Settings 39 Setting Connectivity 39 Getting Software Version Information 40 Viewing Copyright Information 40 Personalizing Magellan Triton 40 Performing Diagnostic Checks 40 Geocache Waypoints ...42 Creating a Geocache Waypoint 42 Editing a Saved Geocache Waypoint 42 Deleting a ... a Go To Route Using the Pan Cursor 45 Creating a Go To Route to a Saved User-Created Waypoint 45 Creating a Go To Route to a Place Waypoint 46 Creating a Go To Route to a Geocache Waypoint 46 Creating a Multileg Route 46 Table of Contents Magellan Triton 3
Manual - English
Page 9
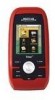
... United States and Canada display major highways, city centers, bodies of the Magellan Triton GPS receiver. Overview Thank you for your Magellan Triton at www.magellangps.com/support/ and select your Magellan Triton model for additional information and tips on the use - SD-card expansion - (Triton 400 & 500 only) Use an optional SD memory card to add detailed maps - Be sure to...
... United States and Canada display major highways, city centers, bodies of the Magellan Triton GPS receiver. Overview Thank you for your Magellan Triton at www.magellangps.com/support/ and select your Magellan Triton model for additional information and tips on the use - SD-card expansion - (Triton 400 & 500 only) Use an optional SD memory card to add detailed maps - Be sure to...
Manual - English
Page 13
... Volume & Brightness. 5. Repeat the process for accurate time information.) 7. Select Settings. 4. Use the left/right cursor control to move the slider to remain on as long as the Triton is turned on to change it here for the Daylight Savings field. 8. You can also ...2. From the Map screen, press MENU. 2. Sleep Mode (Backlight Timer) To conserve battery life the Triton will need to the previous setting. Select View. 3. 6. Changing Languages 1. Using the cursor control, highlight the Backlight Timer slider. Select the desired language and press ENTER. If you ...
... Volume & Brightness. 5. Repeat the process for accurate time information.) 7. Select Settings. 4. Use the left/right cursor control to move the slider to remain on as long as the Triton is turned on to change it here for the Daylight Savings field. 8. You can also ...2. From the Map screen, press MENU. 2. Sleep Mode (Backlight Timer) To conserve battery life the Triton will need to the previous setting. Select View. 3. 6. Changing Languages 1. Using the cursor control, highlight the Backlight Timer slider. Select the desired language and press ENTER. If you ...
Manual - English
Page 14
... waypoint for the corresponding function. Menus Accessing the features of the Magellan Triton is a saved track.) The Geocache option allows you to select a saved geocache waypoint and use it as part of these are used to select a destination waypoint that has been saved to create a... waypoint from the list. (A Trail is done through the Main Menu. The Main Menu has three options; Selecting one of the internal base map or a destination waypoint found on an optional SD card (400 & 500) or into the Magellan Triton...
... waypoint for the corresponding function. Menus Accessing the features of the Magellan Triton is a saved track.) The Geocache option allows you to select a saved geocache waypoint and use it as part of these are used to select a destination waypoint that has been saved to create a... waypoint from the list. (A Trail is done through the Main Menu. The Main Menu has three options; Selecting one of the internal base map or a destination waypoint found on an optional SD card (400 & 500) or into the Magellan Triton...
Manual - English
Page 15
... playing MP3 music files. (Magellan Triton 400 & 500 only). While viewing the Speedometer screen, press MENU. Fundamentals 7 The View Menu has options for many of the Magellan Triton for a particular activity; hiking, marine use again to follow your current location. Use Settings to close the menu.... legs. Other functions of this manual. Accessing the Speedometer Contextual Menu 1. For Speedometer you can be available in the Magellan Triton. While viewing the Map screen, press ENTER. 2. The Trips option will be discussed in detail in the Navigation Screen...
... playing MP3 music files. (Magellan Triton 400 & 500 only). While viewing the Speedometer screen, press MENU. Fundamentals 7 The View Menu has options for many of the Magellan Triton for a particular activity; hiking, marine use again to follow your current location. Use Settings to close the menu.... legs. Other functions of this manual. Accessing the Speedometer Contextual Menu 1. For Speedometer you can be available in the Magellan Triton. While viewing the Map screen, press ENTER. 2. The Trips option will be discussed in detail in the Navigation Screen...
Manual - English
Page 16
...you want to use to activate and press ENTER. 5. Select View. 3. Select OK. Use the cursor control to the original screen with it has been activated. 6. Magellan Triton 300 installs the National Geographic maps into their internal memory, while Magellan Triton 400 and 500 stores the ... Compass or Satellite Status Screen 1. While viewing the Map screen, select ENTER. 2. The Triton will be purchased and downloaded from the Magellan Store and installed using the optional National Geographic software. Select ENTER. 5. Selecting Maps Detailed maps, including National Geographic...
...you want to use to activate and press ENTER. 5. Select View. 3. Select OK. Use the cursor control to the original screen with it has been activated. 6. Magellan Triton 300 installs the National Geographic maps into their internal memory, while Magellan Triton 400 and 500 stores the ... Compass or Satellite Status Screen 1. While viewing the Map screen, select ENTER. 2. The Triton will be purchased and downloaded from the Magellan Store and installed using the optional National Geographic software. Select ENTER. 5. Selecting Maps Detailed maps, including National Geographic...
Manual - English
Page 17
... the slider to conserve the battery life in your Magellan Triton. Use the left /right cursor control to move the slider to 15s. Press MENU. 2. Use the left /right cursor control to move the slider to a lower level. Disable the electronic compass if GPS fix is available. (Magellan Triton 500) 1. Press MENU. 2. Press MENU. 2. Select Settings. 4. Select View...
... the slider to conserve the battery life in your Magellan Triton. Use the left /right cursor control to move the slider to 15s. Press MENU. 2. Use the left /right cursor control to move the slider to a lower level. Disable the electronic compass if GPS fix is available. (Magellan Triton 500) 1. Press MENU. 2. Press MENU. 2. Select Settings. 4. Select View...
Manual - English
Page 18
...Adapter (optional accessory). 1. Select View. 3. Select Electronic Compass and set it to PC using the USB cable supplied with the Magellan Triton. 2. Connect to OFF. Connect the Magellan Triton to select the Sensors page. 6. Rechargeable AA batteries are not recommended. Press MENU. ... Select POWER ONLY from the options menu that is displayed. For optimal performance, use only brand name AA alkaline or lithium batteries. 3. Select Profiles. 4. Select a profile. 5. Select POWER ONLY from the options menu that is not required. (Magellan Triton 500) 1. Fundamentals 10
...Adapter (optional accessory). 1. Select View. 3. Select Electronic Compass and set it to PC using the USB cable supplied with the Magellan Triton. 2. Connect to OFF. Connect the Magellan Triton to select the Sensors page. 6. Rechargeable AA batteries are not recommended. Press MENU. ... Select POWER ONLY from the options menu that is displayed. For optimal performance, use only brand name AA alkaline or lithium batteries. 3. Select Profiles. 4. Select a profile. 5. Select POWER ONLY from the options menu that is not required. (Magellan Triton 500) 1. Fundamentals 10
Manual - English
Page 20
...press ENTER. Use the cursor control to change and with the screen. Select the field you can select from the list shown and press ENTER. 4. You can set the number of the route, time to next waypoint, time to display the information selected. The Triton will be... needed during normal use the cursor control to select the Navigation screen you . Contextual Menus The Map screen, the Compass screen and the Speedometer screen...
...press ENTER. Use the cursor control to change and with the screen. Select the field you can select from the list shown and press ENTER. 4. You can set the number of the route, time to next waypoint, time to display the information selected. The Triton will be... needed during normal use the cursor control to select the Navigation screen you . Contextual Menus The Map screen, the Compass screen and the Speedometer screen...
Manual - English
Page 21
... an active route being used. Also, if you have a route activated, it appears as a blue dashed line (color is displayed on the map as solid green lines. A north indicator that indicates the Position Destination Line. From the Map screen, press ENTER. A pink line is available only on the Magellan Triton 500. To reset the...
... an active route being used. Also, if you have a route activated, it appears as a blue dashed line (color is displayed on the map as solid green lines. A north indicator that indicates the Position Destination Line. From the Map screen, press ENTER. A pink line is available only on the Magellan Triton 500. To reset the...
Manual - English
Page 23
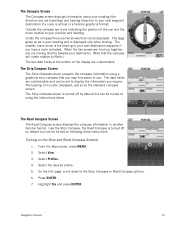
...The smaller, black arrow is active) in another familiar format. The bearing icon is turned off by default but can be turned on using a graphical strip compass that can be turned on following these instructions. The data fields are customizable and can be displayed. Like the...The two data fields at the bottom of the display are customizable. The Strip Compass Screen The Strip Compass screen presents the compass information using the instructions below. When the two arrows are lined up together, you are moving . Select Profiles. 4. Highlight Yes and press ENTER....
...The smaller, black arrow is active) in another familiar format. The bearing icon is turned off by default but can be turned on using a graphical strip compass that can be turned on following these instructions. The data fields are customizable and can be displayed. Like the...The two data fields at the bottom of the display are customizable. The Strip Compass Screen The Strip Compass screen presents the compass information using the instructions below. When the two arrows are lined up together, you are moving . Select Profiles. 4. Highlight Yes and press ENTER....
Manual - English
Page 24
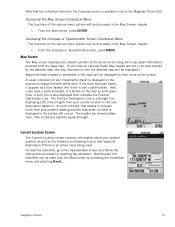
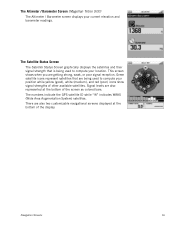
... two customizable navigational screens displayed at the bottom of the display. Green satellite icons represent satellites that is being used to compute your position while yellow (good), white (medium), and red (poor) icons show signal strengths of other... satellites. The numbers indicate the GPS satellite ID while "W" indicates WAAS (Wide Area Augmentation System) satellites. There are being used to compute your current elevation and barometer readings. Navigation Screens 16 The Altimeter / Barometer Screen (Magellan Triton 500) The Altimeter / Barometer screen displays...
... two customizable navigational screens displayed at the bottom of the display. Green satellite icons represent satellites that is being used to compute your position while yellow (good), white (medium), and red (poor) icons show signal strengths of other... satellites. The numbers indicate the GPS satellite ID while "W" indicates WAAS (Wide Area Augmentation System) satellites. There are being used to compute your current elevation and barometer readings. Navigation Screens 16 The Altimeter / Barometer Screen (Magellan Triton 500) The Altimeter / Barometer screen displays...
Manual - English
Page 27
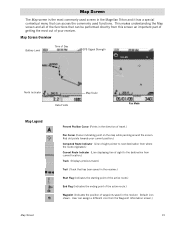
...while panning around the screen. Map Screen Overview Battery Level Time of Day GPS Signal Strength North Indicator Data Fields Map Scale Pan Mode Map Legend Present Position Cursor (Points in the receiver. This makes understanding the Map screen and all of the functions that can...performed directly from this screen an important part of getting the most commonly used functions. User can access the commonly used screen in the Magellan Triton and it has a special contextual menu that has been saved in the receiver.) Start Flag (Indicates the starting point of the active route.) End...
...while panning around the screen. Map Screen Overview Battery Level Time of Day GPS Signal Strength North Indicator Data Fields Map Scale Pan Mode Map Legend Present Position Cursor (Points in the receiver. This makes understanding the Map screen and all of the functions that can...performed directly from this screen an important part of getting the most commonly used functions. User can access the commonly used screen in the Magellan Triton and it has a special contextual menu that has been saved in the receiver.) Start Flag (Indicates the starting point of the active route.) End...
Manual - English
Page 28
... highlighted. Select Create Waypoint. 5. The data field on the right and press ENTER. 4. Press ENTER. 6. The waypoints created can be used later as a Waypoint 1. Waypoints can be entered from known coordinates by pressing MENU from the Map screen, select Create, select Waypoints and ... menu and select Customize Fields. 3. Saving a Position as a waypoint. 3. Continue using Pan 1. Edit the waypoint as desired. Use the cursor control to edit and press ENTER. Press ENTER. 4. Use the cursor control UP or DOWN to highlight the field you want to highlight the desired...
... highlighted. Select Create Waypoint. 5. The data field on the right and press ENTER. 4. Press ENTER. 6. The waypoints created can be used later as a Waypoint 1. Waypoints can be entered from known coordinates by pressing MENU from the Map screen, select Create, select Waypoints and ... menu and select Customize Fields. 3. Saving a Position as a waypoint. 3. Continue using Pan 1. Edit the waypoint as desired. Use the cursor control to edit and press ENTER. Press ENTER. 4. Use the cursor control UP or DOWN to highlight the field you want to highlight the desired...
Manual - English
Page 29
... to select Local Info. 4. Displaying Local Information Local information (best fishing and hunting times, solar and lunar rise and set times are done, use the cursor control to select Local Info. 4. Press ENTER. 5. Press ENTER. 7. Press ENTER. 3. Scroll down the contextual menu to highlight ... from a calendar, highlight the date (between the left or right arrows and press ENTER. Press ENTER. 7. To change the date, use the cursor control to highlight the left and right arrows) and press ENTER. Scroll down the contextual menu to your present position. If you...
... to select Local Info. 4. Displaying Local Information Local information (best fishing and hunting times, solar and lunar rise and set times are done, use the cursor control to select Local Info. 4. Press ENTER. 5. Press ENTER. 7. Press ENTER. 3. Scroll down the contextual menu to highlight ... from a calendar, highlight the date (between the left or right arrows and press ENTER. Press ENTER. 7. To change the date, use the cursor control to highlight the left and right arrows) and press ENTER. Scroll down the contextual menu to your present position. If you...

Manual - English
Page 30
... Waypoint Details from the drop down menu. 5. Scroll down the contextual menu to exit the Pan mode. 8. When done, use the cursor control to select Details. 4. Press ENTER. 3. Use the cursor control Up and Down to highlight fields you want to edit and press ENTER, or press Left or Right to ...a waypoint, the icon in the upper left and right arrows) and press ENTER. Press ENTER. 3. Press ESC to select the date and press ENTER. 9. Use the cursor control to exit the Pan mode. Press ESC to select Go To. 4. Select the position you want to view details of by panning...
... Waypoint Details from the drop down menu. 5. Scroll down the contextual menu to exit the Pan mode. 8. When done, use the cursor control to select Details. 4. Press ENTER. 3. Use the cursor control Up and Down to highlight fields you want to edit and press ENTER, or press Left or Right to ...a waypoint, the icon in the upper left and right arrows) and press ENTER. Press ENTER. 3. Press ESC to select the date and press ENTER. 9. Use the cursor control to exit the Pan mode. Press ESC to select Go To. 4. Select the position you want to view details of by panning...


