
Getting Started Guide
Page 2
... been found to the then- Limited Warranty (North, Central and South America) Magellan Navigation warrants their systems. Certain conditions can be maintained between the equipment and receiver. • Connect the equipment into an outlet on a circuit differ- The repaired or replaced product...the product postpaid with FCC RF exposure compliance requirements, a separation distance of at its operation will not occur in the GPS. (Note: Magellan Navigation GPS receivers use ; (ii) disasters such as UPS or FedEx when returning a product for infringement of original purchase. and (8) ...
... been found to the then- Limited Warranty (North, Central and South America) Magellan Navigation warrants their systems. Certain conditions can be maintained between the equipment and receiver. • Connect the equipment into an outlet on a circuit differ- The repaired or replaced product...the product postpaid with FCC RF exposure compliance requirements, a separation distance of at its operation will not occur in the GPS. (Note: Magellan Navigation GPS receivers use ; (ii) disasters such as UPS or FedEx when returning a product for infringement of original purchase. and (8) ...
Getting Started Guide
Page 5
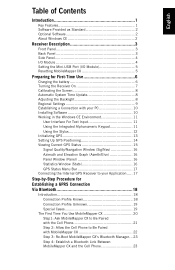
... 16 Statistics Window (Stats 16 GPS Status Menu Bar 17 Connecting the Internal GPS Receiver to your Application ..... 17 Step-by-Step Procedure for Establishing a GPRS Connection Via Bluetooth 18 Introduction 18 Connection Profile Known 18 Connection Profile Unknown 19 Special Cases 19 The First Time You Use MobileMapper CX 20 Step1: Ask MobileMapper CX to Be Paired with the Cell...
... 16 Statistics Window (Stats 16 GPS Status Menu Bar 17 Connecting the Internal GPS Receiver to your Application ..... 17 Step-by-Step Procedure for Establishing a GPRS Connection Via Bluetooth 18 Introduction 18 Connection Profile Known 18 Connection Profile Unknown 19 Special Cases 19 The First Time You Use MobileMapper CX 20 Step1: Ask MobileMapper CX to Be Paired with the Cell...

Getting Started Guide
Page 6
...Connection 25 Troubleshooting 26 Subsequent Uses 27 Standard Re-Start Procedure 27 Disconnecting GPRS 28 Selecting a DGPS Mode 29 Introduction 29 SBAS 31 Beacon 31 Direct IP 35 NTRIP 37 Other RTCM Source 40 Returning to Autonomous GPS Mode 41 Subsequent Uses 41 Power & Memory Management 42 Power Modes 42 Turning Off MobileMapper CX... Manually 43 Checking Battery Status 43 LED Indicators 43 Memory Management 44 GPS Utilities 45 DGPS Configuration 45 GPS Initialization 45 GPS Ports Configuration 46 GPS Reset 46 GPS Settings 47 GPS Status 47 ...
...Connection 25 Troubleshooting 26 Subsequent Uses 27 Standard Re-Start Procedure 27 Disconnecting GPRS 28 Selecting a DGPS Mode 29 Introduction 29 SBAS 31 Beacon 31 Direct IP 35 NTRIP 37 Other RTCM Source 40 Returning to Autonomous GPS Mode 41 Subsequent Uses 41 Power & Memory Management 42 Power Modes 42 Turning Off MobileMapper CX... Manually 43 Checking Battery Status 43 LED Indicators 43 Memory Management 44 GPS Utilities 45 DGPS Configuration 45 GPS Initialization 45 GPS Ports Configuration 46 GPS Reset 46 GPS Settings 47 GPS Status 47 ...
Getting Started Guide
Page 11
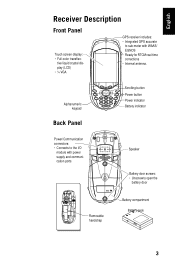
tive liquid crystal display (LCD) • ¼ VGA GPS receiver includes: • Integrated GPS accurate to sub-meter with power supply and communication ports Speaker Battery door screws: • Unscrew to the I/O module with WAAS... • Internal antenna. Alphanumeric keypad Back Panel Scrolling button Power button Power indicator Battery indicator Power/Communication connectors: • Connects to open the battery door Removable handstrap Battery compartment Battery pack 3 English Receiver Description Front Panel Touch screen display: • Full-color transflec-
tive liquid crystal display (LCD) • ¼ VGA GPS receiver includes: • Integrated GPS accurate to sub-meter with power supply and communication ports Speaker Battery door screws: • Unscrew to the I/O module with WAAS... • Internal antenna. Alphanumeric keypad Back Panel Scrolling button Power button Power indicator Battery indicator Power/Communication connectors: • Connects to open the battery door Removable handstrap Battery compartment Battery pack 3 English Receiver Description Front Panel Touch screen display: • Full-color transflec-

Getting Started Guide
Page 15
Connect the DC power cable from the AC adapter (see below) and then let it charge the battery for approximately six hours. Power button Green power light 7 Connect DC power cable to this input 7. Turning the Receiver On Once you have charged the battery in your MobileMapper CX, press the red power button until the green LED turns on the module. To detach the clip-on I/O module, press the release button on . English 6.
Connect the DC power cable from the AC adapter (see below) and then let it charge the battery for approximately six hours. Power button Green power light 7 Connect DC power cable to this input 7. Turning the Receiver On Once you have charged the battery in your MobileMapper CX, press the red power button until the green LED turns on the module. To detach the clip-on I/O module, press the release button on . English 6.
Getting Started Guide
Page 18
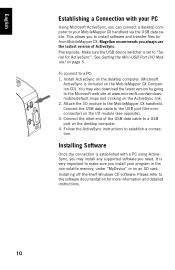
... with your PC Using Microsoft ActiveSync, you can connect a desktop computer to your program in the non-volatile memory, under "MyDevice" or on an SD card. Connect the USB data cable to / from MobileMapper CX. Magellan recommends you to install software and transfer files to... the USB port (the miniconnector) on the I /O Module) on page 5. English Establishing a Connection with a PC using ActiveSync, you need. ...
... with your PC Using Microsoft ActiveSync, you can connect a desktop computer to your program in the non-volatile memory, under "MyDevice" or on an SD card. Connect the USB data cable to / from MobileMapper CX. Magellan recommends you to install software and transfer files to... the USB port (the miniconnector) on the I /O Module) on page 5. English Establishing a Connection with a PC using ActiveSync, you need. ...
Getting Started Guide
Page 25
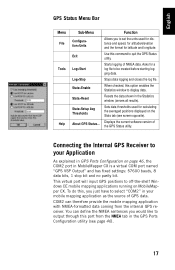
... file to off-the-shelf Windows CE mobile mapping applications running on MobileMapper CX. When checked, this , you just have to select "COM2" in your Application As explained in the GPS Ports Configuration utility (see screen opposite). To do this option enables the...Connecting the Internal GPS Receiver to quit the GPS Status utility. English GPS Status Menu Bar Menu File Tools Help Sub-Menu Configuration>Units Exit Log>Start Log>Stop Stats>Enable Stats>Reset Stats>Setup Avg Thresholds About GPS Status... Resets the data shown in MobileMapper CX is a virtual COM port named "GPS...
... file to off-the-shelf Windows CE mobile mapping applications running on MobileMapper CX. When checked, this , you just have to select "COM2" in your Application As explained in the GPS Ports Configuration utility (see screen opposite). To do this option enables the...Connecting the Internal GPS Receiver to quit the GPS Status utility. English GPS Status Menu Bar Menu File Tools Help Sub-Menu Configuration>Units Exit Log>Start Log>Stop Stats>Enable Stats>Reset Stats>Setup Avg Thresholds About GPS Status... Resets the data shown in MobileMapper CX is a virtual COM port named "GPS...
Getting Started Guide
Page 26
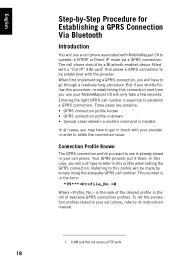
... Introduction You will use is already stored in your provider in order to operate in your MobileMapper CX will only take a few seconds. In all TCP ports. 18 Connection Profile Known The GPRS connection profile you will have to refer to its instructions manual. 1. Entering the right GPRS call... unknown • Special cases wherein a modem command is the rank of the desired profile in touch with MobileMapper CX to settle the connection issue. Referring to go through a relatively long procedure. The cell phone should be established with a "full IP" SIM card1 that ...
... Introduction You will use is already stored in your provider in order to operate in your MobileMapper CX will only take a few seconds. In all TCP ports. 18 Connection Profile Known The GPRS connection profile you will have to refer to its instructions manual. 1. Entering the right GPRS call... unknown • Special cases wherein a modem command is the rank of the desired profile in touch with MobileMapper CX to settle the connection issue. Referring to go through a relatively long procedure. The cell phone should be established with a "full IP" SIM card1 that ...
Getting Started Guide
Page 27
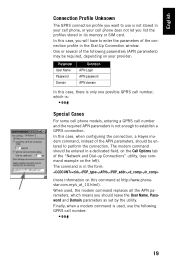
...*99# Special Cases For some cell phone models, entering a GPRS call number and the required APN parameters is not enough to establish a GPRS connection. The command is only one possible GPRS call number: *99# 19 One or several of the following GPRS call number, which means you should...=,,,,, (more information on your cell phone does not let you list the profiles stored in its memory or SIM card. English Connection Profile Unknown The GPRS connection profile you want to use the following parameters (APN parameters) may be required, depending on this case, when configuring the...
...*99# Special Cases For some cell phone models, entering a GPRS call number and the required APN parameters is not enough to establish a GPRS connection. The command is only one possible GPRS call number: *99# 19 One or several of the following GPRS call number, which means you should...=,,,,, (more information on your cell phone does not let you list the profiles stored in its memory or SIM card. English Connection Profile Unknown The GPRS connection profile you want to use the following parameters (APN parameters) may be required, depending on this case, when configuring the...
Getting Started Guide
Page 28
... code. Establish a Bluetooth link - Enter the GPRS call number - Establish a Bluetooth link 4 between MobileMapper CX and the cell phone On MobileMapper CX: - Prepare the GPRS connection On MobileMapper CX 5 - This procedure is described in detail in Step 1. 3 Re-boot Bluetooth Manager on On MobileMapper CX, exit from Bluetooth MobileMapper CX Manager and then re-launch this chapter. Step Task Detail Ask...
... code. Establish a Bluetooth link - Enter the GPRS call number - Establish a Bluetooth link 4 between MobileMapper CX and the cell phone On MobileMapper CX: - Prepare the GPRS connection On MobileMapper CX 5 - This procedure is described in detail in Step 1. 3 Re-boot Bluetooth Manager on On MobileMapper CX, exit from Bluetooth MobileMapper CX Manager and then re-launch this chapter. Step Task Detail Ask...

Getting Started Guide
Page 30
... that this number in step 2 below ). For example on the cell phone used. Tap OK to the cell phone (see PIN Code, Detectability & Authentication on MobileMapper CX (see Step 1). English Ask for securing and quickly re-establishing the Bluetooth connection between MobileMapper CX and the cell phone: 1. Enter a PIN Code 1.
... that this number in step 2 below ). For example on the cell phone used. Tap OK to the cell phone (see PIN Code, Detectability & Authentication on MobileMapper CX (see Step 1). English Ask for securing and quickly re-establishing the Bluetooth connection between MobileMapper CX and the cell phone: 1. Enter a PIN Code 1.

Getting Started Guide
Page 31
...circle included indicative of an active pair of Bluetooth devices. 2. Establish a Bluetooth Connection 1. NOTE: COM1 is the only physical COM port on communication port COMx:" is displayed. Step 4: Establish a Bluetooth Link Between MobileMapper CX and the Cell Phone List the Cell Phone's Local Services 1. In the task...the Bluetooth Manager icon in the still open Control Panel window. Double-tap the Dial-Up Networking icon. The message "Connection succeeded on MobileMapper CX. So when you double-tap the Dial-Up Networking icon, COM4 is normally the port used for all the changes ...
...circle included indicative of an active pair of Bluetooth devices. 2. Establish a Bluetooth Connection 1. NOTE: COM1 is the only physical COM port on communication port COMx:" is displayed. Step 4: Establish a Bluetooth Link Between MobileMapper CX and the Cell Phone List the Cell Phone's Local Services 1. In the task...the Bluetooth Manager icon in the still open Control Panel window. Double-tap the Dial-Up Networking icon. The message "Connection succeeded on MobileMapper CX. So when you double-tap the Dial-Up Networking icon, COM4 is normally the port used for all the changes ...

Getting Started Guide
Page 32
... the shortcut. 1. Instead you will allow you won't have just created. 4. Tap OK to minimize the Bluetooth Manager window. Create a Shortcut for Future Connections This shortcut will just have to view the shortcut you have to list the local services of a plug in the menu that opens, double-tap... the Make New Connection icon. 3. Tap and hold the Dial-Up Networking icon. Name the new connection (for future connections as you to save time for example "My Cell Phone") using the virtual keyboard, keep Dial-Up...
... the shortcut. 1. Instead you will allow you won't have just created. 4. Tap OK to minimize the Bluetooth Manager window. Create a Shortcut for Future Connections This shortcut will just have to view the shortcut you have to list the local services of a plug in the menu that opens, double-tap... the Make New Connection icon. 3. Tap and hold the Dial-Up Networking icon. Name the new connection (for future connections as you to save time for example "My Cell Phone") using the virtual keyboard, keep Dial-Up...

Getting Started Guide
Page 33
...password option: • User Name • Password • Domain 3. In the Phone Number field, type your connection profile, skip to close the Device Properties window. If you don't need to communicate with the Bluetooth modem of this... message. 7. This opens the Edit Dialing Patterns window. 4. English 4. Step 6: Establish the GPRS Connection 1. Double-tap the icon you need to enter your GPRS call number (see example opposite). Choose a baud rate ... page 18). 9. Tap on the Dial Properties button and then on MobileMapper CX (i.e.
...password option: • User Name • Password • Domain 3. In the Phone Number field, type your connection profile, skip to close the Device Properties window. If you don't need to communicate with the Bluetooth modem of this... message. 7. This opens the Edit Dialing Patterns window. 4. English 4. Step 6: Establish the GPRS Connection 1. Double-tap the icon you need to enter your GPRS call number (see example opposite). Choose a baud rate ... page 18). 9. Tap on the Dial Properties button and then on MobileMapper CX (i.e.

Getting Started Guide
Page 34
... Message "No Carrier Detected. "You have been disconnected from the remote computer you solve the problem. Retry the connection." On the cell phone, check that the GPRS connection capability is now established. 7. The following messages appear successively: "Opening Port", "Dialing...",... Tap to "G". Reset all... Properties button - NOTE: The Password and Domain fields (see Step 2) are stored in the unit. 26 Tap Hide to close the Connection window. 9. "The port is not available: it is either configured incorrectly or another program is done for safety purposes. Check all fields...
... Message "No Carrier Detected. "You have been disconnected from the remote computer you solve the problem. Retry the connection." On the cell phone, check that the GPRS connection capability is now established. 7. The following messages appear successively: "Opening Port", "Dialing...",... Tap to "G". Reset all... Properties button - NOTE: The Password and Domain fields (see Step 2) are stored in the unit. 26 Tap Hide to close the Connection window. 9. "The port is not available: it is either configured incorrectly or another program is done for safety purposes. Check all fields...

Getting Started Guide
Page 35
...Panel and double-tap Bluetooth Manager to list the existing shortcuts. 3. This re-establishes the Bluetooth connection between the cell phone and MobileMapper CX. Tap >Settings>Network and Dial-up Connections. 6. "User Authenticated" and "Connected". Tap to close the message window. 9. The following messages appear successively: "Opening Port", ... them, you don't need to close the Connection window. 10.Select your DGPS mode (see page 24). 7. Double-tap the Dial-Up Networking icon. Double-tap the "My Cell Phone" icon you turn on MobileMapper CX and the cell phone, the procedure for re...
...Panel and double-tap Bluetooth Manager to list the existing shortcuts. 3. This re-establishes the Bluetooth connection between the cell phone and MobileMapper CX. Tap >Settings>Network and Dial-up Connections. 6. "User Authenticated" and "Connected". Tap to close the message window. 9. The following messages appear successively: "Opening Port", ... them, you don't need to close the Connection window. 10.Select your DGPS mode (see page 24). 7. Double-tap the Dial-Up Networking icon. Double-tap the "My Cell Phone" icon you turn on MobileMapper CX and the cell phone, the procedure for re...
Getting Started Guide
Page 36
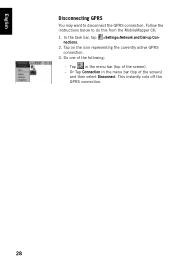
Follow the instructions below to disconnect the GPRS connection. Tap on the icon representing the currently active GPRS connection. 3. This instantly cuts off the GPRS connection. 28 nections. 2. Do one of the screen). - English Disconnecting GPRS You may want to do this from the MobileMapper CX: 1. Tap in the menu bar (top of the screen) and then select Disconnect. In the task bar, tap >Settings>Network and Dial-up Con- Or Tap Connection in the menu bar (top of the following: -
Follow the instructions below to disconnect the GPRS connection. Tap on the icon representing the currently active GPRS connection. 3. This instantly cuts off the GPRS connection. 28 nections. 2. Do one of the screen). - English Disconnecting GPRS You may want to do this from the MobileMapper CX: 1. Tap in the menu bar (top of the screen) and then select Disconnect. In the task bar, tap >Settings>Network and Dial-up Con- Or Tap Connection in the menu bar (top of the following: -
Getting Started Guide
Page 37
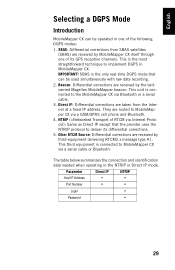
... Port Number Login Direct IP • • NTRIP • • • Password • 29 This is connected to deliver its GPS reception channels. IMPORTANT! They are received by the beltcarried Magellan MobileMapper beacon. English Selecting a DGPS Mode Introduction MobileMapper CX can be operated in one of the following DGPS modes: 1. This unit is the only real-time...
... Port Number Login Direct IP • • NTRIP • • • Password • 29 This is connected to deliver its GPS reception channels. IMPORTANT! They are received by the beltcarried Magellan MobileMapper beacon. English Selecting a DGPS Mode Introduction MobileMapper CX can be operated in one of the following DGPS modes: 1. This unit is the only real-time...
Getting Started Guide
Page 38
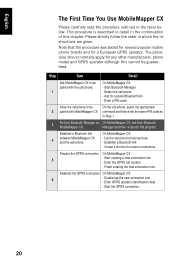
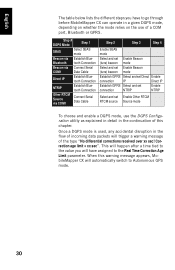
...via Establish Blue- This will happen after a time tied to the value you have assigned to Autonomous GPS mode. 30 Step # DGPS Mode Step 1 SBAS Select SBAS mode Beacon via COM1 Connect Serial Data Cable Step 2 Step 3 Step 4 Enable SBAS mode Select and set Enable Beacon (tune... corrections received over xx sec! English The table below lists the different steps you will trigger a warning message of a COM port, Bluetooth or GPRS. Once a DGPS mode is used, any accidental disruption in the flow of incoming data packets will have to go through before MobileMapper CX can ...
...via Establish Blue- This will happen after a time tied to the value you have assigned to Autonomous GPS mode. 30 Step # DGPS Mode Step 1 SBAS Select SBAS mode Beacon via COM1 Connect Serial Data Cable Step 2 Step 3 Step 4 Enable SBAS mode Select and set Enable Beacon (tune... corrections received over xx sec! English The table below lists the different steps you will trigger a warning message of a COM port, Bluetooth or GPRS. Once a DGPS mode is used, any accidental disruption in the flow of incoming data packets will have to go through before MobileMapper CX can ...
Getting Started Guide
Page 39
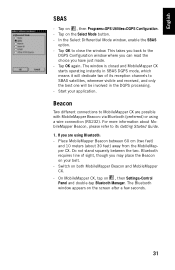
.... - For more information about 30 feet) away from the MobileMapper CX. Bluetooth requires line of its Getting Started Guide. 1. English SBAS - Tap on the Select Mode button. - Tap on , then Programs>GPS Utilities>DGPS Configuration. - Beacon Two different connections to SBAS satellites, whenever visible and received, and only the best one will be involved in...
.... - For more information about 30 feet) away from the MobileMapper CX. Bluetooth requires line of its Getting Started Guide. 1. English SBAS - Tap on the Select Mode button. - Tap on , then Programs>GPS Utilities>DGPS Configuration. - Beacon Two different connections to SBAS satellites, whenever visible and received, and only the best one will be involved in...


