

User Guide
Page 2
We take every care in this manual are properties of their respective owners. ■ MSI® is registered trademark of Micro-Star Int'l Co.,Ltd. ■ NVIDIA® is registered trademark of NVIDIA Corporation. ■ ATI® is registered trademark ...
We take every care in this manual are properties of their respective owners. ■ MSI® is registered trademark of Micro-Star Int'l Co.,Ltd. ■ NVIDIA® is registered trademark of NVIDIA Corporation. ■ ATI® is registered trademark ...
User Guide
Page 3
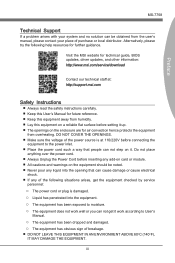
... equipment checked by service personnel: ◯ The power cord or plug is at : http://support.msi.com Safety Instructions ■ Always read the safety instructions carefully. ■ Keep this User's Manual for future reference. ■ Keep this equipment away from overheating. Do not place anything over the...system and no solution can be noted. ■ Never pour any liquid into the equipment. ◯ The equipment has been exposed to User's Manual. ◯ The equipment has been dropped and damaged. ◯ The equipment has obvious sign of the power source is damaged. ◯ ...
... equipment checked by service personnel: ◯ The power cord or plug is at : http://support.msi.com Safety Instructions ■ Always read the safety instructions carefully. ■ Keep this User's Manual for future reference. ■ Keep this equipment away from overheating. Do not place anything over the...system and no solution can be noted. ■ Never pour any liquid into the equipment. ◯ The equipment has been exposed to User's Manual. ◯ The equipment has been dropped and damaged. ◯ The equipment has obvious sign of the power source is damaged. ◯ ...

User Guide
Page 24
... of the screw holes on the mainboard are no loose metal components on a flat surface free from unnecessary debris. • To prevent damage to the manual that came with the mainboard package. For more information, please refer to the mainboard, any screws. They should line up with your computer case. The...
... of the screw holes on the mainboard are no loose metal components on a flat surface free from unnecessary debris. • To prevent damage to the manual that came with the mainboard package. For more information, please refer to the mainboard, any screws. They should line up with your computer case. The...

User Guide
Page 27
Manually check if the memory module has been locked in place by pushing the mounting clips to fit one way into the DIMM slot. 2. The memory ...
Manually check if the memory module has been locked in place by pushing the mounting clips to fit one way into the DIMM slot. 2. The memory ...
User Guide
Page 29
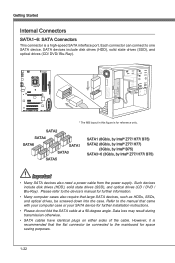
...one or more discrete video cards will use. Depending on the expansion slot(s) that will lock in place. 4. For best compatibility, MSI graphics cards are hardware lines over which devices can be clip(s) on the expansion slot(s) used, there should be installed by way of...Single Video Card Installation 1. Some video cards might require a power cable directly from the computer case. 2. Please consult your video card's manual for further instructions regarding driver installation or other special settings. 1-19 Chapter 1 MS-7758 PCI Interrupt Request Routing IRQ, or interrupt request lines...
...one or more discrete video cards will use. Depending on the expansion slot(s) that will lock in place. 4. For best compatibility, MSI graphics cards are hardware lines over which devices can be clip(s) on the expansion slot(s) used, there should be installed by way of...Single Video Card Installation 1. Some video cards might require a power cable directly from the computer case. 2. Please consult your video card's manual for further instructions regarding driver installation or other special settings. 1-19 Chapter 1 MS-7758 PCI Interrupt Request Routing IRQ, or interrupt request lines...

User Guide
Page 31
The CrossFire™ setting must be enabled to allow CrossFire™ mode to the manual that came with your video card. 4. Chapter 1 MS-7758 3. After entering the operating system (OS), right click on your video card package. ... software included in the Catalyst Control Center. Depending on the desktop and choose the "Catalyst Control Center". 5. For more details, please consult the graphics card manual. 1-21 Important A CrossFireTM system has four possible display modes: • SuperTiling • Scissor Mode • Alternate Frame Rendering • Super Anti-aliasing...
The CrossFire™ setting must be enabled to allow CrossFire™ mode to the manual that came with your video card. 4. Chapter 1 MS-7758 3. After entering the operating system (OS), right click on your video card package. ... software included in the Catalyst Control Center. Depending on the desktop and choose the "Catalyst Control Center". 5. For more details, please consult the graphics card manual. 1-21 Important A CrossFireTM system has four possible display modes: • SuperTiling • Scissor Mode • Alternate Frame Rendering • Super Anti-aliasing...
User Guide
Page 32
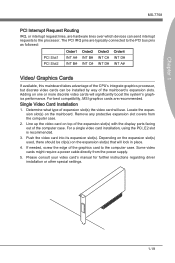
...(3Gb/s, by Intel® Z77/ H77/ B75) Important • Many SATA devices also need a power cable from the power supply. Refer to the manual that the flat connector be screwed down into the case. However, it is recommended that came with your computer case or your SATA device for.... Such devices include disk drives (HDD), solid state drives (SSD), and optical drives (CD / DVD / Blu-Ray). Please refer to the device's manual for further information. • Many computer cases also require that large SATA devices, such as HDDs, SSDs, and optical drives, be connected to one SATA...
...(3Gb/s, by Intel® Z77/ H77/ B75) Important • Many SATA devices also need a power cable from the power supply. Refer to the manual that the flat connector be screwed down into the case. However, it is recommended that came with your computer case or your SATA device for.... Such devices include disk drives (HDD), solid state drives (SSD), and optical drives (CD / DVD / Blu-Ray). Please refer to the device's manual for further information. • Many computer cases also require that large SATA devices, such as HDDs, SSDs, and optical drives, be connected to one SATA...

User Guide
Page 37
... connector connects to a TPM (Trusted Platform Module). Chapter 1 115V MS-7758 JAUD1: Front Panel Audio Connector This connector allows you to the TPM security platform manual for reference only. 1-27
... connector connects to a TPM (Trusted Platform Module). Chapter 1 115V MS-7758 JAUD1: Front Panel Audio Connector This connector allows you to the TPM security platform manual for reference only. 1-27
User Guide
Page 51
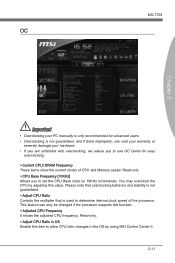
..., we advise you to allow CPU ratio changes in 10KHz increments). You may overclock the CPU by using MSI Control Center II. 2-11 This feature can void your warranty or severely damage your PC manually is only recommended for easy overclocking. ▶ Current CPU/ DRAM Frequency These items show the current clocks...
..., we advise you to allow CPU ratio changes in 10KHz increments). You may overclock the CPU by using MSI Control Center II. 2-11 This feature can void your warranty or severely damage your PC manually is only recommended for easy overclocking. ▶ Current CPU/ DRAM Frequency These items show the current clocks...
User Guide
Page 52
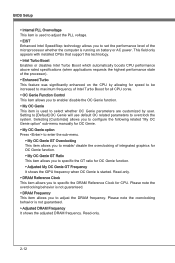
... This feature was significantly enhanced on battery or AC power. Selecting [Customize] allows you to configure the following related "My OC Genie option" sub-menu manually for OC Genie. ▶ My OC Genie option Press to enter the sub-menu. ▶ My OC Genie GT Overclocking This item allows you to...
... This feature was significantly enhanced on battery or AC power. Selecting [Customize] allows you to configure the following related "My OC Genie option" sub-menu manually for OC Genie. ▶ My OC Genie option Press to enter the sub-menu. ▶ My OC Genie GT Overclocking This item allows you to...

User Guide
Page 53
.... ▶ tRRD Specifies the active-to CAS (column address strobe). Setting to [Auto] enables DRAM timings and the following related "Advanced DRAM Configuration" sub-menu manually. ▶ Advanced DRAM Configuration Press to enter the sub-menu. ▶ Command Rate This setting controls the DRAM command rate. ▶ tCL Controls CAS latency...
.... ▶ tRRD Specifies the active-to CAS (column address strobe). Setting to [Auto] enables DRAM timings and the following related "Advanced DRAM Configuration" sub-menu manually. ▶ Advanced DRAM Configuration Press to enter the sub-menu. ▶ Command Rate This setting controls the DRAM command rate. ▶ tCL Controls CAS latency...

User Guide
Page 59
An additional partition from MSI Driver Disc in USB flash drive/ MSI Driver Disc by clicking their respective buttons. 2-19 USB HDD) for HDD Backup to back up (/restore) image to (/from ) it 's strongly recommended to (/from ) a .... ▶ Live Update This tool can detect and update your HDD partitions and re-load them when necessary. Use this utility to spend time searching manually. UTILITIES MS-7758 Chapter 2 ▶ HDD Backup Hard disk storage backups and restoring is one of your BIOS online so that you can 't back up...
An additional partition from MSI Driver Disc in USB flash drive/ MSI Driver Disc by clicking their respective buttons. 2-19 USB HDD) for HDD Backup to back up (/restore) image to (/from ) it 's strongly recommended to (/from ) a .... ▶ Live Update This tool can detect and update your HDD partitions and re-load them when necessary. Use this utility to spend time searching manually. UTILITIES MS-7758 Chapter 2 ▶ HDD Backup Hard disk storage backups and restoring is one of your BIOS online so that you can 't back up...

User Guide
Page 84
Press to remove the Disk/Volume Acceleration. Are you sure you want to manually sync the disks for avoiding data loss. WARNING: IT IS RECOMMENDED THAT YOU [ERFORM A SYNCHRONIZATION BEFORE REMOVING ACCELERATION. [ ↑↓] - Previous Menu [ SYNCHRONIZATION VERIFICATION ] SYNCHRONIZING ... some situations, you are using Maximized mode as the Acceleration mode, the data on the hard disk is complete, the status will change to sync manually. 1.
Press to remove the Disk/Volume Acceleration. Are you sure you want to manually sync the disks for avoiding data loss. WARNING: IT IS RECOMMENDED THAT YOU [ERFORM A SYNCHRONIZATION BEFORE REMOVING ACCELERATION. [ ↑↓] - Previous Menu [ SYNCHRONIZATION VERIFICATION ] SYNCHRONIZING ... some situations, you are using Maximized mode as the Acceleration mode, the data on the hard disk is complete, the status will change to sync manually. 1.


