User Guide
Page 2
....tw/index.php?func=service ◙ Contact our technical staff at: http://ocss.msi.com.tw ii We take every care in this document, but no solution can be obtained from the user's manual, please contact your system and no guarantee is given as to make changes without notice. ...Alternatively, please try the following help resources for further guidance. ◙ Visit the MSI website for PCB 1.X Date March 2009 Technical Support If a...
....tw/index.php?func=service ◙ Contact our technical staff at: http://ocss.msi.com.tw ii We take every care in this document, but no solution can be obtained from the user's manual, please contact your system and no guarantee is given as to make changes without notice. ...Alternatively, please try the following help resources for further guidance. ◙ Visit the MSI website for PCB 1.X Date March 2009 Technical Support If a...

User Guide
Page 3
... that could damage or cause electrical shock. ■ If any of the power source and adjust properly 110/220V before connecting the equipment to User's Manual. ◯ The equipment has dropped and damaged. ◯ The equipment has obvious sign of explosion if battery is incorrectly replaced. thing over the power... TEMPERATURE ABOVE 600 C (1400F), IT MAY DAMAGE THE EQUIPMENT. MS-7593 Safety Instructions ■ Always read the safety instructions carefully. ■ Keep this User's Manual for future reference. ■ Keep this equipment on a reliable flat surface before setting it .
... that could damage or cause electrical shock. ■ If any of the power source and adjust properly 110/220V before connecting the equipment to User's Manual. ◯ The equipment has dropped and damaged. ◯ The equipment has obvious sign of explosion if battery is incorrectly replaced. thing over the power... TEMPERATURE ABOVE 600 C (1400F), IT MAY DAMAGE THE EQUIPMENT. MS-7593 Safety Instructions ■ Always read the safety instructions carefully. ■ Keep this User's Manual for future reference. ■ Keep this equipment on a reliable flat surface before setting it .

User Guide
Page 26
... push it in until the golden finger on the center and will automatically close when the memory module is properly inserted in the right orientation. 2. Manually check if the memory module has been locked in place by the DIMM slot clips at each side of the DIMM slot will only fit...
... push it in until the golden finger on the center and will automatically close when the memory module is properly inserted in the right orientation. 2. Manually check if the memory module has been locked in place by the DIMM slot clips at each side of the DIMM slot will only fit...

User Guide
Page 36
▍ Hardware Setup TPM Module connector: JTPM1 (optional) This connector connects to the TPM security platform manual for more details and usages. 2.34V.36S..3tS8aVe.n15Prd0iVaob1.NlwyP2I1o.eRopG4rwoPQ.rwGeionreurornudnd 1.L3P.L5CP.LCC7P.loLRC9cP.eLka1CsPd1e1ad.CtL3drPea.dLsdCrPsedasCr&edsFdsd&sraraedt&amsasdpteaa&intpa0dinap1tian2pin3 2-20 Please refer to a TPM (Trusted Platform Module) module (optional).
▍ Hardware Setup TPM Module connector: JTPM1 (optional) This connector connects to the TPM security platform manual for more details and usages. 2.34V.36S..3tS8aVe.n15Prd0iVaob1.NlwyP2I1o.eRopG4rwoPQ.rwGeionreurornudnd 1.L3P.L5CP.LCC7P.loLRC9cP.eLka1CsPd1e1ad.CtL3drPea.dLsdCrPsedasCr&edsFdsd&sraraedt&amsasdpteaa&intpa0dinap1tian2pin3 2-20 Please refer to a TPM (Trusted Platform Module) module (optional).
User Guide
Page 42
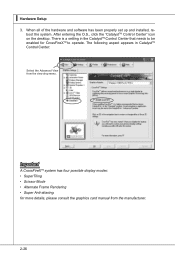
for CrossFireXTM to be enabled for more details, please consult the graphics card manual from the view drop menu. The following aspect appears in the CatalystTM Control Center that needs to operate. After entering the O.S., click the "CatalystTM Control ...
for CrossFireXTM to be enabled for more details, please consult the graphics card manual from the view drop menu. The following aspect appears in the CatalystTM Control Center that needs to operate. After entering the O.S., click the "CatalystTM Control ...
User Guide
Page 44
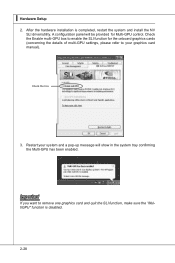
... install the NV SLI driver/utility. A configuration panel will show in the system tray confirming the Multi-GPU has been enabled. Restart your graphics card manual). Check the Enable multi-GPU box to enable the SLI function for Multi-GPU control. After the hardware installation is disabled. 2-28
... install the NV SLI driver/utility. A configuration panel will show in the system tray confirming the Multi-GPU has been enabled. Restart your graphics card manual). Check the Enable multi-GPU box to enable the SLI function for Multi-GPU control. After the hardware installation is disabled. 2-28

User Guide
Page 67
... less the clock cycles, the faster the DRAM performance. ▶ tRP This setting controls the number of the L3 cache and memory controller). Setting to [Manual] allows you to set advanced memory timings. ▶ Memory Ratio This item allows you to run at 1N (N=clock cycles) rate. MS-7593 ▶ 1N...
... less the clock cycles, the faster the DRAM performance. ▶ tRP This setting controls the number of the L3 cache and memory controller). Setting to [Manual] allows you to set advanced memory timings. ▶ Memory Ratio This item allows you to run at 1N (N=clock cycles) rate. MS-7593 ▶ 1N...

User Guide
Page 103
In the "System Warning" block, you can select desired values for manual overclocking. Click the arrow sign and the drop-down menu will appear below the button, then select a value. The system will appear. Simply click the ...
In the "System Warning" block, you can select desired values for manual overclocking. Click the arrow sign and the drop-down menu will appear below the button, then select a value. The system will appear. Simply click the ...


