
User Manual
Page 1
Wind Top AE1920 All-in-One (AIO) PC MS-A923 (V1.X) System G52-A9231XA
Wind Top AE1920 All-in-One (AIO) PC MS-A923 (V1.X) System G52-A9231XA

User Manual
Page 2
▍ Preface ▍ table of contents Copyright Notice iii Trademarks iii Revision History iii Upgrade and Warranty iv Acquisition of Replaceable Parts iv Technical Support iv Green Product Features v Environmental Policy v Safety Instructions vi CE Conformity viii FCC-B Radio Frequency Interference Statement viii WEEE Statement ix 1. System Operations 3-1 System Booting Setup for the first time 3-2 Creating System Recovery Disk 3-3 Touch Panel Calibration (Only for single-touch model 3-9 Network Connection under Windows 3-11 RALINK Wireless LAN Connection (Optional 3-16 ...
▍ Preface ▍ table of contents Copyright Notice iii Trademarks iii Revision History iii Upgrade and Warranty iv Acquisition of Replaceable Parts iv Technical Support iv Green Product Features v Environmental Policy v Safety Instructions vi CE Conformity viii FCC-B Radio Frequency Interference Statement viii WEEE Statement ix 1. System Operations 3-1 System Booting Setup for the first time 3-2 Creating System Recovery Disk 3-3 Touch Panel Calibration (Only for single-touch model 3-9 Network Connection under Windows 3-11 RALINK Wireless LAN Connection (Optional 3-16 ...

User Manual
Page 3
MSI® is a registered trademark of MICRO-STAR INTERNATIONAL. Our products are the properties of their respective owners. MS-A923 Copyright Notice The material in the ...
MSI® is a registered trademark of MICRO-STAR INTERNATIONAL. Our products are the properties of their respective owners. MS-A923 Copyright Notice The material in the ...

User Manual
Page 4
... product has been discontinued, depending on the official regulations declared at the time. ■ Please contact the manufacturer via http://ocss.msi.com/ iv For any further information about the acquisition of purchase or local distributor. Alternatively, please try the following help resources for... further guidance. ◙ Visit the MSI website for any component of the product if you contact the authorized dealer or service center for FAQ, technical guide, BIOS updates...
... product has been discontinued, depending on the official regulations declared at the time. ■ Please contact the manufacturer via http://ocss.msi.com/ iv For any further information about the acquisition of purchase or local distributor. Alternatively, please try the following help resources for... further guidance. ◙ Visit the MSI website for any component of the product if you contact the authorized dealer or service center for FAQ, technical guide, BIOS updates...

User Manual
Page 5
.... ◙ Users should contact the local authorized point of collection for recycling and disposing of their end-of-life products. ◙ Visit the MSI website and locate a nearby distributor for further recycling information: http://www.msi.com/index.php?func=html&name=service_ worldwide. ◙ Users may also reach us at gpgreenteam...
.... ◙ Users should contact the local authorized point of collection for recycling and disposing of their end-of-life products. ◙ Visit the MSI website and locate a nearby distributor for further recycling information: http://www.msi.com/index.php?func=html&name=service_ worldwide. ◙ Users may also reach us at gpgreenteam...

User Manual
Page 6
Lay this equipment away from humidity and high temperature. NOTE: The maximum operating temperature is used for air convection and to the equipment. ◙ Always disconnect the AC power cord or switch the wall socket off if the equipment would be left unused for future reference. Keep the User's Guide that the power voltage is within its safety range and has been adjusted properly to the value of 100~240V before installing any add-on card or module to prevent the equipment from the plug. Keep this equipment on a reliable flat surface before setting it up. ◙ Make sure that ...
Lay this equipment away from humidity and high temperature. NOTE: The maximum operating temperature is used for air convection and to the equipment. ◙ Always disconnect the AC power cord or switch the wall socket off if the equipment would be left unused for future reference. Keep the User's Guide that the power voltage is within its safety range and has been adjusted properly to the value of 100~240V before installing any add-on card or module to prevent the equipment from the plug. Keep this equipment on a reliable flat surface before setting it up. ◙ Make sure that ...

User Manual
Page 7
When installing the coaxial cable to the TV Tuner, it is incorrectly replaced. Cable distribution system should be grounded (earthed) in particular Section 820.93, Grounding of Outer Conductive Shield of procedures other than those specified is damaged. ◙ Liquid has penetrated into the opening that could damage or cause electrical shock. If any liquid into the equipment. ◙ The equipment has been exposed to moisture. ◙ The equipment does not work well or you can not get it . vii Place the power cord in a way that the metal shield is reliably connected to user's ...
When installing the coaxial cable to the TV Tuner, it is incorrectly replaced. Cable distribution system should be grounded (earthed) in particular Section 820.93, Grounding of Outer Conductive Shield of procedures other than those specified is damaged. ◙ Liquid has penetrated into the opening that could damage or cause electrical shock. If any liquid into the equipment. ◙ The equipment has been exposed to moisture. ◙ The equipment does not work well or you can not get it . vii Place the power cord in a way that the metal shield is reliably connected to user's ...

User Manual
Page 8
Notice 1 The changes or modifications not expressly approved by one or more of the measures listed below: ■ Reorient or relocate the receiving antenna. ■ Increase the separation between the equipment and receiver. ■ Connect the equipment into an outlet on a circuit different from that to which can radiate radio frequency energy and, if not installed and used in a residential installation. This equipment generates, uses and can be used in accordance with the emission limits. Notice 2 Shielded interface cables and AC power cord, if any interference ...
Notice 1 The changes or modifications not expressly approved by one or more of the measures listed below: ■ Reorient or relocate the receiving antenna. ■ Increase the separation between the equipment and receiver. ■ Connect the equipment into an outlet on a circuit different from that to which can radiate radio frequency energy and, if not installed and used in a residential installation. This equipment generates, uses and can be used in accordance with the emission limits. Notice 2 Shielded interface cables and AC power cord, if any interference ...

User Manual
Page 13
Chapter 1 Overview Wind Top AE1920 is accompanied with the best computer features, such as instant message, low acoustics, energy saving, and 802.11 b/g/n wireless internet capability so you may roam freely in design, selecting a stylish appearance with a mirror screen, which displays the simplicity of modern individualism and the comfort of cyberspace. Furthermore, it is integrated in the realm of home.
Chapter 1 Overview Wind Top AE1920 is accompanied with the best computer features, such as instant message, low acoustics, energy saving, and 802.11 b/g/n wireless internet capability so you may roam freely in design, selecting a stylish appearance with a mirror screen, which displays the simplicity of modern individualism and the comfort of cyberspace. Furthermore, it is integrated in the realm of home.

User Manual
Page 14
▍ Overview Packing Contents Wind Top Series AC/DC Adapter AC Power Cord Driver/Utility Disk User Manual & Quick Guide LCD Display Wiper Keyboard (Optional) Mouse (Optional) Stylus (Optional) * Please contact us immediately if any of the items is damaged or missing. * The illustrations are for reference only and your packing contents may slightly vary depending on the model you purchased. 1-2
▍ Overview Packing Contents Wind Top Series AC/DC Adapter AC Power Cord Driver/Utility Disk User Manual & Quick Guide LCD Display Wiper Keyboard (Optional) Mouse (Optional) Stylus (Optional) * Please contact us immediately if any of the items is damaged or missing. * The illustrations are for reference only and your packing contents may slightly vary depending on the model you purchased. 1-2

User Manual
Page 15
The 18.5-inch TFT LCD display is off when the AIO PC is with stereo system and Hi-Fi function supported. 5 Power Indicator - The built-in sleep mode and turns off . 1-3 The power indicator illuminates in green when the AIO PC is on, illuminates in orange when the AIO PC is in stereo speakers deliver high quality sound blaster with an optimal resolution of 1366 X 768 and standard proportion of 16:9 widescreen. 4 Stereo Speakers - System Overview Front View 1 3 MS-A923 2 4 4 5 1 Microphone - The built-in webcam with the microphone can be used for picture taking, video ...
The 18.5-inch TFT LCD display is off when the AIO PC is with stereo system and Hi-Fi function supported. 5 Power Indicator - The built-in sleep mode and turns off . 1-3 The power indicator illuminates in green when the AIO PC is on, illuminates in orange when the AIO PC is in stereo speakers deliver high quality sound blaster with an optimal resolution of 1366 X 768 and standard proportion of 16:9 widescreen. 4 Stereo Speakers - System Overview Front View 1 3 MS-A923 2 4 4 5 1 Microphone - The built-in webcam with the microphone can be used for picture taking, video ...

User Manual
Page 16
▍ Overview Rear View 1 1 2 1 4 3 5 1 10 6 7 89 Important We suggest that you connect the AC/DC adapter to your AIO PC first and then connect the AC power cord to the socket-outlet for safety concerns. 1-4
▍ Overview Rear View 1 1 2 1 4 3 5 1 10 6 7 89 Important We suggest that you connect the AC/DC adapter to your AIO PC first and then connect the AC power cord to the socket-outlet for safety concerns. 1-4

User Manual
Page 17
The built-in devices like digital cameras, MP3 players, mobile phones and PDAs. Use this stand to avoid cable spaghetti when connecting devices. 6 Power Jack - Route the cables through this jack. Power supplied through the cable routing hole to position your home entertainment. (Blu-ray is integrated for attaching USB devices such as XD (eXtreme Digital), SD (Secure Digital), SDHC (SD High Capacity), MS (Memory Stick), MS Pro (Memory Stick Pro) or MMC (Multi-Media Card) cards that the supported memory cards may support various types of memory card, such as mouse, keyboard, ...
The built-in devices like digital cameras, MP3 players, mobile phones and PDAs. Use this stand to avoid cable spaghetti when connecting devices. 6 Power Jack - Route the cables through this jack. Power supplied through the cable routing hole to position your home entertainment. (Blu-ray is integrated for attaching USB devices such as XD (eXtreme Digital), SD (Secure Digital), SDHC (SD High Capacity), MS (Memory Stick), MS Pro (Memory Stick Pro) or MMC (Multi-Media Card) cards that the supported memory cards may support various types of memory card, such as mouse, keyboard, ...

User Manual
Page 18
LAN link is provided for headphones or speakers. 1-6 This connector is established. Yellow Green/ Orange LED Left Right Color Yellow Green Orange LED State Off On (steady state) On (brighter & pulsing) Off On On Condition LAN link is selected. 9 Microphone Jack (Pink) - You can connect a network cable to the Local Area Network (LAN). ▍ Overview 8 RJ-45 LAN Jack - The computer is communicating with another computer on the LAN. 10 Mbit/sec data rate is selected. 100 Mbit/sec data rate is selected. 1000 Mbit/sec data rate is not established. The standard RJ-45 ...
LAN link is provided for headphones or speakers. 1-6 This connector is established. Yellow Green/ Orange LED Left Right Color Yellow Green Orange LED State Off On (steady state) On (brighter & pulsing) Off On On Condition LAN link is selected. 9 Microphone Jack (Pink) - You can connect a network cable to the Local Area Network (LAN). ▍ Overview 8 RJ-45 LAN Jack - The computer is communicating with another computer on the LAN. 10 Mbit/sec data rate is selected. 100 Mbit/sec data rate is selected. 1000 Mbit/sec data rate is not established. The standard RJ-45 ...

User Manual
Page 19
Press the eject button to open the optical disk drive. 3 Eject Hole - A DVD Super-Multi drive is integrated for further information and please be noted that usually used in card reader may vary without notice. 1-7 Contact the local dealer for your home entertainment. (Blu-ray is optional.) 2 Eject Button - Insert a thin, straight object (such as XD (eXtreme Digital), SD (Secure Digital), SDHC (SD High Capacity), MS (Memory Stick), MS Pro (Memory Stick Pro) or MMC (Multi-Media Card) cards that the supported memory cards may support various types of memory card, such as a paper ...
Press the eject button to open the optical disk drive. 3 Eject Hole - A DVD Super-Multi drive is integrated for further information and please be noted that usually used in card reader may vary without notice. 1-7 Contact the local dealer for your home entertainment. (Blu-ray is optional.) 2 Eject Button - Insert a thin, straight object (such as XD (eXtreme Digital), SD (Secure Digital), SDHC (SD High Capacity), MS (Memory Stick), MS Pro (Memory Stick Pro) or MMC (Multi-Media Card) cards that the supported memory cards may support various types of memory card, such as a paper ...

User Manual
Page 20
▍ Overview 5 USB Ports - The ventilator on and off. 8 MENU Button - Press the power button to turn the system on the enclosure is provided for air convection and to prevent the equipment from overheating. This button indicates the cursor movement or OSD manual selection in decremental values. 10 AUTO Button - Press this button to view the video mode menu or exit the submenu. 1-8 Left Button - The USB (Universal Serial Bus) port is used for attaching USB devices such as mouse, keyboard, printer, scanner, camera, PDA or other USB-compatible devices. 6 Ventilator - Press ...
▍ Overview 5 USB Ports - The ventilator on and off. 8 MENU Button - Press the power button to turn the system on the enclosure is provided for air convection and to prevent the equipment from overheating. This button indicates the cursor movement or OSD manual selection in decremental values. 10 AUTO Button - Press this button to view the video mode menu or exit the submenu. 1-8 Left Button - The USB (Universal Serial Bus) port is used for attaching USB devices such as mouse, keyboard, printer, scanner, camera, PDA or other USB-compatible devices. 6 Ventilator - Press ...

User Manual
Page 21
MS-A923 Mainboard Specifications Processor ■ Intel® Atom™ Single/ Dual-Core Processor D425/ D525 (Optional) ■ CPU Frequency 1.8 GHz Chipset ■ Intel® NM10 Express Chipset Memory ■ 2 DDR3 800MHz SO-DIMM slots ■ Supports the maximum of 4GB LAN ■ Gigabit Fast Ethernet by Realtek® RTL8111C GbE controller Audio ■ Chip integrated by Realtek® ALC888 ■ Compliant with Azalia 1.0 spec Graphics ■ ATI® Park-LP, M2 package size, DDR3, 512MB VRAM (Optional) ■ Realtek® RTD2382-GR multi-function display controller ...
MS-A923 Mainboard Specifications Processor ■ Intel® Atom™ Single/ Dual-Core Processor D425/ D525 (Optional) ■ CPU Frequency 1.8 GHz Chipset ■ Intel® NM10 Express Chipset Memory ■ 2 DDR3 800MHz SO-DIMM slots ■ Supports the maximum of 4GB LAN ■ Gigabit Fast Ethernet by Realtek® RTL8111C GbE controller Audio ■ Chip integrated by Realtek® ALC888 ■ Compliant with Azalia 1.0 spec Graphics ■ ATI® Park-LP, M2 package size, DDR3, 512MB VRAM (Optional) ■ Realtek® RTD2382-GR multi-function display controller ...

User Manual
Page 22
▍ Overview System Specifications Display ■ 18.5" TFT LCD display with an optimal resolution of 1366 X 768 ■ Standard proportion of 16:9 widescreen Rear Panel I/O ■ 1 power jack ■ 4 USB ports ■ 1 RJ-45 LAN jack ■ 1 microphone jack ■ 1 headphone/ speaker jack Communication ■ Wired LAN: supported by Realtek® RTL8111C GbE controller ■ Wireless LAN: supported through Mini PCI-E WLAN module (Optional) Storage ■ Hard Disk Drive: 2.5", SATAII ■ Optical Disk Drive: Slim DVD Super Multi ■ Card Reader: all-in-one (SD, SD ...
▍ Overview System Specifications Display ■ 18.5" TFT LCD display with an optimal resolution of 1366 X 768 ■ Standard proportion of 16:9 widescreen Rear Panel I/O ■ 1 power jack ■ 4 USB ports ■ 1 RJ-45 LAN jack ■ 1 microphone jack ■ 1 headphone/ speaker jack Communication ■ Wired LAN: supported by Realtek® RTL8111C GbE controller ■ Wireless LAN: supported through Mini PCI-E WLAN module (Optional) Storage ■ Hard Disk Drive: 2.5", SATAII ■ Optical Disk Drive: Slim DVD Super Multi ■ Card Reader: all-in-one (SD, SD ...
User Manual
Page 23
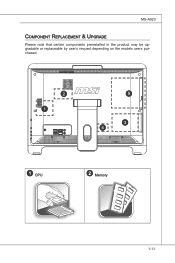
MS-A923 Component Replacement & Upgrade Please note that certain components preinstalled in the product may be upgradable or replaceable by user's request depending on the models users purchased. 2 1 5 3 4 1 CPU 2 Memory 1-11
MS-A923 Component Replacement & Upgrade Please note that certain components preinstalled in the product may be upgradable or replaceable by user's request depending on the models users purchased. 2 1 5 3 4 1 CPU 2 Memory 1-11
User Manual
Page 24
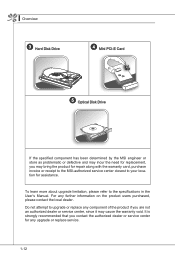
...an authorized dealer or service center, since it may bring the product for repair along with the warranty card, purchase invoice or receipt to the MSI-authorized service center closest to the specifications in the User's Manual. It is strongly recommended that you contact the authorized dealer or service center ... or replace service. 1-12 ▍ Overview 3 Hard Disk Drive 4 Mini PCI-E Card 5 Optical Disk Drive If the specified component has been determined by the MSI engineer or store as problematic or defective and may incur the need for replacement, you may cause the warranty void.
...an authorized dealer or service center, since it may bring the product for repair along with the warranty card, purchase invoice or receipt to the MSI-authorized service center closest to the specifications in the User's Manual. It is strongly recommended that you contact the authorized dealer or service center ... or replace service. 1-12 ▍ Overview 3 Hard Disk Drive 4 Mini PCI-E Card 5 Optical Disk Drive If the specified component has been determined by the MSI engineer or store as problematic or defective and may incur the need for replacement, you may cause the warranty void.
