
User Manual
Page 27
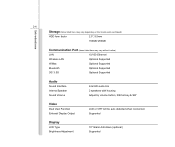
Supported Display LCD Type Brightness Adjustment 10" Glare/ Anti-Glare (optional) Supported Introductions 2-6 Storage (Items listed here may vary depending on the model users purchased) HDD form ... Sound Interface Internal Speaker Sound Volume Intel HD audio link 2 speakers with housing Adjust by volume button, K/B hot-key & SW Video Dual View Function External Display Output LCD or CRT will be auto detected when connected.
Supported Display LCD Type Brightness Adjustment 10" Glare/ Anti-Glare (optional) Supported Introductions 2-6 Storage (Items listed here may vary depending on the model users purchased) HDD form ... Sound Interface Internal Speaker Sound Volume Intel HD audio link 2 speakers with housing Adjust by volume button, K/B hot-key & SW Video Dual View Function External Display Output LCD or CRT will be auto detected when connected.
User Manual
Page 36
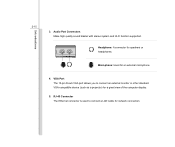
Audio Port Connectors Make high quality sound blaster with stereo system and Hi-Fi function supported. VGA Port The 15-pin D-sub VGA port allows you to connect a LAN cable for a great view of the computer display. 5. RJ-45 Connector The Ethernet connector is used to connect an external monitor or other standard VGA-compatible device (such as a projector) for network connection. Microphone: Used for speakers or headphones. Headphone: A connector for an external microphone. 4. Introductions 2-15 3.
Audio Port Connectors Make high quality sound blaster with stereo system and Hi-Fi function supported. VGA Port The 15-pin D-sub VGA port allows you to connect a LAN cable for a great view of the computer display. 5. RJ-45 Connector The Ethernet connector is used to connect an external monitor or other standard VGA-compatible device (such as a projector) for network connection. Microphone: Used for speakers or headphones. Headphone: A connector for an external microphone. 4. Introductions 2-15 3.

User Manual
Page 50
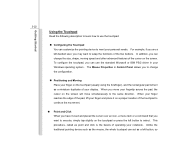
... activate the ECO Power Saving function under battery mode: 1. The lower brightness level of the display panel. Low High Display Panel Brightness Showing the brightness level of the display panel, the better power saving performance achieved. 3-9 ECO Power Saving Function (Optional Supported) Getting Started While the AC power is disconnected, read the instructions...
... activate the ECO Power Saving function under battery mode: 1. The lower brightness level of the display panel. Low High Display Panel Brightness Showing the brightness level of the display panel, the better power saving performance achieved. 3-9 ECO Power Saving Function (Optional Supported) Getting Started While the AC power is disconnected, read the instructions...
User Manual
Page 51
Power Options in Windows OS allow you to control the power management features of your personal needs 4. Then select a power plan that meets your display, hard drive, and battery. Then click on the System and Maintenance. 2. Follow the instructions below to adjust the power management settings in response to a command .../hibernate mode after a period of following: Š the power button, Š the mouse, Š the keyboard. The computer should be energy efficient, turn off your display or set your computer. 5.
Power Options in Windows OS allow you to control the power management features of your personal needs 4. Then select a power plan that meets your display, hard drive, and battery. Then click on the System and Maintenance. 2. Follow the instructions below to adjust the power management settings in response to a command .../hibernate mode after a period of following: Š the power button, Š the mouse, Š the keyboard. The computer should be energy efficient, turn off your display or set your computer. 5.
User Manual
Page 60
... Logo key ( ) and one Application Logo key ( ) on the keyboard, which are used to your Windows manual or online help. „ [Fn] Key + Switch the display output mode between the LCD, external monitor and both. Enable or disable the touchpad function. + Decrease the LCD brightness. + Increase the LCD brightness. + Decrease the...
... Logo key ( ) and one Application Logo key ( ) on the keyboard, which are used to your Windows manual or online help. „ [Fn] Key + Switch the display output mode between the LCD, external monitor and both. Enable or disable the touchpad function. + Decrease the LCD brightness. + Increase the LCD brightness. + Decrease the...
User Manual
Page 63
... want to change the size, shape, moving speed and other advanced features of the two buttons. This procedure, called as a miniature duplicate of operating your display. When you are a left button to the same direction. For example, if you move simultaneously to select.
... want to change the size, shape, moving speed and other advanced features of the two buttons. This procedure, called as a miniature duplicate of operating your display. When you are a left button to the same direction. For example, if you move simultaneously to select.
User Manual
Page 68
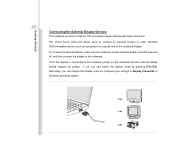
... connect an external monitor or other standard VGA-compatible device (such as a projector) for connecting a larger display with higher resolution. Getting Started 3-27 Connecting the External Display Devices This notebook provides a VGA port for a great view of Windows operating system. The 15-pin D-...sub VGA port allows users to the notebook. Alternately, you can change the display mode by configuring the settings in Display Properties of the notebook display. Once the display is connected to the notebook, power on the notebook and the external...
... connect an external monitor or other standard VGA-compatible device (such as a projector) for connecting a larger display with higher resolution. Getting Started 3-27 Connecting the External Display Devices This notebook provides a VGA port for a great view of Windows operating system. The 15-pin D-...sub VGA port allows users to the notebook. Alternately, you can change the display mode by configuring the settings in Display Properties of the notebook display. Once the display is connected to the notebook, power on the notebook and the external...
User Manual
Page 80
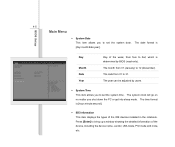
... users. Š System Time This item allows you to set the system time. The time format is [hour:minute:second]. Š IDE Information This item displays the types of the device, including the device name, vendor, LBA mode, PIO mode and more, etc.
... users. Š System Time This item allows you to set the system time. The time format is [hour:minute:second]. Š IDE Information This item displays the types of the device, including the device name, vendor, LBA mode, PIO mode and more, etc.


