User Manual
Page 2
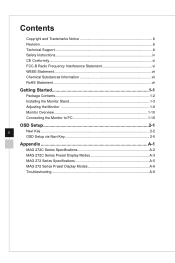
... Support iii Safety Instructions iv CE Conformity vi FCC-B Radio Frequency Interference Statement vi WEEE Statement vii Chemical Substances Information vii RoHS Statement vii Getting Started 1-1 Package Contents 1-2 Installing the Monitor Stand 1-3 Adjusting the Monitor 1-8 Monitor Overview 1-10 Connecting the Monitor to PC 1-16 OSD Setup 2-1 ii Navi Key 2-2 OSD Setup via Navi Key 2-5 Appendix A-1 MAG 272C Series Specifications A-2 MAG 272C Series Preset Display Modes A-3 MAG 272 Series Specifications A-5 MAG 272 Series Preset Display Modes A-6 Troubleshooting...
... Support iii Safety Instructions iv CE Conformity vi FCC-B Radio Frequency Interference Statement vi WEEE Statement vii Chemical Substances Information vii RoHS Statement vii Getting Started 1-1 Package Contents 1-2 Installing the Monitor Stand 1-3 Adjusting the Monitor 1-8 Monitor Overview 1-10 Connecting the Monitor to PC 1-16 OSD Setup 2-1 ii Navi Key 2-2 OSD Setup via Navi Key 2-5 Appendix A-1 MAG 272C Series Specifications A-2 MAG 272C Series Preset Display Modes A-3 MAG 272 Series Specifications A-5 MAG 272 Series Preset Display Modes A-6 Troubleshooting...
User Manual
Page 4
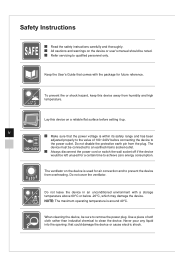
... disconnect the power cord or switch the wall socket off if the device would be sure to remove the power plug. Do not cover the ventilator. Do not leave the device in an unconditioned environment with the package for a certain time to prevent the device from overheating. iv ◙◙ Make sure that the power voltage is used for air convection...
... disconnect the power cord or switch the wall socket off if the device would be sure to remove the power plug. Do not cover the ventilator. Do not leave the device in an unconditioned environment with the package for a certain time to prevent the device from overheating. iv ◙◙ Make sure that the power voltage is used for air convection...
User Manual
Page 5
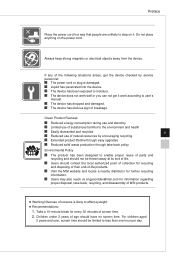
...checked by encouraging recycling v ◙◙ Extended product lifetime through easy upgrades ◙◙ Reduced solid waste production through take -back, recycling, and disassembly of breakage. If any of natural resources by service personnel: ◙◙ The power cord or plug is likely to step on the power cord. Green Product Features ◙◙ Reduced energy consumption during use and stand...moisture. ◙◙ The device does not work according to less than one hour per day. Children under 2 years of screen time. 2. Take a 10-minute break for ...
...checked by encouraging recycling v ◙◙ Extended product lifetime through easy upgrades ◙◙ Reduced solid waste production through take -back, recycling, and disassembly of breakage. If any of natural resources by service personnel: ◙◙ The power cord or plug is likely to step on the power cord. Green Product Features ◙◙ Reduced energy consumption during use and stand...moisture. ◙◙ The device does not work according to less than one hour per day. Children under 2 years of screen time. 2. Take a 10-minute break for ...
User Manual
Page 6
... equipment and receiver. ■■ Connect the equipment into an outlet on a circuit different from that to which can radiate radio frequency energy and, if not installed and used in order to comply with the instruction manual, may cause harmful interference to operate the equipment. This device complies with the requirements set out in accordance with the...
... equipment and receiver. ■■ Connect the equipment into an outlet on a circuit different from that to which can radiate radio frequency energy and, if not installed and used in order to comply with the instruction manual, may cause harmful interference to operate the equipment. This device complies with the requirements set out in accordance with the...

User Manual
Page 13
Align the latches of the stand to secure the base. 1 2 1-5 3 IMPORTANT The holes for installing the stand can be also used for proper wall mount kit. Please contact your dealer for wall mount. Connect the base to the stand and tighten the base screw to the monitor. 2. Getting Started hh MAG272CR/ MAG272CQR/ MAG272CRX 1. Tighten the stand with the stand screws. 3.
Align the latches of the stand to secure the base. 1 2 1-5 3 IMPORTANT The holes for installing the stand can be also used for proper wall mount kit. Please contact your dealer for wall mount. Connect the base to the stand and tighten the base screw to the monitor. 2. Getting Started hh MAG272CR/ MAG272CQR/ MAG272CRX 1. Tighten the stand with the stand screws. 3.

User Manual
Page 15
Align the latches of the stand to secure the base. 1 2 1-7 3 IMPORTANT The holes for installing the stand can be also used for proper wall mount kit. Connect the base to the stand and tighten the base screw to the monitor. 2. Please contact your dealer for wall mount. Tighten the stand with the stand screws. 3. Getting Started hh MAG272R/ MAG272QP/ MAG272QR 1.
Align the latches of the stand to secure the base. 1 2 1-7 3 IMPORTANT The holes for installing the stand can be also used for proper wall mount kit. Connect the base to the stand and tighten the base screw to the monitor. 2. Please contact your dealer for wall mount. Tighten the stand with the stand screws. 3. Getting Started hh MAG272R/ MAG272QP/ MAG272QR 1.

User Manual
Page 16
Adjusting the Monitor This monitor is designed to maximize your viewing comfort with its adjustment capabilities such as tilt and lift. hh MAG272C -5 O 20O 1-8 hh MAG272CR/ MAG272CQR/ MAG272CRX -5 O 20O 130mm IMPORTANT Avoid touching the display panel when adjusting the monitor.
Adjusting the Monitor This monitor is designed to maximize your viewing comfort with its adjustment capabilities such as tilt and lift. hh MAG272C -5 O 20O 1-8 hh MAG272CR/ MAG272CQR/ MAG272CRX -5 O 20O 130mm IMPORTANT Avoid touching the display panel when adjusting the monitor.

User Manual
Page 19
IMPORTANT Check the package for use. To PC To Monitor 9 Navi Key 10 Kensington Lock 1-11 Getting Started 1 Power Button 2 Power Jack 3 DisplayPort 4 HDMI Port 5 USB-C Port This port can send simultaneously video signal and power stream up to the PC and monitor. Once this cable is connected, the USB Type A Downstream Ports on the monitor will be ready for USB Upstream Cable and connect it to PD 5V/3A. It doesn't support data transmission function. 6 Headphone...
IMPORTANT Check the package for use. To PC To Monitor 9 Navi Key 10 Kensington Lock 1-11 Getting Started 1 Power Button 2 Power Jack 3 DisplayPort 4 HDMI Port 5 USB-C Port This port can send simultaneously video signal and power stream up to the PC and monitor. Once this cable is connected, the USB Type A Downstream Ports on the monitor will be ready for USB Upstream Cable and connect it to PD 5V/3A. It doesn't support data transmission function. 6 Headphone...

User Manual
Page 21
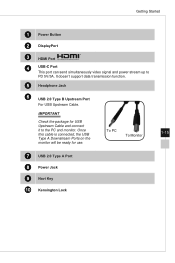
IMPORTANT Check the package for use. Getting Started 1 Power Button 2 Power Jack 3 HDMI Port 4 DisplayPort 5 USB-C Port This port can send simultaneously video signal and power stream up to the PC and monitor. To PC To Monitor 9 Navi Key 10 Kensington Lock 1-13 Once this cable is connected, the USB Type A Downstream Ports on the monitor will be ready for USB Upstream Cable and connect it to PD 5V/3A. It doesn't support data transmission function. 6 Headphone Jack 7 USB 3.2 Gen1 Type A Port 8 USB 3.2 Gen1 Type B Upstream Port For USB Upstream Cable.
IMPORTANT Check the package for use. Getting Started 1 Power Button 2 Power Jack 3 HDMI Port 4 DisplayPort 5 USB-C Port This port can send simultaneously video signal and power stream up to the PC and monitor. To PC To Monitor 9 Navi Key 10 Kensington Lock 1-13 Once this cable is connected, the USB Type A Downstream Ports on the monitor will be ready for USB Upstream Cable and connect it to PD 5V/3A. It doesn't support data transmission function. 6 Headphone Jack 7 USB 3.2 Gen1 Type A Port 8 USB 3.2 Gen1 Type B Upstream Port For USB Upstream Cable.
User Manual
Page 23
It doesn't support data transmission function. 5 Headphone Jack 6 USB 2.0 Type B Upstream Port For USB Upstream Cable. To PC To Monitor 7 USB 2.0 Type A Port 8 Power Jack 9 Navi Key 10 Kensington Lock 1-15 IMPORTANT Check the package for use. Getting Started 1 Power Button 2 DisplayPort 3 HDMI Port 4 USB-C Port This port can send simultaneously video signal and power stream up to the PC and monitor. Once this cable is connected, the USB Type A Downstream Ports on the monitor will be ready for USB Upstream Cable and connect it to PD 5V/3A.
It doesn't support data transmission function. 5 Headphone Jack 6 USB 2.0 Type B Upstream Port For USB Upstream Cable. To PC To Monitor 7 USB 2.0 Type A Port 8 Power Jack 9 Navi Key 10 Kensington Lock 1-15 IMPORTANT Check the package for use. Getting Started 1 Power Button 2 DisplayPort 3 HDMI Port 4 USB-C Port This port can send simultaneously video signal and power stream up to the PC and monitor. Once this cable is connected, the USB Type A Downstream Ports on the monitor will be ready for USB Upstream Cable and connect it to PD 5V/3A.

User Manual
Page 24
Turn off your computer. 3. Plug the power cord into the electrical outlet. (Figure B) 5. Connect the power cord to PC hh MAG272C/ MAG272CR/ MAG272CQR/ MAG272CRX 1. A B 1-16 C Connecting the Monitor to the monitor power jack. (Figure A) 4. Turn on the computer then monitor will auto detect signal source. Power on the monitor. (Figure C) 6. Connect the HDMI/DisplayPort cable from the monitor to your computer. 2.
Turn off your computer. 3. Plug the power cord into the electrical outlet. (Figure B) 5. Connect the power cord to PC hh MAG272C/ MAG272CR/ MAG272CQR/ MAG272CRX 1. A B 1-16 C Connecting the Monitor to the monitor power jack. (Figure A) 4. Turn on the computer then monitor will auto detect signal source. Power on the monitor. (Figure C) 6. Connect the HDMI/DisplayPort cable from the monitor to your computer. 2.

User Manual
Page 25
Turn on the computer then monitor will auto detect signal source. Connect the HDMI/DisplayPort cable from the monitor to the monitor power jack.(Figure B) 5. B C A 1-17 D Getting Started hh MAG272/ MAG272R/ MAG272QP/ MAG272QR 1. Assemble the monitor power adapter & power cord.(Figure A) 4. Power on the monitor.(Figure D) 7. Connect the power adapter to your computer. 2. Plug the power cord into the electrical outlet.(Figure C) 6. Turn off your computer. 3.
Turn on the computer then monitor will auto detect signal source. Connect the HDMI/DisplayPort cable from the monitor to the monitor power jack.(Figure B) 5. B C A 1-17 D Getting Started hh MAG272/ MAG272R/ MAG272QP/ MAG272QR 1. Assemble the monitor power adapter & power cord.(Figure A) 4. Power on the monitor.(Figure D) 7. Connect the power adapter to your computer. 2. Plug the power cord into the electrical outlet.(Figure C) 6. Turn off your computer. 3.
User Manual
Page 31
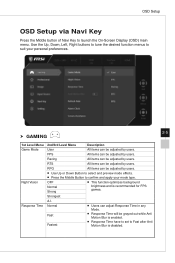
...;■ This function optimizes background brightness and is disabled. RPG All items can be grayed out while Anti Motion Blur is enabled. Fast ■■ Response Time will be adjusted by users. ■■ Use Up or Down Button to select and preview mode effects. ■■ Press the Middle Button to launch the On-Screen Display (OSD) main menu. OSD Setup OSD Setup via Navi Key...
...;■ This function optimizes background brightness and is disabled. RPG All items can be grayed out while Anti Motion Blur is enabled. Fast ■■ Response Time will be adjusted by users. ■■ Use Up or Down Button to select and preview mode effects. ■■ Press the Middle Button to launch the On-Screen Display (OSD) main menu. OSD Setup OSD Setup via Navi Key...

User Manual
Page 32
... adjusted ON/OFF in any mode, any resolution, any input source and any Mode. Right Bottom ■■ Default Alarm Clock Location is Left Top. Press the Middle Button to ON. Position Reset FreeSync (OFF) (ON) ■■ FreeSync prevents screen tearing ■■ DisplayPort or HDMI default is ON and can adjust Alarm Clock in any screen refresh rate ■■ Anti Motion Blur will be disabled...
... adjusted ON/OFF in any mode, any resolution, any input source and any Mode. Right Bottom ■■ Default Alarm Clock Location is Left Top. Press the Middle Button to ON. Position Reset FreeSync (OFF) (ON) ■■ FreeSync prevents screen tearing ■■ DisplayPort or HDMI default is ON and can adjust Alarm Clock in any screen refresh rate ■■ Anti Motion Blur will be disabled...

User Manual
Page 33
... Mode. When enabled, Eye Saver adjusts the screen color temperature to a more yellow glow. ■■ Users can adjust Eye Saver in any Mode. ■■ When Pro Mode is set to Reader, it is set to improve their acutance. ■■ Users can adjust HDCR in any Mode. ■■ HDCR enhances image quality by users. OSD Setup hh Professional 1st Level Menu 2nd Level Menu Description Pro Mode User Default mode. Image...
... Mode. When enabled, Eye Saver adjusts the screen color temperature to a more yellow glow. ■■ Users can adjust Eye Saver in any Mode. ■■ When Pro Mode is set to Reader, it is set to improve their acutance. ■■ Users can adjust HDCR in any Mode. ■■ HDCR enhances image quality by users. OSD Setup hh Professional 1st Level Menu 2nd Level Menu Description Pro Mode User Default mode. Image...

User Manual
Page 34
... Brightness Game Mode Screen Assistance Alarm Clock Input Source Refresh Rate Information on Screen Description ■■ Up Button default is Game Mode. ■■ Down Button default is Screen Assistance. ■■ Left Button default is Alarm Clock. ■■ Right Button default is Auto. 1st Level Menu HDMI1 HDMI2 DP Type C 2nd/3rd Level Menu Description Users can adjust Input Source in any Mode. ■■ Sharpness improves clarity and details of images. Screen Size Auto 4:3 16:9 2-8 hh Input Source...
... Brightness Game Mode Screen Assistance Alarm Clock Input Source Refresh Rate Information on Screen Description ■■ Up Button default is Game Mode. ■■ Down Button default is Screen Assistance. ■■ Left Button default is Alarm Clock. ■■ Right Button default is Auto. 1st Level Menu HDMI1 HDMI2 DP Type C 2nd/3rd Level Menu Description Users can adjust Input Source in any Mode. ■■ Sharpness improves clarity and details of images. Screen Size Auto 4:3 16:9 2-8 hh Input Source...
User Manual
Page 35
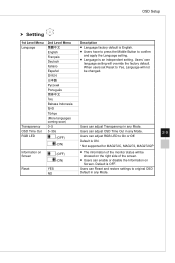
... Middle Button to original OSD Default in any Mode. When users set Reset to On or Off. OSD Time Out RGB LED 5~30s (OFF) (ON) Users can adjust RGB LED to Yes, Language will not be showed on the right side of the monitor status will override the factory default. Users can enable or disable the Information on Screen. OSD Setup hh Setting 1st Level Menu 2nd Level Menu Description Language 繁體中文 ■■ Language factory default...
... Middle Button to original OSD Default in any Mode. When users set Reset to On or Off. OSD Time Out RGB LED 5~30s (OFF) (ON) Users can adjust RGB LED to Yes, Language will not be showed on the right side of the monitor status will override the factory default. Users can enable or disable the Information on Screen. OSD Setup hh Setting 1st Level Menu 2nd Level Menu Description Language 繁體中文 ■■ Language factory default...
User Manual
Page 38
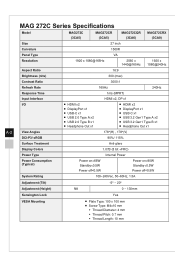
MAG 272C Series Specifications Model MAG272C (3CA5) MAG272CR (3CA5) MAG272CQR (3CA6) MAG272CRX (3CA0) Size 27 inch Curvature 1500R Panel Type VA Resolution 1920 x 1080@165Hz 2560 x 1440@165Hz 1920 x 1080@240Hz Aspect Ratio 16:9 Brightness (nits) 300 (max) Contrast Ratio 3000:1 Refresh Rate 165Hz 240Hz Response Time 1ms (MPRT) Input Interface HDMI x2, DP x1 I/O ■■ HDMI x2 ■■ HDMI x2 ■■ DisplayPort x1...
MAG 272C Series Specifications Model MAG272C (3CA5) MAG272CR (3CA5) MAG272CQR (3CA6) MAG272CRX (3CA0) Size 27 inch Curvature 1500R Panel Type VA Resolution 1920 x 1080@165Hz 2560 x 1440@165Hz 1920 x 1080@240Hz Aspect Ratio 16:9 Brightness (nits) 300 (max) Contrast Ratio 3000:1 Refresh Rate 165Hz 240Hz Response Time 1ms (MPRT) Input Interface HDMI x2, DP x1 I/O ■■ HDMI x2 ■■ HDMI x2 ■■ DisplayPort x1...

User Manual
Page 41
... x1 View Angles DCI-P3/ sRGB Surface Treatment 178°(H) , 178°(V) 95.4% / 122.9% Anti-glare 95.6% / 123.7% Display Colors 1.07B (8 bit +FRC) Power Type External Power Adapter Power Consumption (Typical) Power Input 65W 100~240Vac, 50~60Hz, 1.6A Max Adjustment (Tilt) -5° ~ 20° Adjustment (Height) NA 0 ~ 100mm Adjustment (Swivel) NA -75° ~ 75° Adjustment (Pivot) NA -90° ~ 90° Kensington Lock Yes VESA Mounting...
... x1 View Angles DCI-P3/ sRGB Surface Treatment 178°(H) , 178°(V) 95.4% / 122.9% Anti-glare 95.6% / 123.7% Display Colors 1.07B (8 bit +FRC) Power Type External Power Adapter Power Consumption (Typical) Power Input 65W 100~240Vac, 50~60Hz, 1.6A Max Adjustment (Tilt) -5° ~ 20° Adjustment (Height) NA 0 ~ 100mm Adjustment (Swivel) NA -75° ~ 75° Adjustment (Pivot) NA -90° ~ 90° Kensington Lock Yes VESA Mounting...
User Manual
Page 44
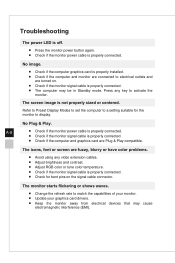
... monitor signal cable is properly connected. The monitor starts flickering or shows waves. ■■ Change the refresh rate to a setting suitable for bent pins on . ■■ Check if the monitor signal cable is not properly sized or centered. Troubleshooting The power LED is off. ■■ Press the monitor power button again. ■■ Check if the monitor power cable is properly connected. ■■ Check if the computer and graphics card are Plug & Play compatible. Refer to Preset Display Modes...
... monitor signal cable is properly connected. The monitor starts flickering or shows waves. ■■ Change the refresh rate to a setting suitable for bent pins on . ■■ Check if the monitor signal cable is not properly sized or centered. Troubleshooting The power LED is off. ■■ Press the monitor power button again. ■■ Check if the monitor power cable is properly connected. ■■ Check if the computer and graphics card are Plug & Play compatible. Refer to Preset Display Modes...
