
User Guide
Page 3
... the product has been discontinued, depending on your system may be upgradable or replaceable by the manufacturer within 5 years at the time. Nightblade MI Series ■■Do not perform any maintenance with wet hands. ■■Prevent foreign substances, such as CPU, Mem- It is... the product users purchased in the product users purchased may cause the warranty void. For any difficulties installing hardware devices, please contact MSI for further information. tact the authorized dealer or service center for demonstration of the product, if you con- Do not attempt to...
... the product has been discontinued, depending on your system may be upgradable or replaceable by the manufacturer within 5 years at the time. Nightblade MI Series ■■Do not perform any maintenance with wet hands. ■■Prevent foreign substances, such as CPU, Mem- It is... the product users purchased in the product users purchased may cause the warranty void. For any difficulties installing hardware devices, please contact MSI for further information. tact the authorized dealer or service center for demonstration of the product, if you con- Do not attempt to...
User Guide
Page 5
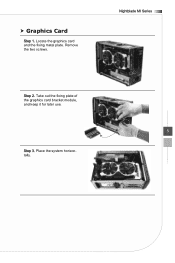
Take out the fixing plate of the graphics card bracket module, and keep it for later use. 5 Step 3. Place the system horizontally. Remove the two screws. hhGraphics Card Step 1. Locate the graphics card and the fixing metal plate. Nightblade MI Series Step 2.
Take out the fixing plate of the graphics card bracket module, and keep it for later use. 5 Step 3. Place the system horizontally. Remove the two screws. hhGraphics Card Step 1. Locate the graphics card and the fixing metal plate. Nightblade MI Series Step 2.
User Guide
Page 7
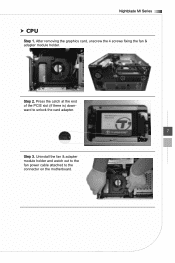
Uninstall the fan & adapter module holder and watch out to the fan power cable attached to unlock the card adapter. 7 Step 3. Step 2. Press the catch at the end of the PCIE slot (if there is) downward to the connector on the motherboard. Nightblade MI Series hhCPU Step 1. After removing the graphics card, unscrew the 4 screws fixing the fan & adapter module holder.
Uninstall the fan & adapter module holder and watch out to the fan power cable attached to unlock the card adapter. 7 Step 3. Step 2. Press the catch at the end of the PCIE slot (if there is) downward to the connector on the motherboard. Nightblade MI Series hhCPU Step 1. After removing the graphics card, unscrew the 4 screws fixing the fan & adapter module holder.
User Guide
Page 9
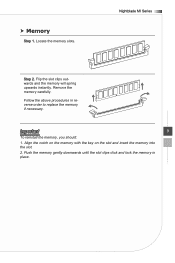
Nightblade MI Series Step 2. Follow the above procedures in place. Align the notch on the memory with the key on the slot and insert the memory into the slot. 2. hhMemory Step 1. Remove the memory carefully. Push the memory gently downwards until the slot clips click and lock the memory in reverse order to replace the memory if necessary. Flip the slot clips outwards and the memory will spring upwards instantly. Locate the memory slots. Important 9 To reinstall the memory, you should: 1.
Nightblade MI Series Step 2. Follow the above procedures in place. Align the notch on the memory with the key on the slot and insert the memory into the slot. 2. hhMemory Step 1. Remove the memory carefully. Push the memory gently downwards until the slot clips click and lock the memory in reverse order to replace the memory if necessary. Flip the slot clips outwards and the memory will spring upwards instantly. Locate the memory slots. Important 9 To reinstall the memory, you should: 1.
User Guide
Page 11
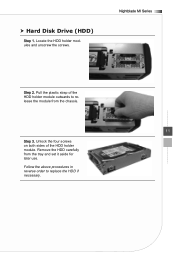
Follow the above procedures in reverse order to release the module from the tray and set it aside for later use. Nightblade MI Series Step 2. Unlock the four screws on both sides of the HDD holder module outwards to replace the HDD if necessary. hhHard Disk Drive (HDD) Step 1. Remove the HDD carefully from the chassis. 11 Step 3. Pull the plastic strap of the HDD holder module. Locate the HDD holder modules and unscrew the screws.
Follow the above procedures in reverse order to release the module from the tray and set it aside for later use. Nightblade MI Series Step 2. Unlock the four screws on both sides of the HDD holder module outwards to replace the HDD if necessary. hhHard Disk Drive (HDD) Step 1. Remove the HDD carefully from the chassis. 11 Step 3. Pull the plastic strap of the HDD holder module. Locate the HDD holder modules and unscrew the screws.