User Manual
Page 2
Contents Getting Started...3 Package Contents...3 Safety & Comfort Tips 3 System Overview...4 Hardware Setup...7 Windows 11 System Operations 9 Power Management 9 Network Connections 13 System Recovery 21 F3 Hotkey Recovery (Optional 23 Safety Instructions...24 Regulatory Notices...26 Revision V4.0, 2023/10 2
Contents Getting Started...3 Package Contents...3 Safety & Comfort Tips 3 System Overview...4 Hardware Setup...7 Windows 11 System Operations 9 Power Management 9 Network Connections 13 System Recovery 21 F3 Hotkey Recovery (Optional 23 Safety Instructions...24 Regulatory Notices...26 Revision V4.0, 2023/10 2
User Manual
Page 3
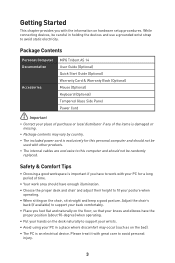
.... ∙ Package contents may occur (such as on hardware setup procedures. Package Contents Personal Computer MPG Trident AS 14 Documentation User Guide (Optional) Quick Start Guide (Optional) Warranty Card & Warranty Book (Optional) Accessories Mouse (Optional) Keyboard (Optional) Tempered Glass Side Panel Power Cord ⚠ Important ∙ Contact your place of purchase or local distributor if any of time. ∙ Your work area should not be careful in a place where...
.... ∙ Package contents may occur (such as on hardware setup procedures. Package Contents Personal Computer MPG Trident AS 14 Documentation User Guide (Optional) Quick Start Guide (Optional) Warranty Card & Warranty Book (Optional) Accessories Mouse (Optional) Keyboard (Optional) Tempered Glass Side Panel Power Cord ⚠ Important ∙ Contact your place of purchase or local distributor if any of time. ∙ Your work area should not be careful in a place where...

User Manual
Page 5
...-speed devices are recommended for USB 3.2 ports whereas lowspeed devices, such as mouse or keyboard, are suggested to the Local Area Network (LAN). 1 Power Button Press the power button to it. LINK/ACT LED SPEED LED LED Link/ Activity LED Speed LED Status Off Yellow Blinking Off Green Orange Description No link Linked Data activity 10 Mbps 100/1000 Mbps 2.5 Gbps 5 This connector can connect a network cable to turn the system on the HDD and remains off . 2 Hard Disk Drive LED...
...-speed devices are recommended for USB 3.2 ports whereas lowspeed devices, such as mouse or keyboard, are suggested to the Local Area Network (LAN). 1 Power Button Press the power button to it. LINK/ACT LED SPEED LED LED Link/ Activity LED Speed LED Status Off Yellow Blinking Off Green Orange Description No link Linked Data activity 10 Mbps 100/1000 Mbps 2.5 Gbps 5 This connector can connect a network cable to turn the system on the HDD and remains off . 2 Hard Disk Drive LED...

User Manual
Page 6
11 USB 3.2 Gen 2 Port This connector is provided for USB peripheral devices. (Speed up to your system. 6 Do not cover the ventilator. 14 Power Jack Power supplied through this jack supplies power to 20 Gbps) 13 Ventilator The ventilator on the enclosure is provided for air convection and to prevent the equipment from overheating. This connector can provide up to 5V/3A of power. (Speed up to 10 Gbps) 12 USB 3.2 Gen 2x2 Type-C Port This connector is used for USB peripheral devices.
11 USB 3.2 Gen 2 Port This connector is provided for USB peripheral devices. (Speed up to your system. 6 Do not cover the ventilator. 14 Power Jack Power supplied through this jack supplies power to 20 Gbps) 13 Ventilator The ventilator on the enclosure is provided for air convection and to prevent the equipment from overheating. This connector can provide up to 5V/3A of power. (Speed up to 10 Gbps) 12 USB 3.2 Gen 2x2 Type-C Port This connector is used for USB peripheral devices.
User Manual
Page 7
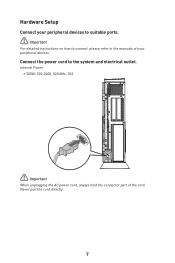
Connect the power cord to the manuals of the cord. Hardware Setup Connect your peripheral devices to suitable ports. ⚠ Important For detailed instructions on how to connect, please refer to the system and electrical outlet. Internal Power • 500W: 100-240V, 50/60Hz, 10A ⚠ Important When unplugging the AC power cord, always hold the connector part of your peripheral devices. Never pull the cord directly. 7
Connect the power cord to the manuals of the cord. Hardware Setup Connect your peripheral devices to suitable ports. ⚠ Important For detailed instructions on how to connect, please refer to the system and electrical outlet. Internal Power • 500W: 100-240V, 50/60Hz, 10A ⚠ Important When unplugging the AC power cord, always hold the connector part of your peripheral devices. Never pull the cord directly. 7

User Manual
Page 8
Press the power button to power on the system. 8
Press the power button to power on the system. 8

User Manual
Page 9
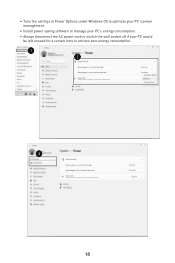
Adjust [Screen and sleep] settings and select a power mode from the list. 2. To choose or customize a power plan, type control panel in the following : ∙ the power button, ∙ the network (Wake On LAN), ∙ the mouse, ∙ the keyboard. Select [Power Options] to change without prior notice. Energy Savings The power management feature allows the computer to initiate a low-power or "Sleep" mode after a period of user inactivity. 9 Right-click [Start] and select [Power Options] from the list. 3. Select a power plan...
Adjust [Screen and sleep] settings and select a power mode from the list. 2. To choose or customize a power plan, type control panel in the following : ∙ the power button, ∙ the network (Wake On LAN), ∙ the mouse, ∙ the keyboard. Select [Power Options] to change without prior notice. Energy Savings The power management feature allows the computer to initiate a low-power or "Sleep" mode after a period of user inactivity. 9 Right-click [Start] and select [Power Options] from the list. 3. Select a power plan...
User Manual
Page 10
∙ Tune the settings in Power Options under Windows OS to optimize your PC's power management. ∙ Install power saving software to manage your PC's energy consumption. ∙ Always disconnect the AC power cord or switch the wall socket off if your PC would be left unused for a certain time to achieve zero energy consumption. 1 2 3 10
∙ Tune the settings in Power Options under Windows OS to optimize your PC's power management. ∙ Install power saving software to manage your PC's energy consumption. ∙ Always disconnect the AC power cord or switch the wall socket off if your PC would be left unused for a certain time to achieve zero energy consumption. 1 2 3 10

User Manual
Page 13
A list of available wireless networks pops up. To establish a new connection, select [Manage known networks]. 5. Choose a connection from the list. 2. Enter information for the wireless network you intend to add and click [Save] to establish a new connection. 1 2 13 Select [Show available networks]. Select and turn on [Wi-Fi]. 3. Network Connections Wi-Fi 1. Right-click [Start] and select [Network Connections] from the list. 4. Select [Add network]. 6.
A list of available wireless networks pops up. To establish a new connection, select [Manage known networks]. 5. Choose a connection from the list. 2. Enter information for the wireless network you intend to add and click [Save] to establish a new connection. 1 2 13 Select [Show available networks]. Select and turn on [Wi-Fi]. 3. Network Connections Wi-Fi 1. Right-click [Start] and select [Network Connections] from the list. 4. Select [Add network]. 6.
User Manual
Page 16
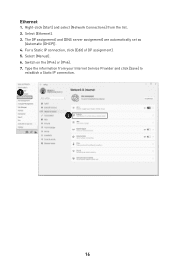
Ethernet 1. Type the information from the list. 2. Select [Ethernet]. 3. Right-click [Start] and select [Network Connections] from your Internet Service Provider and click [Save] to establish a Static IP connection. 1 2 16 Select [Manual]. 6. For a Static IP connection, click [Edit] of [IP assignment]. 5. Switch on the [IPv4] or [IPv6]. 7. The [IP assignment] and [DNS server assignment] are automatically set as [Automatic (DHCP)]. 4.
Ethernet 1. Type the information from the list. 2. Select [Ethernet]. 3. Right-click [Start] and select [Network Connections] from your Internet Service Provider and click [Save] to establish a Static IP connection. 1 2 16 Select [Manual]. 6. For a Static IP connection, click [Edit] of [IP assignment]. 5. Switch on the [IPv4] or [IPv6]. 7. The [IP assignment] and [DNS server assignment] are automatically set as [Automatic (DHCP)]. 4.
User Manual
Page 19
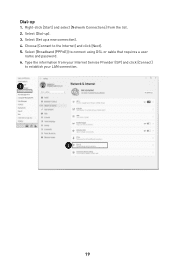
Choose [Connect to connect using DSL or cable that requires a user name and password. 6. Select [Broadband (PPPoE)] to the Internet] and click [Next]. 5. Select [Set up 1. Type the information from the list. 2. Right-click [Start] and select [Network Connections] from your Internet Service Provider (ISP) and click [Connect] to establish your LAN connection. 1 2 19 Dial-up a new connection]. 4. Select [Dial-up]. 3.
Choose [Connect to connect using DSL or cable that requires a user name and password. 6. Select [Broadband (PPPoE)] to the Internet] and click [Next]. 5. Select [Set up 1. Type the information from the list. 2. Right-click [Start] and select [Network Connections] from your Internet Service Provider (ISP) and click [Connect] to establish your LAN connection. 1 2 19 Dial-up a new connection]. 4. Select [Dial-up]. 3.
User Manual
Page 21
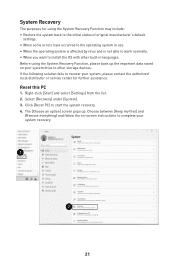
...'s default settings. ∙ When some errors have occurred to the operating system in use. ∙ When the operating system is affected by virus and is not able to work normally. ∙ When you want to install the OS with other storage devices. Click [Reset PC] to recover your system recovery. 1 2 2 21 The [Choose an option] screen pops up the important data saved on -screen instructions...
...'s default settings. ∙ When some errors have occurred to the operating system in use. ∙ When the operating system is affected by virus and is not able to work normally. ∙ When you want to install the OS with other storage devices. Click [Reset PC] to recover your system recovery. 1 2 2 21 The [Choose an option] screen pops up the important data saved on -screen instructions...
User Manual
Page 23
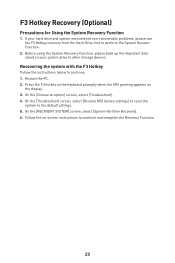
... to the default settings. 5. On the [Choose an option] screen, select [Troubleshoot]. 4. On the [RECOVERY SYSTEM] screen, select [System Partition Recovery]. 6. Restart the PC. 2. Before using the System Recovery Function, please back up the important data saved on -screen instructions to other storage devices. F3 Hotkey Recovery (Optional) Precautions for Using the System Recovery Function 1. Press the F3 hotkey on the keyboard promptly when the MSI greeting appears on the display. 3.
... to the default settings. 5. On the [Choose an option] screen, select [Troubleshoot]. 4. On the [RECOVERY SYSTEM] screen, select [System Partition Recovery]. 6. Restart the PC. 2. Before using the System Recovery Function, please back up the important data saved on -screen instructions to other storage devices. F3 Hotkey Recovery (Optional) Precautions for Using the System Recovery Function 1. Press the F3 hotkey on the keyboard promptly when the MSI greeting appears on the display. 3.
User Manual
Page 24
... power outlet. ∙ If the power cord comes with a battery. ∙ Danger of explosion if battery is swallowed, it . Keep new and used batteries away from the plug. If the coin/button cell battery is incorrectly replaced. Safety Instructions ∙ Read the safety instructions carefully and thoroughly. ∙ All cautions and warnings on card or module to the device. ∙ Always disconnect the power cord or switch...
... power outlet. ∙ If the power cord comes with a battery. ∙ Danger of explosion if battery is swallowed, it . Keep new and used batteries away from the plug. If the coin/button cell battery is incorrectly replaced. Safety Instructions ∙ Read the safety instructions carefully and thoroughly. ∙ All cautions and warnings on card or module to the device. ∙ Always disconnect the power cord or switch...
User Manual
Page 25
California, USA: The button cell battery may damage the device. ∙ The maximum operating temperature is damaged. • Liquid has penetrated into the opening; Use a piece of in an unconditioned ...device checked by service personnel: • The power cord or plug is around 35℃. ∙ When cleaning the device, be sure to the User Guide. • The device has dropped and damaged. • The device has obvious sign of overheating the device, do not place the device on a soft, unsteady surface or obstruct its air ventilators. ∙ Use this device only on a hard...
California, USA: The button cell battery may damage the device. ∙ The maximum operating temperature is damaged. • Liquid has penetrated into the opening; Use a piece of in an unconditioned ...device checked by service personnel: • The power cord or plug is around 35℃. ∙ When cleaning the device, be sure to the User Guide. • The device has dropped and damaged. • The device has obvious sign of overheating the device, do not place the device on a soft, unsteady surface or obstruct its air ventilators. ∙ Use this device only on a hard...

User Manual
Page 26
... otherwise indicated in normal use only in typical operating positions. Products with existing radio services. Restrictions for Products with Radio Functionality (select products only) CAUTION: IEEE 802.11x wireless LAN with 5.15~5.35 GHz frequency band is restricted for regulatory matters is assessed using applicable European Harmonized Standards. Radio frequency bands and maximum power levels ∙ Features...
... otherwise indicated in normal use only in typical operating positions. Products with existing radio services. Restrictions for Products with Radio Functionality (select products only) CAUTION: IEEE 802.11x wireless LAN with 5.15~5.35 GHz frequency band is restricted for regulatory matters is assessed using applicable European Harmonized Standards. Radio frequency bands and maximum power levels ∙ Features...
User Manual
Page 27
...against harmful interference in order to comply with the instruction manual, may cause harmful interference to radio communications. Notice 1 The changes or modifications not expressly approved by one or more of the measures listed below: ∙ Reorient or relocate the receiving antenna..." cannot be used in a particular installation. If this device must accept any , must be discarded as municipal waste anymore and manufacturers of covered electronic equipment will not occur in accordance with the emission limits. Notice 2 Shielded interface cables and AC power cord, if ...
...against harmful interference in order to comply with the instruction manual, may cause harmful interference to radio communications. Notice 1 The changes or modifications not expressly approved by one or more of the measures listed below: ∙ Reorient or relocate the receiving antenna..." cannot be used in a particular installation. If this device must accept any , must be discarded as municipal waste anymore and manufacturers of covered electronic equipment will not occur in accordance with the emission limits. Notice 2 Shielded interface cables and AC power cord, if ...

User Manual
Page 28
... weight % and 0.01 weight % for cadmium, except for a number of hazardous substances in Schedule 2 of the Rule. Chemical Substances Information In compliance with requirements of the Technical Regulation, approved by the Resolution of Cabinet of Ministry of Ukraine as...specification JIS C 0950, mandates that manufacturers provide material declarations for certain categories of electronic products offered for sale after July 1, 2006. Vietnam RoHS As from December 1, 2012, all products manufactured by MSI comply with the "India E-waste (Management and Handling) Rule 2016" and prohibits use...
... weight % and 0.01 weight % for cadmium, except for a number of hazardous substances in Schedule 2 of the Rule. Chemical Substances Information In compliance with requirements of the Technical Regulation, approved by the Resolution of Cabinet of Ministry of Ukraine as...specification JIS C 0950, mandates that manufacturers provide material declarations for certain categories of electronic products offered for sale after July 1, 2006. Vietnam RoHS As from December 1, 2012, all products manufactured by MSI comply with the "India E-waste (Management and Handling) Rule 2016" and prohibits use...
User Manual
Page 29
...-life products. ∙ Visit the MSI website and locate a nearby distributor for any further information about the acquisition of MSI products. Upgrade and Warranty Please note that the acquisition of replaceable parts (or compatible ones) of the product if you contact the authorized dealer or service center for further recycling information. ∙ Users may also reach us at the...
...-life products. ∙ Visit the MSI website and locate a nearby distributor for any further information about the acquisition of MSI products. Upgrade and Warranty Please note that the acquisition of replaceable parts (or compatible ones) of the product if you contact the authorized dealer or service center for further recycling information. ∙ Users may also reach us at the...

User Manual
Page 30
... guidance. The MSI logo used is expressed or implied. Alternatively, please try the following help resources for technical guide, BIOS updates, driver updates and other marks and names mentioned may be obtained from the user's manual, please contact your place of Micro-Star Int'l Co., Ltd. Technical Support If a problem arises with your system and no solution can be trademarks of HDMI™ Licensing...
... guidance. The MSI logo used is expressed or implied. Alternatively, please try the following help resources for technical guide, BIOS updates, driver updates and other marks and names mentioned may be obtained from the user's manual, please contact your place of Micro-Star Int'l Co., Ltd. Technical Support If a problem arises with your system and no solution can be trademarks of HDMI™ Licensing...


