User Manual
Page 3
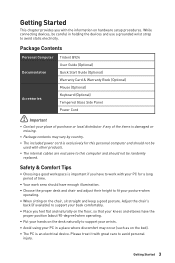
Package Contents Personal Computer Trident B924 User Guide (Optional) Documentation Quick Start Guide (Optional) Warranty Card & Warranty Book (Optional) Mouse (Optional) Accessories Keyboard (Optional) Tempered Glass Side Panel Power Cord ⚠ Important ∙ Contact your place of purchase or local distributor if any of time. ∙ Your work with your PC in holding the devices and use a grounded wrist strap to avoid personal injury. Getting Started 3 Getting Started This chapter provides...
Package Contents Personal Computer Trident B924 User Guide (Optional) Documentation Quick Start Guide (Optional) Warranty Card & Warranty Book (Optional) Mouse (Optional) Accessories Keyboard (Optional) Tempered Glass Side Panel Power Cord ⚠ Important ∙ Contact your place of purchase or local distributor if any of time. ∙ Your work with your PC in holding the devices and use a grounded wrist strap to avoid personal injury. Getting Started 3 Getting Started This chapter provides...

User Manual
Page 5
... High-speed devices are recommended for USB 3.2 ports whereas lowspeed devices, such as mouse or keyboard, are suggested to be plugged into the USB 2.0 ports. 6 Mic-In Jack For microphones. 7 Line-Out Jack For headphones or speakers. 8 Line-In Jack For external audio output devices. 9 2.5 Gbps LAN Jack The standard RJ-45 LAN jack is provided for connection to the Local Area Network (LAN). This connector can connect a network cable to it. 1 Power Button 2 Hard Disk Drive LED This...
... High-speed devices are recommended for USB 3.2 ports whereas lowspeed devices, such as mouse or keyboard, are suggested to be plugged into the USB 2.0 ports. 6 Mic-In Jack For microphones. 7 Line-Out Jack For headphones or speakers. 8 Line-In Jack For external audio output devices. 9 2.5 Gbps LAN Jack The standard RJ-45 LAN jack is provided for connection to the Local Area Network (LAN). This connector can connect a network cable to it. 1 Power Button 2 Hard Disk Drive LED This...

User Manual
Page 6
... discrete graphics card. 13 HDMI™ Connector Supports 4K@60Hz as specified in HDMI™ 2.1. ⚠ Important ∙ Graphics specifications may vary depending on the installed CPU. ∙ For processors without integrated graphics, connect your monitor to the discrete graphics card. 14 Ventilator 15 Power Jack 6 Getting Started This connector can provide up to 5V/3A of power. (Speed up to 10 Gbps) 11 USB 3.2 Gen 2x2 Type-C Port This connector is provided for USB peripheral devices.
... discrete graphics card. 13 HDMI™ Connector Supports 4K@60Hz as specified in HDMI™ 2.1. ⚠ Important ∙ Graphics specifications may vary depending on the installed CPU. ∙ For processors without integrated graphics, connect your monitor to the discrete graphics card. 14 Ventilator 15 Power Jack 6 Getting Started This connector can provide up to 5V/3A of power. (Speed up to 10 Gbps) 11 USB 3.2 Gen 2x2 Type-C Port This connector is provided for USB peripheral devices.
User Manual
Page 7
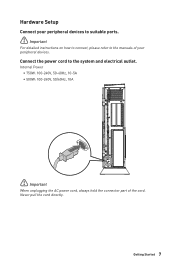
Getting Started 7 Never pull the cord directly. Internal Power • 750W: 100-240V, 50-60Hz, 10-5A • 500W: 100-240V, 50/60Hz, 10A ⚠ Important When unplugging the AC power cord, always hold the connector part of your peripheral devices. Hardware Setup Connect your peripheral devices to suitable ports. ⚠ Important For detailed instructions on how to connect, please refer to the system and electrical outlet. Connect the power cord to the manuals of the cord.
Getting Started 7 Never pull the cord directly. Internal Power • 750W: 100-240V, 50-60Hz, 10-5A • 500W: 100-240V, 50/60Hz, 10A ⚠ Important When unplugging the AC power cord, always hold the connector part of your peripheral devices. Hardware Setup Connect your peripheral devices to suitable ports. ⚠ Important For detailed instructions on how to connect, please refer to the system and electrical outlet. Connect the power cord to the manuals of the cord.

User Manual
Page 9
... to change without prior notice. Energy Savings The power management feature allows the computer to initiate a low-power or "Sleep" mode after a period of user inactivity. Windows 11 System Operations 9 Adjust [Screen and sleep] settings and select a power mode from the list. 2. To choose or customize a power plan, type control panel in response to behave in the following : ∙ the power button, ∙ the network (Wake On LAN), ∙ the mouse, ∙ the keyboard. Select [Power Options] to...
... to change without prior notice. Energy Savings The power management feature allows the computer to initiate a low-power or "Sleep" mode after a period of user inactivity. Windows 11 System Operations 9 Adjust [Screen and sleep] settings and select a power mode from the list. 2. To choose or customize a power plan, type control panel in response to behave in the following : ∙ the power button, ∙ the network (Wake On LAN), ∙ the mouse, ∙ the keyboard. Select [Power Options] to...
User Manual
Page 16
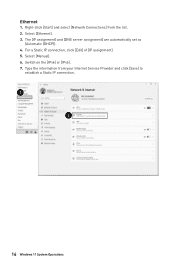
For a Static IP connection, click [Edit] of [IP assignment]. 5. Type the information from the list. 2. Switch on the [IPv4] or [IPv6]. 7. Right-click [Start] and select [Network Connections] from your Internet Service Provider and click [Save] to establish a Static IP connection. 1 2 16 Windows 11 System Operations Select [Manual]. 6. The [IP assignment] and [DNS server assignment] are automatically set as [Automatic (DHCP)]. 4. Select [Ethernet]. 3. Ethernet 1.
For a Static IP connection, click [Edit] of [IP assignment]. 5. Type the information from the list. 2. Switch on the [IPv4] or [IPv6]. 7. Right-click [Start] and select [Network Connections] from your Internet Service Provider and click [Save] to establish a Static IP connection. 1 2 16 Windows 11 System Operations Select [Manual]. 6. The [IP assignment] and [DNS server assignment] are automatically set as [Automatic (DHCP)]. 4. Select [Ethernet]. 3. Ethernet 1.
User Manual
Page 19
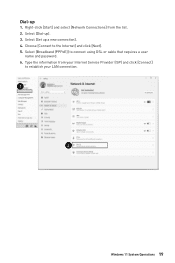
Select [Dial-up a new connection]. 4. Select [Set up ]. 3. Select [Broadband (PPPoE)] to establish your Internet Service Provider (ISP) and click [Connect] to connect using DSL or cable that requires a user name and password. 6. Type the information from the list. 2. Choose [Connect to the Internet] and click [Next]. 5. Right-click [Start] and select [Network Connections] from your LAN connection. 1 2 Windows 11 System Operations 19 Dial-up 1.
Select [Dial-up a new connection]. 4. Select [Set up ]. 3. Select [Broadband (PPPoE)] to establish your Internet Service Provider (ISP) and click [Connect] to connect using DSL or cable that requires a user name and password. 6. Type the information from the list. 2. Choose [Connect to the Internet] and click [Next]. 5. Right-click [Start] and select [Network Connections] from your LAN connection. 1 2 Windows 11 System Operations 19 Dial-up 1.
User Manual
Page 21
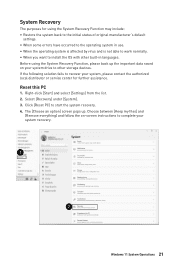
... work normally. ∙ When you want to install the OS with other storage devices. Right-click [Start] and select [Settings] from the list. 2. Before using the System Recovery Function may include: ∙ Restore the system back to the initial status of original manufacturer's default settings. ∙ When some errors have occurred to the operating system in languages. Select [Recovery] under [System]. 3. The [Choose an option] screen...
... work normally. ∙ When you want to install the OS with other storage devices. Right-click [Start] and select [Settings] from the list. 2. Before using the System Recovery Function may include: ∙ Restore the system back to the initial status of original manufacturer's default settings. ∙ When some errors have occurred to the operating system in languages. Select [Recovery] under [System]. 3. The [Choose an option] screen...
User Manual
Page 23
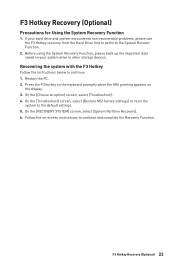
... encountered non-recoverable problems, please use the F3 Hotkey recovery from the Hard Drive first to perform the System Recover Function. 2. On the [Choose an option] screen, select [Troubleshoot]. 4. Follow the on-screen instructions to continue: 1. On the [Troubleshoot] screen, select [Restore MSI factory settings] to reset the system to other storage devices. F3 Hotkey Recovery (Optional) Precautions for Using the System Recovery Function 1. If your system drive to the default settings. 5. F3 Hotkey Recovery (Optional) 23
... encountered non-recoverable problems, please use the F3 Hotkey recovery from the Hard Drive first to perform the System Recover Function. 2. On the [Choose an option] screen, select [Troubleshoot]. 4. Follow the on-screen instructions to continue: 1. On the [Troubleshoot] screen, select [Restore MSI factory settings] to reset the system to other storage devices. F3 Hotkey Recovery (Optional) Precautions for Using the System Recovery Function 1. If your system drive to the default settings. 5. F3 Hotkey Recovery (Optional) 23
User Manual
Page 24
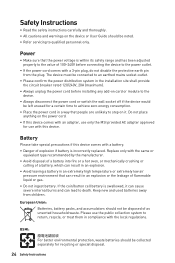
... place anything on the power cord. ∙ If this device comes with an adapter, use only the MSI provided AC adapter approved for use the public collection system to return, recycle, or treat them in compliance with a 3-pin plug, do not disable the protective earth pin from children. Replace only with a battery. ∙ Danger of explosion if battery is incorrectly replaced. BSMI: For better environmental...
... place anything on the power cord. ∙ If this device comes with an adapter, use only the MSI provided AC adapter approved for use the public collection system to return, recycle, or treat them in compliance with a 3-pin plug, do not disable the protective earth pin from children. Replace only with a battery. ∙ Danger of explosion if battery is incorrectly replaced. BSMI: For better environmental...

User Manual
Page 25
... to remove the power plug. For further information please visit: https://dtsc.ca.gov/perchlorate/ Environment ∙ To reduce the possibility of heat-related injuries or of breakage. Use a piece of in California. Safety Instructions 25 California, USA: The button cell battery may damage the device. ∙ The maximum operating temperature is damaged. • Liquid has penetrated into the opening...
... to remove the power plug. For further information please visit: https://dtsc.ca.gov/perchlorate/ Environment ∙ To reduce the possibility of heat-related injuries or of breakage. Use a piece of in California. Safety Instructions 25 California, USA: The button cell battery may damage the device. ∙ The maximum operating temperature is damaged. • Liquid has penetrated into the opening...
User Manual
Page 27
... FCC Rules. These limits are designed to comply with Part 15 of the FCC Rules. If this device must be used in order to provide reasonable protection against harmful interference in a particular installation. Regulatory Notices 27 This equipment generates, uses and can be obligated to operate the equipment. MSI Computer Corp. 901 Canada Court, City of Industry...
... FCC Rules. These limits are designed to comply with Part 15 of the FCC Rules. If this device must be used in order to provide reasonable protection against harmful interference in a particular installation. Regulatory Notices 27 This equipment generates, uses and can be obligated to operate the equipment. MSI Computer Corp. 901 Canada Court, City of Industry...
User Manual
Page 29
...; Easily dismantled and recycled ∙ Reduced use of natural resources by encouraging recycling ∙ Extended product lifetime through easy upgrades ∙ Reduced solid waste production through take -back, recycling, and disassembly of MSI products. It is strongly recommended that the acquisition of replaceable parts (or compatible ones) of the product users purchased in the product may be...
...; Easily dismantled and recycled ∙ Reduced use of natural resources by encouraging recycling ∙ Extended product lifetime through easy upgrades ∙ Reduced solid waste production through take -back, recycling, and disassembly of MSI products. It is strongly recommended that the acquisition of replaceable parts (or compatible ones) of the product users purchased in the product may be...

User Manual
Page 30
... help resources for technical guide, BIOS updates, driver updates and other marks and names mentioned may be obtained from the user's manual, please contact your place of their respective owners. Technical Support If a problem arises with your system and no solution can be trademarks of purchase or local distributor. Visit the MSI website for further guidance. MSI reserves the right to make changes to accuracy or...
... help resources for technical guide, BIOS updates, driver updates and other marks and names mentioned may be obtained from the user's manual, please contact your place of their respective owners. Technical Support If a problem arises with your system and no solution can be trademarks of purchase or local distributor. Visit the MSI website for further guidance. MSI reserves the right to make changes to accuracy or...
Quick Start Guide
Page 2
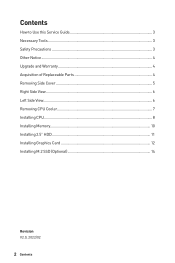
Contents How to Use this Service Guide 3 Necessary Tools...3 Safety Precautions...3 Other Notice...4 Upgrade and Warranty 4 Acquisition of Replaceable Parts 4 Removing Side Cover...5 Right Side View...6 Left Side View...6 Removing CPU Cooler 7 Installing CPU...8 Installing Memory...10 Installing 2.5" HDD...11 Installing Graphics Card 12 Installing M.2 SSD (Optional 14 Revision V2.0, 2022/02 2 Contents
Contents How to Use this Service Guide 3 Necessary Tools...3 Safety Precautions...3 Other Notice...4 Upgrade and Warranty 4 Acquisition of Replaceable Parts 4 Removing Side Cover...5 Right Side View...6 Left Side View...6 Removing CPU Cooler 7 Installing CPU...8 Installing Memory...10 Installing 2.5" HDD...11 Installing Graphics Card 12 Installing M.2 SSD (Optional 14 Revision V2.0, 2022/02 2 Contents
Quick Start Guide
Page 3
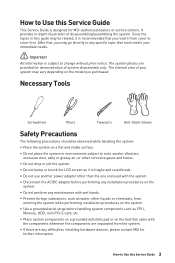
... LCD screen as CPU, Memory, HDD, mini PCI-E card, etc. ∙∙Place system components on a grounded antistatic pad or on the model you read it is subject to cover first. Necessary Tools Screwdriver Pliers Tweezers Anti-Static Gloves Safety Precautions The following precautions should be related, it is designed for MSI-authorized dealers or service centers. The internal view of system disassembly...
... LCD screen as CPU, Memory, HDD, mini PCI-E card, etc. ∙∙Place system components on a grounded antistatic pad or on the model you read it is subject to cover first. Necessary Tools Screwdriver Pliers Tweezers Anti-Static Gloves Safety Precautions The following precautions should be related, it is designed for MSI-authorized dealers or service centers. The internal view of system disassembly...
Quick Start Guide
Page 4
... To learn more about the product users purchased, please contact the local dealer. For any upgrade or replace service. It is subject to software and hardware are the properties of Replaceable Parts Please be noticed that certain components preinstalled in accordance with actual system configuration. Acquisition of their respective owners. Other Notice The peripheral devices contained herein may vary depending on...
... To learn more about the product users purchased, please contact the local dealer. For any upgrade or replace service. It is subject to software and hardware are the properties of Replaceable Parts Please be noticed that certain components preinstalled in accordance with actual system configuration. Acquisition of their respective owners. Other Notice The peripheral devices contained herein may vary depending on...

Quick Start Guide
Page 5
Unlock the screws and keep the screws for later use . Removing Side Cover 5 Right Side Left Side 2. Pull to replace the cover. Remove it, and set it aside for later use . Right Side Left Side 1 2 1 2 ∙∙Follow the above procedures in reverse order to open the cover carefully. Removing Side Cover ⚠⚠Important Before you remove or install any components, make sure the system is not turned on a flat and steady surface. Place the system on or connected to the power. 1.
Unlock the screws and keep the screws for later use . Removing Side Cover 5 Right Side Left Side 2. Pull to replace the cover. Remove it, and set it aside for later use . Right Side Left Side 1 2 1 2 ∙∙Follow the above procedures in reverse order to open the cover carefully. Removing Side Cover ⚠⚠Important Before you remove or install any components, make sure the system is not turned on a flat and steady surface. Place the system on or connected to the power. 1.

Quick Start Guide
Page 7
Unlock screws of the CPU fan module. 2. Remove screws on the CPU thermal module. 3. Removing CPU Cooler 7 Unplug the power cable and the RGB LED cable ∙∙Follow the above procedures in reversed order to replace the CPU cooler if needed. Removing CPU Cooler 1.
Unlock screws of the CPU fan module. 2. Remove screws on the CPU thermal module. 3. Removing CPU Cooler 7 Unplug the power cable and the RGB LED cable ∙∙Follow the above procedures in reversed order to replace the CPU cooler if needed. Removing CPU Cooler 1.

Quick Start Guide
Page 11
Put the bracket to replace the HDD if needed. Secure the bracket. ∙∙Follow the above procedures in reverse order to the 2.5" HDD and lock the screws. 2. Installing 2.5" HDD 11 Locate the HDD and connect the power and signal cables. 3. Installing 2.5" HDD 1.
Put the bracket to replace the HDD if needed. Secure the bracket. ∙∙Follow the above procedures in reverse order to the 2.5" HDD and lock the screws. 2. Installing 2.5" HDD 11 Locate the HDD and connect the power and signal cables. 3. Installing 2.5" HDD 1.


