User Manual
Page 2
... 2-1 Safety & Comfort Tips 2-2 Hardware Setup 2-3 3. System Operations 3-1 Power Management 3-2 Network Connection (Windows 10 3-4 System Recovery (Windows 10 3-7 System Recovery (F3 Hotkey Recovery 3-11 Overview 1-1 Packing Contents 1-2 System Overview 1-3 ii 2. Contents Copyright and Trademarks Notice iii Revision iii Upgrade and Warranty iv Acquisition of Replaceable Parts iv Technical Support iv Chemical Substances Information v Battery Information v Safety Instructions vi CE Conformity viii FCC-B Radio Frequency Interference Statement viii WEEE Statement...
... 2-1 Safety & Comfort Tips 2-2 Hardware Setup 2-3 3. System Operations 3-1 Power Management 3-2 Network Connection (Windows 10 3-4 System Recovery (Windows 10 3-7 System Recovery (F3 Hotkey Recovery 3-11 Overview 1-1 Packing Contents 1-2 System Overview 1-3 ii 2. Contents Copyright and Trademarks Notice iii Revision iii Upgrade and Warranty iv Acquisition of Replaceable Parts iv Technical Support iv Chemical Substances Information v Battery Information v Safety Instructions vi CE Conformity viii FCC-B Radio Frequency Interference Statement viii WEEE Statement...
User Manual
Page 4
... service center, since it may be upgradable or replaceable by the manufacturer within 5 years at most since the computer has been discontinued, depending on the official regulations declared at the time. Technical Support If a problem arises with your computer and no solution can be obtained from the user's manual, please contact your place of spare parts. Visit the MSI website for technical guide, BIOS updates, driver updates...
... service center, since it may be upgradable or replaceable by the manufacturer within 5 years at most since the computer has been discontinued, depending on the official regulations declared at the time. Technical Support If a problem arises with your computer and no solution can be obtained from the user's manual, please contact your place of spare parts. Visit the MSI website for technical guide, BIOS updates, driver updates...
User Manual
Page 6
... if battery is incorrectly replaced. Safety Instructions ◙◙ Read the safety instructions carefully and thoroughly. ◙◙ All cautions and warnings on the computer or user's manual should be noted. ◙◙ Make sure that the power voltage is within its safety range and has been adjusted properly to the value of 100~240V before installing any add-on card...
... if battery is incorrectly replaced. Safety Instructions ◙◙ Read the safety instructions carefully and thoroughly. ◙◙ All cautions and warnings on the computer or user's manual should be noted. ◙◙ Make sure that the power voltage is within its safety range and has been adjusted properly to the value of 100~240V before installing any add-on card...
User Manual
Page 7
... use of natural resources by encouraging recycling ◙◙ Extended product lifetime through easy upgrades ◙◙ Reduced solid waste production through take -back, recycling, and disassembly of the following situations arises, get the computer checked by service personnel: ◙◙ The power cord or plug is damaged. ◙◙ Liquid has penetrated into the opening that...
... use of natural resources by encouraging recycling ◙◙ Extended product lifetime through easy upgrades ◙◙ Reduced solid waste production through take -back, recycling, and disassembly of the following situations arises, get the computer checked by service personnel: ◙◙ The power cord or plug is damaged. ◙◙ Liquid has penetrated into the opening that...

User Manual
Page 8
... radiate radio frequency energy and, if not installed and used in order to comply with the instruction manual, may not cause harmful interference, and 2. This device complies with the essential safety requirements and other relevant provisions set out in the European Directive. If this computer does cause harmful interference to Part 15 of the FCC Rules. this...
... radiate radio frequency energy and, if not installed and used in order to comply with the instruction manual, may not cause harmful interference, and 2. This device complies with the essential safety requirements and other relevant provisions set out in the European Directive. If this computer does cause harmful interference to Part 15 of the FCC Rules. this...
User Manual
Page 12
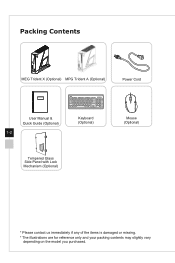
Packing Contents MEG Trident X (Optional) MPG Trident A (Optional) Power Cord User Manual & Quick Guide (Optional) 1-2 Keyboard (Optional) Tempered Glass Side Panel with Lock Mechanism (Optional) Mouse (Optional) * Please contact us immediately if any of the items is damaged or missing. * The illustrations are for reference only and your packing contents may slightly vary depending on the model you purchased.
Packing Contents MEG Trident X (Optional) MPG Trident A (Optional) Power Cord User Manual & Quick Guide (Optional) 1-2 Keyboard (Optional) Tempered Glass Side Panel with Lock Mechanism (Optional) Mouse (Optional) * Please contact us immediately if any of the items is damaged or missing. * The illustrations are for reference only and your packing contents may slightly vary depending on the model you purchased.

User Manual
Page 15
... various devices, such as storage devices, hard drives, video cameras, etc. Overview 1 Drive Activity Indicator LED blinks when the system is accessing the internal storage drives. 2 USB 3.2 Gen 1 Port (Type-C) USB 3.2 Gen 1, the SuperSpeed USB, delivers up to 480Mbit/s (Hi-Speed) data transfer rate. 5 Microphone Jack This connector is provided for microphones. 1-5 6 Headphone Jack This connector is provided for headphones or speakers. 7 Line-In This connector is provided for external audio output devices. 8 Line...
... various devices, such as storage devices, hard drives, video cameras, etc. Overview 1 Drive Activity Indicator LED blinks when the system is accessing the internal storage drives. 2 USB 3.2 Gen 1 Port (Type-C) USB 3.2 Gen 1, the SuperSpeed USB, delivers up to 480Mbit/s (Hi-Speed) data transfer rate. 5 Microphone Jack This connector is provided for microphones. 1-5 6 Headphone Jack This connector is provided for headphones or speakers. 7 Line-In This connector is provided for external audio output devices. 8 Line...

User Manual
Page 16
... USB 2.0 Port The USB (Universal Serial Bus) port is for attaching USB devices such as storage devices, hard drives, video cameras, etc. 16 Thunderbolt™ 3 (Type-C) Port Thunderbolt™ 3 delivers stunning 40 Gbps for faster transfers. 12 S/PDIF-Out This S/PDIF (Sony & Philips Digital Interconnect Format) connector is provided for connection to the Local Area Network (LAN). Press and hold the Clear CMOS button for about 5-10 seconds to reset BIOS to default...
... USB 2.0 Port The USB (Universal Serial Bus) port is for attaching USB devices such as storage devices, hard drives, video cameras, etc. 16 Thunderbolt™ 3 (Type-C) Port Thunderbolt™ 3 delivers stunning 40 Gbps for faster transfers. 12 S/PDIF-Out This S/PDIF (Sony & Philips Digital Interconnect Format) connector is provided for connection to the Local Area Network (LAN). Press and hold the Clear CMOS button for about 5-10 seconds to reset BIOS to default...
User Manual
Page 17
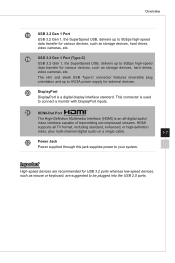
... USB 2.0 ports. This connector is used to connect a monitor with DisplayPort inputs. 21 HDMI-Out Port The High-Definition Multimedia Interface (HDMI) is a digital display interface standard. Overview 18 USB 3.2 Gen 1 Port USB 3.2 Gen 1, the SuperSpeed USB, delivers up to 5Gbps high-speed data transfer for various devices, such as storage devices, hard drives, video cameras, etc. 19 USB 3.2 Gen 1 Port (Type-C) USB 3.2 Gen 1, the SuperSpeed USB, delivers up to 5V/3A power supply for USB 3.2 ports whereas low-speed devices...
... USB 2.0 ports. This connector is used to connect a monitor with DisplayPort inputs. 21 HDMI-Out Port The High-Definition Multimedia Interface (HDMI) is a digital display interface standard. Overview 18 USB 3.2 Gen 1 Port USB 3.2 Gen 1, the SuperSpeed USB, delivers up to 5Gbps high-speed data transfer for various devices, such as storage devices, hard drives, video cameras, etc. 19 USB 3.2 Gen 1 Port (Type-C) USB 3.2 Gen 1, the SuperSpeed USB, delivers up to 5V/3A power supply for USB 3.2 ports whereas low-speed devices...
User Manual
Page 21
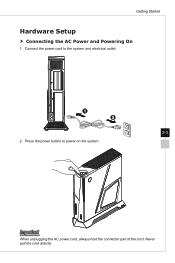
Getting Started Hardware Setup hh Connecting the AC Power and Powering On 1. Connect the power cord to power on the system. Important When unplugging the AC power cord, always hold the connector part of the cord. Never pull the cord directly. Press the power button to the system and electrical outlet. 1 2 2-3 2.
Getting Started Hardware Setup hh Connecting the AC Power and Powering On 1. Connect the power cord to power on the system. Important When unplugging the AC power cord, always hold the connector part of the cord. Never pull the cord directly. Press the power button to the system and electrical outlet. 1 2 2-3 2.

User Manual
Page 24
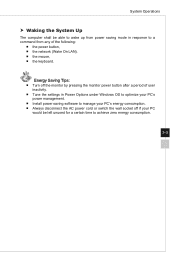
... your display, hard drive, and battery. To be energy efficient, turn off the display after 10 minutes ■■ Initiate Sleep after a period of user inactivity. hh Power Management in Windows 10 ■■ [Power Options] in the following ways when the system is operating on AC power: ■■ Turn off your display or set your personal needs. When used with an external ENERGY STAR qualified monitor, this feature also supports similar power management...
... your display, hard drive, and battery. To be energy efficient, turn off the display after 10 minutes ■■ Initiate Sleep after a period of user inactivity. hh Power Management in Windows 10 ■■ [Power Options] in the following ways when the system is operating on AC power: ■■ Turn off your display or set your personal needs. When used with an external ENERGY STAR qualified monitor, this feature also supports similar power management...
User Manual
Page 25
... the settings in Power Options under Windows OS to optimize your PC's power management. ■■ Install power saving software to manage your PC's energy consumption. ■■ Always disconnect the AC power cord or switch the wall socket off the monitor by pressing the monitor power button after a period of the following: ■■ the power button, ■■ the network (Wake On LAN), ■■ the mouse, ■■ the keyboard.
... the settings in Power Options under Windows OS to optimize your PC's power management. ■■ Install power saving software to manage your PC's energy consumption. ■■ Always disconnect the AC power cord or switch the wall socket off the monitor by pressing the monitor power button after a period of the following: ■■ the power button, ■■ the network (Wake On LAN), ■■ the mouse, ■■ the keyboard.
User Manual
Page 26
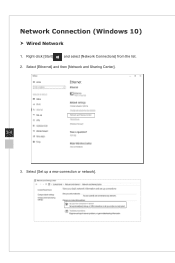
Right-click [Start] and select [Network Connections] from the list. 2. Select [Set up a new connection or network]. Network Connection (Windows 10) hh Wired Network 1. Select [Ethernet] and then [Network and Sharing Center]. 3-4 3.
Right-click [Start] and select [Network Connections] from the list. 2. Select [Set up a new connection or network]. Network Connection (Windows 10) hh Wired Network 1. Select [Ethernet] and then [Network and Sharing Center]. 3-4 3.
User Manual
Page 27
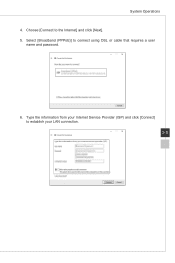
Select [Broadband (PPPoE)] to establish your LAN connection. 3-5 Type the information from your Internet Service Provider (ISP) and click [Connect] to connect using DSL or cable that requires a user name and password. 6. System Operations 4. Choose [Connect to the Internet] and click [Next]. 5.
Select [Broadband (PPPoE)] to establish your LAN connection. 3-5 Type the information from your Internet Service Provider (ISP) and click [Connect] to connect using DSL or cable that requires a user name and password. 6. System Operations 4. Choose [Connect to the Internet] and click [Next]. 5.

User Manual
Page 28
To establish a new connection, select [Network and Sharing Center]. 3-6 4. Enter information for the wireless network you intend to add and click [Next] to [Start] , click [Settings] and select [Network and Internet]. 2. A list of available WLAN connections pops up a new connection or network]. 5. A new WLAN connection has been made. Go to proceed. 7. Select [Set up . Choose a connection from the list. 3. hh Wireless Network 1. Followingly, choose [Manually connect to a wireless network] and click [Next] to continue. 6.
To establish a new connection, select [Network and Sharing Center]. 3-6 4. Enter information for the wireless network you intend to add and click [Next] to [Start] , click [Settings] and select [Network and Internet]. 2. A list of available WLAN connections pops up a new connection or network]. 5. A new WLAN connection has been made. Go to proceed. 7. Select [Set up . Choose a connection from the list. 3. hh Wireless Network 1. Followingly, choose [Manually connect to a wireless network] and click [Next] to continue. 6.
User Manual
Page 29
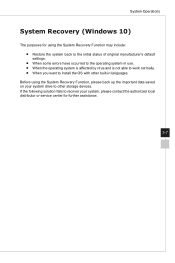
... authorized local distributor or service center for using the System Recovery Function may include: ■■ Restore the system back to the initial status of original manufacturer's default settings. ■■ When some errors have occurred to the operating system in use. ■■ When the operating system is affected by virus and is not able to work normally. ■■ When...
... authorized local distributor or service center for using the System Recovery Function may include: ■■ Restore the system back to the initial status of original manufacturer's default settings. ■■ When some errors have occurred to the operating system in use. ■■ When the operating system is affected by virus and is not able to work normally. ■■ When...
User Manual
Page 30
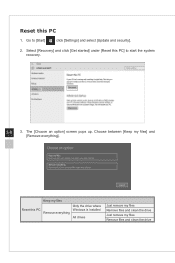
Choose between [Keep my files] and [Remove everything All drives Just remove my files Remove files and clean the drive Just remove my files Remove files and clean the drive Keep my files Only the drive where Reset this PC] to [Start] , click [Settings] and select [Update and security]. 2. Go to start the system recovery. 3-8 3. Select [Recovery] and click [Get started] under [Reset this PC Windows is installed Remove everything ]. The [Choose an option] screen pops up. Reset this PC 1.
Choose between [Keep my files] and [Remove everything All drives Just remove my files Remove files and clean the drive Just remove my files Remove files and clean the drive Keep my files Only the drive where Reset this PC] to [Start] , click [Settings] and select [Update and security]. 2. Go to start the system recovery. 3-8 3. Select [Recovery] and click [Get started] under [Reset this PC Windows is installed Remove everything ]. The [Choose an option] screen pops up. Reset this PC 1.

User Manual
Page 31
Click [Reset] to continue. 3-9 3. Click [Next] to start the system reset. hh Keep my files 1. The next screen will need to be reinstalled from the web or installation discs. Select [Keep my files]. The [Your apps will be removed] screen shows a list of apps that will show the changes to be made during the process. System Operations 2.
Click [Reset] to continue. 3-9 3. Click [Next] to start the system reset. hh Keep my files 1. The next screen will need to be reinstalled from the web or installation discs. Select [Keep my files]. The [Your apps will be removed] screen shows a list of apps that will show the changes to be made during the process. System Operations 2.

User Manual
Page 32
If you to choose between [Just remove my files] and [Remove files and clean the drive]. 3-10 4. Then select between [Only the drive where Windows is installed] and [All drives]. 3. Select [Remove everything 1. hh Remove everything ]. 2. The next screen will pop up, asking you have multiple hard drives, a screen will show the changes to start the system reset. Click [Reset] to be made during the process.
If you to choose between [Just remove my files] and [Remove files and clean the drive]. 3-10 4. Then select between [Only the drive where Windows is installed] and [All drives]. 3. Select [Remove everything 1. hh Remove everything ]. 2. The next screen will pop up, asking you have multiple hard drives, a screen will show the changes to start the system reset. Click [Reset] to be made during the process.
User Manual
Page 33
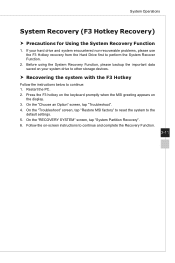
... hard drive and system encountered non-recoverable problems, please use the F3 Hotkey recovery from the Hard Drive first to perform the System Recover Function. 2. On the "Troubleshoot" screen, tap "Restore MSI factory" to reset the system to continue: 1. On the "RECOVERY SYSTEM" screen, tap "System Partition Recovery". 6. Follow the on-screen instructions to other storage devices. System Operations System Recovery (F3 Hotkey Recovery) hh Precautions for Using the System Recovery Function 1. If your system drive...
... hard drive and system encountered non-recoverable problems, please use the F3 Hotkey recovery from the Hard Drive first to perform the System Recover Function. 2. On the "Troubleshoot" screen, tap "Restore MSI factory" to reset the system to continue: 1. On the "RECOVERY SYSTEM" screen, tap "System Partition Recovery". 6. Follow the on-screen instructions to other storage devices. System Operations System Recovery (F3 Hotkey Recovery) hh Precautions for Using the System Recovery Function 1. If your system drive...


