Quick Start Guide
Page 2
... 4 M-VISION DASHBOARD function 4 Connecting the M-VISION Dashboard 5 Get Started...6 System Requirements 6 Installing MSI Center 6 Basic mode...8 Debug Code LED...8 Debug status...9 CPU Error...9 DDR Error...9 VGA Error...10 Boot Fail...10 Tuning Controller 11 CPU CLK 11 Safe Boot...11 OC Retry...11 Clear CMOS ...11 Shut Down ...11 Restart...11 Countdown Timer 12 Countdown timer setting page 12 Temperature display 14 Humidity display...14 Advanced mode...15 EZ Tuning...16 CPU CLK 16 Shut...
... 4 M-VISION DASHBOARD function 4 Connecting the M-VISION Dashboard 5 Get Started...6 System Requirements 6 Installing MSI Center 6 Basic mode...8 Debug Code LED...8 Debug status...9 CPU Error...9 DDR Error...9 VGA Error...10 Boot Fail...10 Tuning Controller 11 CPU CLK 11 Safe Boot...11 OC Retry...11 Clear CMOS ...11 Shut Down ...11 Restart...11 Countdown Timer 12 Countdown timer setting page 12 Temperature display 14 Humidity display...14 Advanced mode...15 EZ Tuning...16 CPU CLK 16 Shut...
Quick Start Guide
Page 3
MSI Center shortcut 20 Power On the computer 21 Configure advanced mode with MSI Center 22 How to open M-Vision Dashboard setting menu 22 M-Vision Dashboard setting menu 23 Set APP Shortcut 23 Brightness...24 Direction...24 LCD Display...24 Mute...24 Alarm Setting 24 Hardware Monitor 25 Video Image...25 Customize Banner 25 System Clock 25 Live Weather...25 Others...26 S4/S5 (Suspend to Disk/Shutdown) state 26 Flash BIOS states 26 Contents 3
MSI Center shortcut 20 Power On the computer 21 Configure advanced mode with MSI Center 22 How to open M-Vision Dashboard setting menu 22 M-Vision Dashboard setting menu 23 Set APP Shortcut 23 Brightness...24 Direction...24 LCD Display...24 Mute...24 Alarm Setting 24 Hardware Monitor 25 Video Image...25 Customize Banner 25 System Clock 25 Live Weather...25 Others...26 S4/S5 (Suspend to Disk/Shutdown) state 26 Flash BIOS states 26 Contents 3
Quick Start Guide
Page 4
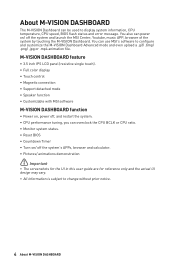
...). ∙∙Full color display ∙∙Touch control ∙∙Magnetic connection ∙∙Support detached mode ∙∙Speaker function ∙∙Customizable with MSI software M-VISION DASHBOARD function ∙∙Power on, power off, and restart the system. ∙∙CPU performance tuning, you can overclock the CPU BCLK or CPU ratio. ∙∙Monitor system status. ∙∙Reset BIOS ∙∙Countdown...
...). ∙∙Full color display ∙∙Touch control ∙∙Magnetic connection ∙∙Support detached mode ∙∙Speaker function ∙∙Customizable with MSI software M-VISION DASHBOARD function ∙∙Power on, power off, and restart the system. ∙∙CPU performance tuning, you can overclock the CPU BCLK or CPU ratio. ∙∙Monitor system status. ∙∙Reset BIOS ∙∙Countdown...

Quick Start Guide
Page 5
... to connect M-VISION Dashboard to the motherboard by the M-VISION cable (detached mode). Use the supplied M-VISION cable to the M-VISION mode. M_SW1: M-VISION switch M-VISION mode: for M-VISION Dashboard 3 Normal mode (Default): for USB device 1 2 10 Gb LAN 2 M-VISION Dashboard Port M-VISION cable About M-VISION DASHBOARD 5 Remove the M-VISION Dashboard from the motherboard. 2. Switch the M-VISION switch (M_SW1) to connect the M-VISION Dashboard and specified USB port (M-VISION Dashboard port) on the back panel. 3. Connecting the...
... to connect M-VISION Dashboard to the motherboard by the M-VISION cable (detached mode). Use the supplied M-VISION cable to the M-VISION mode. M_SW1: M-VISION switch M-VISION mode: for M-VISION Dashboard 3 Normal mode (Default): for USB device 1 2 10 Gb LAN 2 M-VISION Dashboard Port M-VISION cable About M-VISION DASHBOARD 5 Remove the M-VISION Dashboard from the motherboard. 2. Switch the M-VISION switch (M_SW1) to connect the M-VISION Dashboard and specified USB port (M-VISION Dashboard port) on the back panel. 3. Connecting the...
Quick Start Guide
Page 6
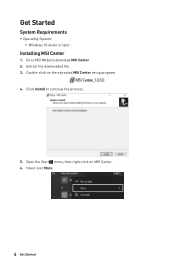
Get Started System Requirements ∙∙Operating System: ▪▪Windows 10 64-bit or later. Double-click on MSI Center. 6. Hover over More. 6 Get Started Open the Start menu, then right-click on the extracted MSI Center setup program. 4. Go to continue the process. 5. Extract the downloaded file. 3. Click Install to MSI Website download MSI Center. 2. Installing MSI Center 1.
Get Started System Requirements ∙∙Operating System: ▪▪Windows 10 64-bit or later. Double-click on MSI Center. 6. Hover over More. 6 Get Started Open the Start menu, then right-click on the extracted MSI Center setup program. 4. Go to continue the process. 5. Extract the downloaded file. 3. Click Install to MSI Website download MSI Center. 2. Installing MSI Center 1.

Quick Start Guide
Page 7
7. Select Run as administrator. 8. You can start to use MSI Center. Get Started 7 Please wait until the installation is complete. 9.
7. Select Run as administrator. 8. You can start to use MSI Center. Get Started 7 Please wait until the installation is complete. 9.
Quick Start Guide
Page 8
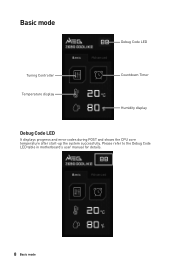
Basic mode Debug Code LED Tuning Controller Temperature display Countdown Timer Humidity display Debug Code LED It displays progress and error codes during POST and shows the CPU core temperature after start-up the system successfully. Please refer to the Debug Code LED table in motherboard's user manual for details. 8 Basic mode
Basic mode Debug Code LED Tuning Controller Temperature display Countdown Timer Humidity display Debug Code LED It displays progress and error codes during POST and shows the CPU core temperature after start-up the system successfully. Please refer to the Debug Code LED table in motherboard's user manual for details. 8 Basic mode
Quick Start Guide
Page 10
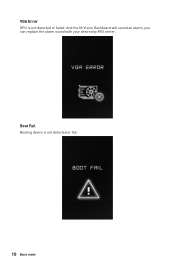
VGA Error GPU is not detected or fail. 10 Basic mode And the M-Vision Dashboard will sound an alarm, you can replace the alarm sound with your desired by MSI center. Boot Fail Booting device is not detected or failed.
VGA Error GPU is not detected or fail. 10 Basic mode And the M-Vision Dashboard will sound an alarm, you can replace the alarm sound with your desired by MSI center. Boot Fail Booting device is not detected or failed.

Quick Start Guide
Page 11
... Safe Boot mode. Restart Touch to reset BIOS with default and lower the PCIe (from CPU) mode. Safe Boot Touch and start the system simultaneously to incress/ decrease the CPU base clock/ CPU ratio. Basic mode 11 CPU CLK - / + Touch / to boot in the POST process. OC Retry Touch to power on the computer. Power On Touch to retry OC settings until the system boot up successfully. Tuning Controller Tuning controller menu helps you to be overclocked...
... Safe Boot mode. Restart Touch to reset BIOS with default and lower the PCIe (from CPU) mode. Safe Boot Touch and start the system simultaneously to incress/ decrease the CPU base clock/ CPU ratio. Basic mode 11 CPU CLK - / + Touch / to boot in the POST process. OC Retry Touch to power on the computer. Power On Touch to retry OC settings until the system boot up successfully. Tuning Controller Tuning controller menu helps you to be overclocked...
Quick Start Guide
Page 12
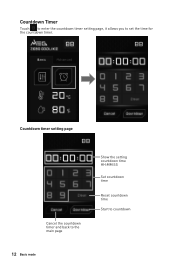
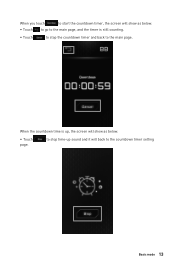
Countdown Timer Touch to enter the countdown timer setting page, it allows you to countdown 12 Basic mode Countdown timer setting page Cancel the countdown timer and back to the main page Show the setting countdown time HH:MM:SS Set countdown time Reset countdown time Start to set the time for the countdown timer.
Countdown Timer Touch to enter the countdown timer setting page, it allows you to countdown 12 Basic mode Countdown timer setting page Cancel the countdown timer and back to the main page Show the setting countdown time HH:MM:SS Set countdown time Reset countdown time Start to set the time for the countdown timer.
Quick Start Guide
Page 13
When the countdown time is still counting. ∙∙ Touch to stop time-up , the screen will back to the countdown timer setting Basic mode 13 When you touch to start the countdown timer, the screen will show as below . ∙∙Touch to go to the main page, and the timer is up sound and it will show as below . ∙∙ Touch page. to stop the countdown timer and back to the main page.
When the countdown time is still counting. ∙∙ Touch to stop time-up , the screen will back to the countdown timer setting Basic mode 13 When you touch to start the countdown timer, the screen will show as below . ∙∙Touch to go to the main page, and the timer is up sound and it will show as below . ∙∙ Touch page. to stop the countdown timer and back to the main page.

Quick Start Guide
Page 15
... can be used to enable the advanced mode. Advanced mode 15 Please download and install the MSI Center to display the system information and status. You can also use the MSI Center to turn on the screen (as shown below) and the advanced mode is disabled. Advanced mode Before using the M-Vision Dashboard advanced mode, please make sure you have installed the MSI Center. You can use it to configure and...
... can be used to enable the advanced mode. Advanced mode 15 Please download and install the MSI Center to display the system information and status. You can also use the MSI Center to turn on the screen (as shown below) and the advanced mode is disabled. Advanced mode Before using the M-Vision Dashboard advanced mode, please make sure you have installed the MSI Center. You can use it to configure and...

Quick Start Guide
Page 16
EZ Tuning Touch to restart the computer. 16 Advanced mode Restart Touch to enter the EZ Tuning menu. CPU CLK - / + Touch / to be overclocked. Please go to BIOS > OC > Direct OC Button and select the CPU BCLK or CPU Ratio to incress/ decrease the CPU base clock/ CPU ratio. Shut Down Touch to power off the computer.
EZ Tuning Touch to restart the computer. 16 Advanced mode Restart Touch to enter the EZ Tuning menu. CPU CLK - / + Touch / to be overclocked. Please go to BIOS > OC > Direct OC Button and select the CPU BCLK or CPU Ratio to incress/ decrease the CPU base clock/ CPU ratio. Shut Down Touch to power off the computer.
Quick Start Guide
Page 22
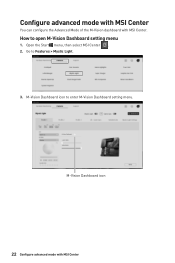
M-Vision Dashboard icon to Features > Mystic Light. 3. Open the Start menu, then select MSI Center . 2. M-Vision Dashboard icon 22 Configure advanced mode with MSI Center. Go to enter M-Vision Dashboard setting menu. Configure advanced mode with MSI Center You can configure the Advanced Mode of the M-Vision dashboard with MSI Center How to open M-Vision Dashboard setting menu 1.
M-Vision Dashboard icon to Features > Mystic Light. 3. Open the Start menu, then select MSI Center . 2. M-Vision Dashboard icon 22 Configure advanced mode with MSI Center. Go to enter M-Vision Dashboard setting menu. Configure advanced mode with MSI Center You can configure the Advanced Mode of the M-Vision dashboard with MSI Center How to open M-Vision Dashboard setting menu 1.
Quick Start Guide
Page 23
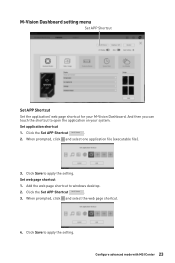
Set application shortcut 1. Configure advanced mode with MSI Center 23 Add the web page shortcut to apply the setting. Click the Set APP Shortcut . 3. When prompted, click and select the web page shortcut. 4. When prompted, click and select one application file (executable file). 3. Click Save to windows desktop. 2. Click Save to open the application on your M-Vision Dashboard. Click the Set APP...
Set application shortcut 1. Configure advanced mode with MSI Center 23 Add the web page shortcut to apply the setting. Click the Set APP Shortcut . 3. When prompted, click and select the web page shortcut. 4. When prompted, click and select one application file (executable file). 3. Click Save to windows desktop. 2. Click Save to open the application on your M-Vision Dashboard. Click the Set APP...
Quick Start Guide
Page 24
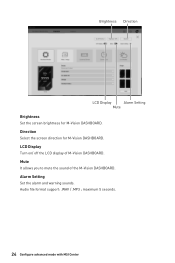
LCD Display Turn on/ off the LCD display of the M-Vision DASHBOARD. Alarm Setting Set the alarm and warning sounds. Audio file format support: .WAV / .MP3 ; Direction Select the screen direction for M-Vision DASHBOARD. maximum 5 seconds. 24 Configure advanced mode with MSI Center Brightness Direction LCD Display Alarm Setting Mute Brightness Set the screen brightness for M-Vision DASHBOARD. Mute It allows you to mute the sound of M-Vision DASHBOARD.
LCD Display Turn on/ off the LCD display of the M-Vision DASHBOARD. Alarm Setting Set the alarm and warning sounds. Audio file format support: .WAV / .MP3 ; Direction Select the screen direction for M-Vision DASHBOARD. maximum 5 seconds. 24 Configure advanced mode with MSI Center Brightness Direction LCD Display Alarm Setting Mute Brightness Set the screen brightness for M-Vision DASHBOARD. Mute It allows you to mute the sound of M-Vision DASHBOARD.

Quick Start Guide
Page 25
... Weather Enable or disable to show the live weather of selected items will be shown on the M-Vision DASHBOARD sequentially. System Clock Select the display style of the hardware monitor function. Configure advanced mode with MSI Center 25 File Restriction: .BMP/ .JPG/ .PNG/ .GIF/.MP4 ; 800x480 px. Hardware Monitor Video Customize System Image Banner Clock Live Weather Hardware Monitor Select the display items of...
... Weather Enable or disable to show the live weather of selected items will be shown on the M-Vision DASHBOARD sequentially. System Clock Select the display style of the hardware monitor function. Configure advanced mode with MSI Center 25 File Restriction: .BMP/ .JPG/ .PNG/ .GIF/.MP4 ; 800x480 px. Hardware Monitor Video Customize System Image Banner Clock Live Weather Hardware Monitor Select the display items of...
Quick Start Guide
Page 26
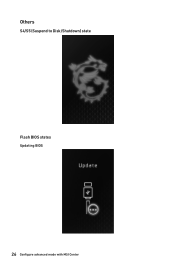
Others S4/S5 (Suspend to Disk/Shutdown) state Flash BIOS states Updating BIOS 26 Configure advanced mode with MSI Center
Others S4/S5 (Suspend to Disk/Shutdown) state Flash BIOS states Updating BIOS 26 Configure advanced mode with MSI Center
Quick Start Guide
Page 27
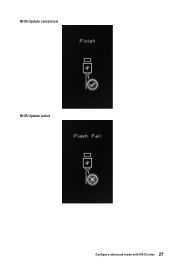
BIOS Update completed BIOS Update failed Configure advanced mode with MSI Center 27
BIOS Update completed BIOS Update failed Configure advanced mode with MSI Center 27

Quick Start Guide
Page 28
No BIOS file or can not read the BIOS file 28 Configure advanced mode with MSI Center
No BIOS file or can not read the BIOS file 28 Configure advanced mode with MSI Center


