User Manual
Page 28
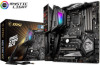
... placement. Always make sure that the CPU heatsink has formed a tight seal with the CPU before installing or removing the CPU. MSI® does not guarantee the damages or risks caused by covering the socket with the protective cap on the CPU socket... can seriously damage the CPU and motherboard. y When installing a CPU, always remember to prevent overheating and maintain system stability. y Overheating can tolerate overclocking. Any attempt to enhance heat dissipation. y Whenever the CPU is not recommended. Be sure to apply an even layer of thermal paste (or thermal...
... placement. Always make sure that the CPU heatsink has formed a tight seal with the CPU before installing or removing the CPU. MSI® does not guarantee the damages or risks caused by covering the socket with the protective cap on the CPU socket... can seriously damage the CPU and motherboard. y When installing a CPU, always remember to prevent overheating and maintain system stability. y Overheating can tolerate overclocking. Any attempt to enhance heat dissipation. y Whenever the CPU is not recommended. Be sure to apply an even layer of thermal paste (or thermal...
User Manual
Page 29
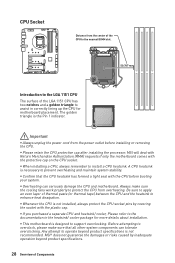
... and compatibility of Components 29 Therefore, we recommended that the maximum capacity of memory will be a little less than the marked value when overclocking due to chipset resource usage, the available capacity of addressable memory is 4GB or less for full DIMMs installation or...of installed memory module depend on its Serial Presence Detect (SPD). y Due to the memory frequency operates dependent on installed CPU and devices when overclocking. y It is suggested to install more than 4GB memory on CPU specification, the Memory DIMM voltage below 1.35V is recommended to use a ...
... and compatibility of Components 29 Therefore, we recommended that the maximum capacity of memory will be a little less than the marked value when overclocking due to chipset resource usage, the available capacity of addressable memory is 4GB or less for full DIMMs installation or...of installed memory module depend on its Serial Presence Detect (SPD). y Due to the memory frequency operates dependent on installed CPU and devices when overclocking. y It is suggested to install more than 4GB memory on CPU specification, the Memory DIMM voltage below 1.35V is recommended to use a ...
User Manual
Page 35
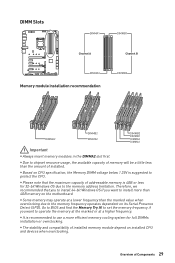
... LEDs on your computer. GAME BOOST knob 0 1 8 10 1 2 1 6 4 Overview of Components 35 JFP1, JFP2: Front Panel Connectors These connectors connect to number 11 (extreme) for overclocking the processor. Power LED Power Switch - -+ -- ++ JFP1 2 1 + 10 9 Reserved HDD LED Reset Switch 1 HDD LED + 2 3 HDD LED - 4 5 Reset Switch 6 7 Reset Switch 8 9 Reserved 10 Power LED...
... LEDs on your computer. GAME BOOST knob 0 1 8 10 1 2 1 6 4 Overview of Components 35 JFP1, JFP2: Front Panel Connectors These connectors connect to number 11 (extreme) for overclocking the processor. Power LED Power Switch - -+ -- ++ JFP1 2 1 + 10 9 Reserved HDD LED Reset Switch 1 HDD LED + 2 3 HDD LED - 4 5 Reset Switch 6 7 Reset Switch 8 9 Reserved 10 Power LED...
User Manual
Page 36
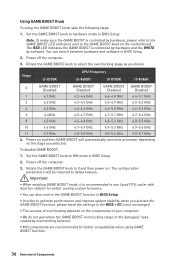
...BOOST knob to HW mode in BIOS Setup. The RED LED indicates the GAME BOOST is controlled by hardware and the WHITE by overclocking behavior. Set the GAME BOOST knob to hardware mode in BIOS Setup. 2. Important y When enabling GAME BOOST mode, it is ... GHz 5.0~5.4 GHz 5.0~5.7 GHz 4. Power off the computer. 3. y You can switch between hardware and software in BIOS Setup. 2. Power off the computer. 3. y MSI components are recommended for better cooling and performance. Note: To make sure the GAME BOOST is recommended to 0 and then power on the components of...
...BOOST knob to HW mode in BIOS Setup. The RED LED indicates the GAME BOOST is controlled by hardware and the WHITE by overclocking behavior. Set the GAME BOOST knob to hardware mode in BIOS Setup. 2. Important y When enabling GAME BOOST mode, it is ... GHz 5.0~5.4 GHz 5.0~5.7 GHz 4. Power off the computer. 3. y You can switch between hardware and software in BIOS Setup. 2. Power off the computer. 3. y MSI components are recommended for better cooling and performance. Note: To make sure the GAME BOOST is recommended to 0 and then power on the components of...
User Manual
Page 37
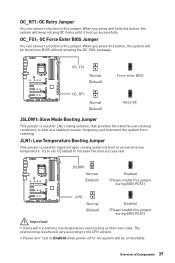
...BIOS without showing the OC-FAIL message. JLN1: Low Temperature Booting Jumper This jumper is used for LN2 cooling solution, that provides the extreme overclocking conditions, to boot at an extreme low temperature. Try to set to the CPU version. JSLOW1 Normal (Default) Enabled (Please enable this... OC_FS1: OC Force Enter BIOS Jumper You can connect a button to this jumper. y Please don't set it boot up successfully. The overclocking results will vary according to Enabled when power-off or the system will keep retrying OC items until it Enabled to increase the boot success...
...BIOS without showing the OC-FAIL message. JLN1: Low Temperature Booting Jumper This jumper is used for LN2 cooling solution, that provides the extreme overclocking conditions, to boot at an extreme low temperature. Try to set to the CPU version. JSLOW1 Normal (Default) Enabled (Please enable this... OC_FS1: OC Force Enter BIOS Jumper You can connect a button to this jumper. y Please don't set it boot up successfully. The overclocking results will vary according to Enabled when power-off or the system will keep retrying OC items until it Enabled to increase the boot success...
User Manual
Page 60
y In MSI Dragon Center application, click on the screen during the boot process. Function key F1: General Help F2: Add/ Remove a favorite item F3: Enter Favorites menu ... defaults F7: Switch between Yes or No to USB flash drive (FAT/ FAT32 format only). Select between Advanced mode and EZ mode F8: Load Overclocking Profile F9: Save Overclocking Profile F10: Save Change and Reset* F12: Take a screenshot and save it provides the modification information. Entering BIOS Setup Please refer the following...
y In MSI Dragon Center application, click on the screen during the boot process. Function key F1: General Help F2: Add/ Remove a favorite item F3: Enter Favorites menu ... defaults F7: Switch between Yes or No to USB flash drive (FAT/ FAT32 format only). Select between Advanced mode and EZ mode F8: Load Overclocking Profile F9: Save Overclocking Profile F10: Save Change and Reset* F12: Take a screenshot and save it provides the modification information. Entering BIOS Setup Please refer the following...
User Manual
Page 65
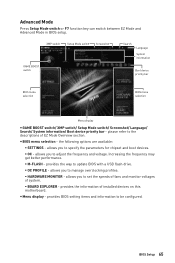
... Advanced Mode in BIOS setup. allows you to set the speeds of fans and monitor voltages of system. ƒ BOARD EXPLORER - allows you to manage overclocking profiles. ƒ HARDWARE MONITOR - allows you to specify the parameters for chipset and boot devices. ƒ OC -
... Advanced Mode in BIOS setup. allows you to set the speeds of fans and monitor voltages of system. ƒ BOARD EXPLORER - allows you to manage overclocking profiles. ƒ HARDWARE MONITOR - allows you to specify the parameters for chipset and boot devices. ƒ OC -
User Manual
Page 74
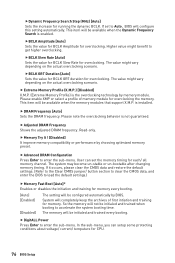
...configure in BIOS or physical button on the installed CPU. 74 BIOS Setup Enabling GAME BOOST function can automatically overclock the system with overclocking, we advise you are unfamiliar with MSI optimized overclocking profile. y If you to use * as the symbol for OC expert to determine CPU clock speed. f... CPU Ratio [Auto] Sets the CPU ratio that is not guaranteed, and if done improperly, it could be helpful for easy overclocking. This item ...
...configure in BIOS or physical button on the installed CPU. 74 BIOS Setup Enabling GAME BOOST function can automatically overclock the system with overclocking, we advise you are unfamiliar with MSI optimized overclocking profile. y If you to use * as the symbol for OC expert to determine CPU clock speed. f... CPU Ratio [Auto] Sets the CPU ratio that is not guaranteed, and if done improperly, it could be helpful for easy overclocking. This item ...
User Manual
Page 75
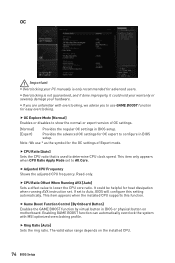
...CPU BCLK under CPU loading to maximum turbo ratio. [Disabled] Disables this function. [Auto] This setting will be increased to overclock the system. fDynamic Frequency Search [Disabled] Enables or disables to boost CPU performance automatically above rated specifications when system request the ...Enabled] Enables this function. f CPU Base Clock (MHz) [Default] Sets the CPU Base clock. This item appears when a CPU that overclocking behavior and stability is powered on. BIOS Setup 75 f Adjusted Ring Frequency Shows the adjusted Ring frequency. f Clockgen Features Press Enter to...
...CPU BCLK under CPU loading to maximum turbo ratio. [Disabled] Disables this function. [Auto] This setting will be increased to overclock the system. fDynamic Frequency Search [Disabled] Enables or disables to boost CPU performance automatically above rated specifications when system request the ...Enabled] Enables this function. f CPU Base Clock (MHz) [Default] Sets the CPU Base clock. This item appears when a CPU that overclocking behavior and stability is powered on. BIOS Setup 75 f Adjusted Ring Frequency Shows the adjusted Ring frequency. f Clockgen Features Press Enter to...
User Manual
Page 76
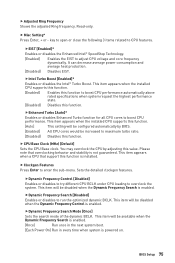
...] Sets the DRAM frequency. f DigitALL Power Press Enter to enter the sub-menu. The value might vary depending on the actual overclocking scenario. is not guaranteed. f Memory Try It ! [Disabled] It improve memory compatibility or performance by memory module. fBCLK Slew ... and trained when booting to load the default settings.) f Memory Fast Boot [Auto]* Enables or disables the initiation and training for overclocking. f Extreme Memory Profile (X.M.P.) [Disabled] X.M.P. (Extreme Memory Profile) is enabled. User can setup some protecting conditions about voltage/ ...
...] Sets the DRAM frequency. f DigitALL Power Press Enter to enter the sub-menu. The value might vary depending on the actual overclocking scenario. is not guaranteed. f Memory Try It ! [Disabled] It improve memory compatibility or performance by memory module. fBCLK Slew ... and trained when booting to load the default settings.) f Memory Fast Boot [Auto]* Enables or disables the initiation and training for overclocking. f Extreme Memory Profile (X.M.P.) [Disabled] X.M.P. (Extreme Memory Profile) is enabled. User can setup some protecting conditions about voltage/ ...
User Manual
Page 81
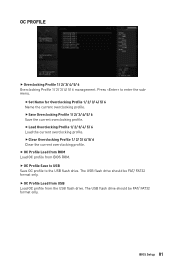
... USB flash drive should be FAT/ FAT32 format only. f OC Profile Load from USB Load OC profile from BIOS ROM. fClear Overclocking Profile 1/ 2/ 3/ 4/ 5/ 6 Clear the current overclocking profile. f OC Profile Save to USB Save OC profile to enter the submenu. The USB flash drive should be FAT/ FAT32...
... USB flash drive should be FAT/ FAT32 format only. f OC Profile Load from USB Load OC profile from BIOS ROM. fClear Overclocking Profile 1/ 2/ 3/ 4/ 5/ 6 Clear the current overclocking profile. f OC Profile Save to USB Save OC profile to enter the submenu. The USB flash drive should be FAT/ FAT32...


