User Manual
Page 20
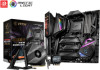
... 2x 256 Mb flash y UEFI AMI BIOS y ACPI 6.1, SMBIOS 2.8 y Multi-language y Drivers y DRAGON CENTER y Killer Control Center y Nahimic Audio y CPU-Z MSI GAMING y MSI App Player (BlueStacks) y Google Chrome™, Google Toolbar, Google Drive y Norton™ Internet Security Solution y DRAGON OPTIMIZATION y OC Performance y Hardware Monitor y LAN ...Manager y True Color y Mystic Light y Live update Please refer to http://download.msi. Continued on next page 20 Specifications com/manual/mb/DRAGONCENTER2. pdf for more details. x 10.7 in .
... 2x 256 Mb flash y UEFI AMI BIOS y ACPI 6.1, SMBIOS 2.8 y Multi-language y Drivers y DRAGON CENTER y Killer Control Center y Nahimic Audio y CPU-Z MSI GAMING y MSI App Player (BlueStacks) y Google Chrome™, Google Toolbar, Google Drive y Norton™ Internet Security Solution y DRAGON OPTIMIZATION y OC Performance y Hardware Monitor y LAN ...Manager y True Color y Mystic Light y Live update Please refer to http://download.msi. Continued on next page 20 Specifications com/manual/mb/DRAGONCENTER2. pdf for more details. x 10.7 in .
User Manual
Page 23
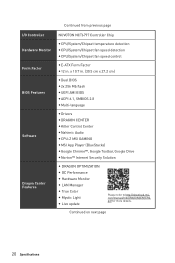
... 6 Package contents Please check the contents of the above items are damaged or missing, please contact your motherboard package. It should contain: Motherboard MEG X570 GODLIKE SATA 6Gb/s Cables 6 1 to 2 RGB LED Extension Y Cable 80cm 1 CORSAIR RGB LED Extension Cable 50cm 1 Cable RAINBOW RGB LED... M.2 screws 3 Accessories 6.3mm Audio Adapters 1 Case Badge 1 SATA Cable Labels 1 Product Registration Card 1 Application DVD Driver DVD 1 User Manual 1 Documentation Quick Guide 1 Quick Installation Guide 1 Important If any of your retailer. Package contents 23
... 6 Package contents Please check the contents of the above items are damaged or missing, please contact your motherboard package. It should contain: Motherboard MEG X570 GODLIKE SATA 6Gb/s Cables 6 1 to 2 RGB LED Extension Y Cable 80cm 1 CORSAIR RGB LED Extension Cable 50cm 1 Cable RAINBOW RGB LED... M.2 screws 3 Accessories 6.3mm Audio Adapters 1 Case Badge 1 SATA Cable Labels 1 Product Registration Card 1 Application DVD Driver DVD 1 User Manual 1 Documentation Quick Guide 1 Quick Installation Guide 1 Important If any of your retailer. Package contents 23
User Manual
Page 43
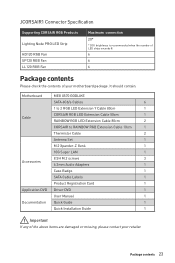
...) for overclocking the processor. Rotate the GAME BOOST knob to 0 and then power on and then GAME BOOST will be automatically adjusted after you to manually select a stage from number 0 (default) to hardware mode in BIOS Setup. 2. The configuration parameters will automatically overclock processor depending on the stage you desire. GAME...
...) for overclocking the processor. Rotate the GAME BOOST knob to 0 and then power on and then GAME BOOST will be automatically adjusted after you to manually select a stage from number 0 (default) to hardware mode in BIOS Setup. 2. The configuration parameters will automatically overclock processor depending on the stage you desire. GAME...
User Manual
Page 44
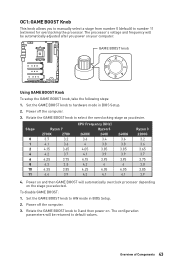
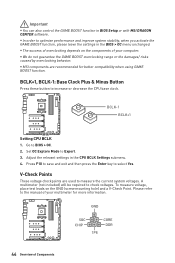
... of overclocking depends on the GND (screw mounting hole) and a V-Check Point. Adjust the relevant settings in BIOS Setup or with MSI DRAGON CENTER software. y We do not guarantee the GAME BOOST overclocking range or the damages/ risks caused by overclocking behavior. Press F10... to save and exit and then press the Enter key to check voltages. y MSI components are used to the manual of your multimeter for better compatibility when using GAME BOOST function. V-Check Points These voltage checkpoints are recommended for more ...
... of overclocking depends on the GND (screw mounting hole) and a V-Check Point. Adjust the relevant settings in BIOS Setup or with MSI DRAGON CENTER software. y We do not guarantee the GAME BOOST overclocking range or the damages/ risks caused by overclocking behavior. Press F10... to save and exit and then press the Enter key to check voltages. y MSI components are used to the manual of your multimeter for better compatibility when using GAME BOOST function. V-Check Points These voltage checkpoints are recommended for more ...
User Manual
Page 46
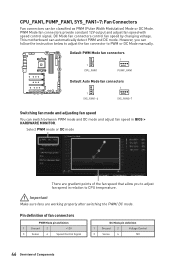
..., PUMP_FAN1, SYS_FAN1~7: Fan Connectors Fan connectors can switch between PWM mode and DC mode and adjust fan speed in relation to PWM or DC Mode manually. DC Mode fan connectors control fan speed by changing voltage. Default PWM Mode fan connectors 1 CPU_FAN1 1 PUMP_FAN1 Default Auto Mode fan connectors 1 1 SYS_FAN1~4 SYS_FAN5~7 Switching...
..., PUMP_FAN1, SYS_FAN1~7: Fan Connectors Fan connectors can switch between PWM mode and DC mode and adjust fan speed in relation to PWM or DC Mode manually. DC Mode fan connectors control fan speed by changing voltage. Default PWM Mode fan connectors 1 CPU_FAN1 1 PUMP_FAN1 Default Auto Mode fan connectors 1 1 SYS_FAN1~4 SYS_FAN5~7 Switching...
User Manual
Page 49
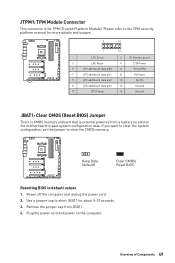
Please refer to the TPM security platform manual for more details and usages. 2 14 1 13 1 LPC Clock 2 3V Standby power 3 LPC Reset 4 3.3V Power 5 LPC address & data pin0 6 Serial IRQ 7 LPC address & data ...
Please refer to the TPM security platform manual for more details and usages. 2 14 1 13 1 LPC Clock 2 3V Standby power 3 LPC Reset 4 3.3V Power 5 LPC address & data pin0 6 Serial IRQ 7 LPC address & data ...
User Manual
Page 64
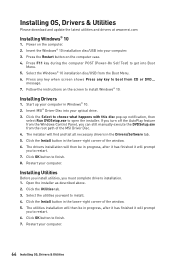
...computer in the lower-right corner of the window. 6. If you turn off the AutoPlay feature from the Windows Control Panel, you can still manually execute the DVDSetup.exe from the root path of the window. 5. Click OK button to install. 4. Select the utilities you to restart.... shows Press any key to finish. 7. Restart your computer. 64 Installing OS, Drivers & Utilities Press the Restart button on the computer. 2. Insert MSI® Driver Disc into your optical drive. 3. Open the installer as described above. 2. Restart your computer. Follow the instructions on the screen to ...
...computer in the lower-right corner of the window. 6. If you turn off the AutoPlay feature from the Windows Control Panel, you can still manually execute the DVDSetup.exe from the root path of the window. 5. Click OK button to install. 4. Select the utilities you to restart.... shows Press any key to finish. 7. Restart your computer. 64 Installing OS, Drivers & Utilities Press the Restart button on the computer. 2. Insert MSI® Driver Disc into your optical drive. 3. Open the installer as described above. 2. Restart your computer. Follow the instructions on the screen to ...
User Manual
Page 69
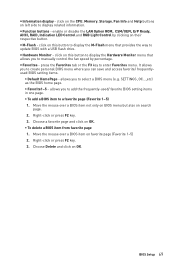
... to a favorite page (Favorite 1~5) 1. y Function buttons - Right-click or press F2 key. 3. click on this button to display the M-Flash menu that allows you to manually control the fan speed by clicking on left side to enter Favorites menu. It allows you can save and access favorite/ frequentlyused BIOS setting items...
... to a favorite page (Favorite 1~5) 1. y Function buttons - Right-click or press F2 key. 3. click on this button to display the M-Flash menu that allows you to manually control the fan speed by clicking on left side to enter Favorites menu. It allows you can save and access favorite/ frequentlyused BIOS setting items...
User Manual
Page 79
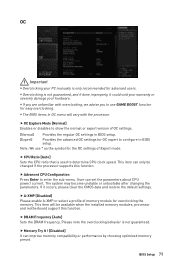
... is only recommended for overclocking the memory. BIOS Setup 79 y Overclocking is not guaranteed. If it could void your warranty or severely damage your PC manually is used to enter the sub-menu. OC Important y Overclocking your hardware. The system may become unstable or unbootable after changing the parameters. Please note...
... is only recommended for overclocking the memory. BIOS Setup 79 y Overclocking is not guaranteed. If it could void your warranty or severely damage your PC manually is used to enter the sub-menu. OC Important y Overclocking your hardware. The system may become unstable or unbootable after changing the parameters. Please note...
User Manual
Page 80
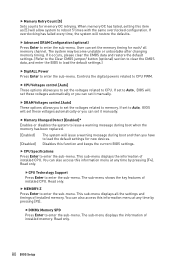
...system may become unstable or unbootable after changing memory timing. If set to Auto, BIOS will set these voltages automatically or you can set it manually. Read only. Read only. fDIMMx Memory SPD Press Enter to enter the sub-menu. User can set the memory timing for new devices. f...every time, the system will set these voltages automatically or you to set the voltages related to Auto, BIOS will restore the defaults. If it manually. If set it occurs, please clear the CMOS data and restore the default settings. (Refer to the Clear CMOS jumper/ button (optional) ...
...system may become unstable or unbootable after changing memory timing. If set to Auto, BIOS will set these voltages automatically or you can set it manually. Read only. Read only. fDIMMx Memory SPD Press Enter to enter the sub-menu. User can set the memory timing for new devices. f...every time, the system will set these voltages automatically or you to set the voltages related to Auto, BIOS will restore the defaults. If it manually. If set it occurs, please clear the CMOS data and restore the default settings. (Refer to the Clear CMOS jumper/ button (optional) ...
User Manual
Page 88
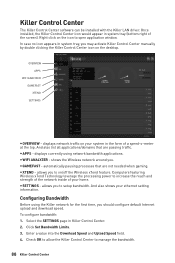
... in system tray (bottom right of the screen). Right click on the desktop. y APPS - shows the Wireless network around you may activate Killer Control Center manually by double clicking the Killer Control Center icon on the icon to manage the bandwidth. 88 Killer Control Center Check OK to allow the Killer...
... in system tray (bottom right of the screen). Right click on the desktop. y APPS - shows the Wireless network around you may activate Killer Control Center manually by double clicking the Killer Control Center icon on the icon to manage the bandwidth. 88 Killer Control Center Check OK to allow the Killer...
User Manual
Page 93
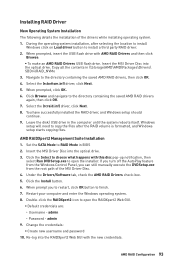
...RAIDXpert2 Management Suite Installation 1. Double-click the RAIDXpert2 icon to finish. 7. Select the (rcraid.inf) driver, click Next. 8. Insert the MSI Driver Disc into the RAIDXpert2 Web GUI with the new credentials. You have successfully installed the RAID driver, and Windows setup should continue. ...9. admin 9. When prompt you can still manually execute the DVDSetup.exe from the root path of the drivers while installing operating system. 1. Navigate to choose what happens with AMD...
...RAIDXpert2 Management Suite Installation 1. Double-click the RAIDXpert2 icon to finish. 7. Select the (rcraid.inf) driver, click Next. 8. Insert the MSI Driver Disc into the RAIDXpert2 Web GUI with the new credentials. You have successfully installed the RAID driver, and Windows setup should continue. ...9. admin 9. When prompt you can still manually execute the DVDSetup.exe from the root path of the drivers while installing operating system. 1. Navigate to choose what happens with AMD...


