
User Manual
Page 14
EZ Debug LED...40 JRGB1~2: RGB LED connectors 41 JRAINBOW1~2: Addressable RGB LED connectors 42 Installing OS, Drivers & Utilities 43 Installing Windows® 10 43 Installing Drivers 43 Installing Utilities 43 BIOS Setup ...44 Entering BIOS Setup 44 Resetting BIOS...45 Updating BIOS...45 EZ Mode ...47 Advanced Mode ...49 SETTINGS...50 ... PROFILE ...63 HARDWARE MONITOR 64 AMD RAID Configuration 65 Enabling RAIDXpert2 Configuration Utility 65 Initializing Disks 66 Creating Arrays...67 Deleting Arrays ...68 Installing RAID Driver 69 Troubleshooting 70 14 Contents
EZ Debug LED...40 JRGB1~2: RGB LED connectors 41 JRAINBOW1~2: Addressable RGB LED connectors 42 Installing OS, Drivers & Utilities 43 Installing Windows® 10 43 Installing Drivers 43 Installing Utilities 43 BIOS Setup ...44 Entering BIOS Setup 44 Resetting BIOS...45 Updating BIOS...45 EZ Mode ...47 Advanced Mode ...49 SETTINGS...50 ... PROFILE ...63 HARDWARE MONITOR 64 AMD RAID Configuration 65 Enabling RAIDXpert2 Configuration Utility 65 Initializing Disks 66 Creating Arrays...67 Deleting Arrays ...68 Installing RAID Driver 69 Troubleshooting 70 14 Contents

User Manual
Page 19
...for more details. ∙∙ Audio ▪▪Audio Boost ∙∙ Network ▪▪2.5G LAN ▪▪Intel WiFi 6 ∙∙ Cooling ▪▪Frozr Heatsink Design ▪▪Propeller Blade technology ▪▪M.2 Shield Frozr ▪▪...19 Software Dragon Center Features Special Features Continued from previous page ∙∙ Drivers ∙∙DRAGON CENTER ∙∙CPU-Z MSI GAMING ∙∙Open Broadcaster Software (OBS) ∙∙MSI App Player (BlueStacks) ∙∙Google Chrome™ ,Google Toolbar, Google...
...for more details. ∙∙ Audio ▪▪Audio Boost ∙∙ Network ▪▪2.5G LAN ▪▪Intel WiFi 6 ∙∙ Cooling ▪▪Frozr Heatsink Design ▪▪Propeller Blade technology ▪▪M.2 Shield Frozr ▪▪...19 Software Dragon Center Features Special Features Continued from previous page ∙∙ Drivers ∙∙DRAGON CENTER ∙∙CPU-Z MSI GAMING ∙∙Open Broadcaster Software (OBS) ∙∙MSI App Player (BlueStacks) ∙∙Google Chrome™ ,Google Toolbar, Google...
User Manual
Page 21
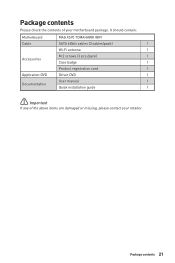
It should contain: Motherboard MAG X570 TOMAHAWK WIFI Cable SATA 6Gb/s cables (2 cables/pack) 1 Wi-Fi antenna 1 M.2 screws (3 pcs./pack) 1 Accessories Case badge 1 Product registration card 1 Application DVD Driver DVD 1 User manual 1 Documentation Quick installation guide 1 ⚠⚠Important If any of your retailer. Package contents 21 Package contents Please check the contents of the above items are damaged or missing, please contact your motherboard package.
It should contain: Motherboard MAG X570 TOMAHAWK WIFI Cable SATA 6Gb/s cables (2 cables/pack) 1 Wi-Fi antenna 1 M.2 screws (3 pcs./pack) 1 Accessories Case badge 1 Product registration card 1 Application DVD Driver DVD 1 User manual 1 Documentation Quick installation guide 1 ⚠⚠Important If any of your retailer. Package contents 21 Package contents Please check the contents of the above items are damaged or missing, please contact your motherboard package.

User Manual
Page 43
...the window. 5. Press F11 key during the computer POST (Power-On Self Test) to install. 4. Insert MSI® Driver Disc into your computer. The installer will find and list all necessary drivers in progress, after it has finished it will prompt you to boot from the Boot Menu. 6. Open ... of the window. 6. Click OK button to install Windows® 10. If you turn off the AutoPlay feature from the root path of the MSI Driver Disc. 4. Start up notification, then select Run DVDSetup.exe to finish. 8. Follow the instructions on the screen to finish. 7. Click OK button...
...the window. 5. Press F11 key during the computer POST (Power-On Self Test) to install. 4. Insert MSI® Driver Disc into your computer. The installer will find and list all necessary drivers in progress, after it has finished it will prompt you to boot from the Boot Menu. 6. Open ... of the window. 6. Click OK button to install Windows® 10. If you turn off the AutoPlay feature from the root path of the MSI Driver Disc. 4. Start up notification, then select Run DVDSetup.exe to finish. 8. Follow the instructions on the screen to finish. 7. Click OK button...
User Manual
Page 45
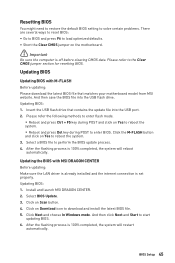
... during POST and click on Download icon to reboot the system. 3. BIOS Setup 45 Updating BIOS Updating BIOS with MSI DRAGON CENTER Before updating: Make sure the LAN driver is already installed and the internet connection is 100% completed, the system will reboot automatically. Select a BIOS file ...BIOS: ∙∙Go to BIOS and press F6 to the Clear CMOS jumper section for resetting BIOS. Updating BIOS: 1. Install and launch MSI DRAGON CENTER. 2. Click Next and choose In Windows mode. Updating BIOS: 1. Please refer to load optimized defaults. ∙∙Short the ...
... during POST and click on Download icon to reboot the system. 3. BIOS Setup 45 Updating BIOS Updating BIOS with MSI DRAGON CENTER Before updating: Make sure the LAN driver is already installed and the internet connection is 100% completed, the system will reboot automatically. Select a BIOS file ...BIOS: ∙∙Go to BIOS and press F6 to the Clear CMOS jumper section for resetting BIOS. Updating BIOS: 1. Install and launch MSI DRAGON CENTER. 2. Click Next and choose In Windows mode. Updating BIOS: 1. Please refer to load optimized defaults. ∙∙Short the ...
User Manual
Page 54
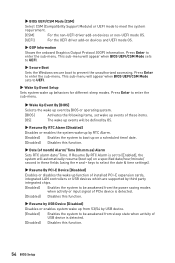
... [CSM] Select CSM (Compatibility Support Module) or UEFI mode to meet the system requirement. [CSM] For the non-UEFI driver add-on devices or non-UEFI mode OS. [UEFI] For the UEFI driver add-on a specified date/hour/minute/ second in these items. [OS] The wake up events will be defined by...
... [CSM] Select CSM (Compatibility Support Module) or UEFI mode to meet the system requirement. [CSM] For the non-UEFI driver add-on devices or non-UEFI mode OS. [UEFI] For the UEFI driver add-on a specified date/hour/minute/ second in these items. [OS] The wake up events will be defined by...

User Manual
Page 55
... information block on PS/2 keyboard is detected. [Hot Key] Enables the system to be erased after enabling Secure Erase+. ▶▶Realtek (R) 8111 Gigabit Shows driver information and configuration of system boot devices. ▶▶Full Screen Logo Display [Enabled] Enables or disables to effectively wipe all data from S3/ S4...
... information block on PS/2 keyboard is detected. [Hot Key] Enables the system to be erased after enabling Secure Erase+. ▶▶Realtek (R) 8111 Gigabit Shows driver information and configuration of system boot devices. ▶▶Full Screen Logo Display [Enabled] Enables or disables to effectively wipe all data from S3/ S4...

User Manual
Page 67
... are initialized. ⚠⚠Important ∙∙For redundant arrays, the Create process is not started until after the operating system and AMD-RAID OS drivers have been installed and the system has booted to use the RAIDXpert2 Web GUI Array Naming feature. ∙∙At any point in the Arrays...
... are initialized. ⚠⚠Important ∙∙For redundant arrays, the Create process is not started until after the operating system and AMD-RAID OS drivers have been installed and the system has booted to use the RAIDXpert2 Web GUI Array Naming feature. ∙∙At any point in the Arrays...
User Manual
Page 69
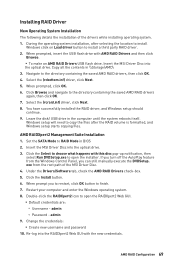
... you can still manually execute the DVDSetup. Under the Drivers/Software tab, check the AMD RAID Drivers check-box. 5. Re-log into the optical drive. Installing RAID Driver New Operating System Installation The following details the installation of the MSI Driver Disc. 4. During the operating system installation, after the... with this disc pop-up notification, then select Run DVDSetup.exe to the directory containing the saved AMD RAID drivers, then click OK. 4. Insert the MSI Driver Disc into the RAIDXpert2 Web GUI with the new credentials. Copy all the contents in the computer until the...
... you can still manually execute the DVDSetup. Under the Drivers/Software tab, check the AMD RAID Drivers check-box. 5. Re-log into the optical drive. Installing RAID Driver New Operating System Installation The following details the installation of the MSI Driver Disc. 4. During the operating system installation, after the... with this disc pop-up notification, then select Run DVDSetup.exe to the directory containing the saved AMD RAID drivers, then click OK. 4. Insert the MSI Driver Disc into the RAIDXpert2 Web GUI with the new credentials. Copy all the contents in the computer until the...

User Manual
Page 70
There is no network ∙∙Make sure the network chipset driver has been installed. ∙∙Verify if the network cable is properly connected and make sure the button is turned on . ∙∙Connect the .... ∙∙If 3 long beeps are heard, remove all memory modules and try to go over troubleshooting guide first to see if your USB drive driver has been installed. ∙∙Verify if USB device is set to Keep DATA. ∙∙Test with another known working graphics card. There is...
There is no network ∙∙Make sure the network chipset driver has been installed. ∙∙Verify if the network cable is properly connected and make sure the button is turned on . ∙∙Connect the .... ∙∙If 3 long beeps are heard, remove all memory modules and try to go over troubleshooting guide first to see if your USB drive driver has been installed. ∙∙Verify if USB device is set to Keep DATA. ∙∙Test with another known working graphics card. There is...
User Manual
Page 74
.... "超出0.1 wt 0.01 wt 2 3 PBDE Copyright Micro-Star Int'l Co.,Ltd. The MSI logo used is expressed or implied. All other information: http://www.msi.com •• Register your place of Micro-Star Int'l Co., Ltd. Revision History Version 1.0,...9675; ○ 備考1. Alternatively, please try the following help resources for further guidance. •• Visit the MSI website for technical guide, BIOS updates, driver updates, and other marks and names mentioned may be obtained from the user guide, please contact your product at: http://...
.... "超出0.1 wt 0.01 wt 2 3 PBDE Copyright Micro-Star Int'l Co.,Ltd. The MSI logo used is expressed or implied. All other information: http://www.msi.com •• Register your place of Micro-Star Int'l Co., Ltd. Revision History Version 1.0,...9675; ○ 備考1. Alternatively, please try the following help resources for further guidance. •• Visit the MSI website for technical guide, BIOS updates, driver updates, and other marks and names mentioned may be obtained from the user guide, please contact your product at: http://...


