
User Manual
Page 1
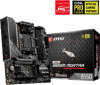
... MSI® MAG B550M MORTAR WIFI/ MAG B550M MORTAR motherboard. Please link to the URL to watch it with the web browser on your computer. This Quick Start section provides demonstration diagrams about how to the URL by scanning the QR code. Some of Screws Quick Start 1 Preparing Tools and Components AMD® AM4 CPU CPU Fan DDR4 Memory Power Supply Unit Chassis Graphics Card Thermal Paste SATA Hard Disk Drive SATA DVD Drive Phillips Screwdriver A Package of the installations...
... MSI® MAG B550M MORTAR WIFI/ MAG B550M MORTAR motherboard. Please link to the URL to watch it with the web browser on your computer. This Quick Start section provides demonstration diagrams about how to the URL by scanning the QR code. Some of Screws Quick Start 1 Preparing Tools and Components AMD® AM4 CPU CPU Fan DDR4 Memory Power Supply Unit Chassis Graphics Card Thermal Paste SATA Hard Disk Drive SATA DVD Drive Phillips Screwdriver A Package of the installations...

User Manual
Page 13
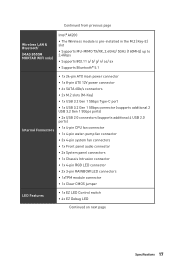
... Quick Start...1 Preparing Tools and Components 1 Safety Information 2 Installing a Processor 3 Installing DDR4 memory 5 Connecting the Front Panel Header 6 Installing the Motherboard 7 Connecting the Power Connectors 8 Installing SATA Drives 9 Installing a Graphics Card 10 Connecting Peripheral Devices 11 Power On...12 Specifications...15 Package contents 21 Block Diagram ...22 Rear I/O Panel...23 LAN Port LED Status Table 23 Audio Ports Configuration 23 Realtek Audio Console 24 Overview of Components 27 Processor Socket 29 DIMM Slots...30 PCI_E1~4: PCIe Expansion Slots 31...
... Quick Start...1 Preparing Tools and Components 1 Safety Information 2 Installing a Processor 3 Installing DDR4 memory 5 Connecting the Front Panel Header 6 Installing the Motherboard 7 Connecting the Power Connectors 8 Installing SATA Drives 9 Installing a Graphics Card 10 Connecting Peripheral Devices 11 Power On...12 Specifications...15 Package contents 21 Block Diagram ...22 Rear I/O Panel...23 LAN Port LED Status Table 23 Audio Ports Configuration 23 Realtek Audio Console 24 Overview of Components 27 Processor Socket 29 DIMM Slots...30 PCI_E1~4: PCIe Expansion Slots 31...

User Manual
Page 14
... RGB LED connectors 42 EZ Debug LED...43 LED_SW1: EZ LED Control 43 Installing OS, Drivers & Utilities 44 Installing Windows® 10 44 Installing Drivers 44 Installing Utilities 44 UEFI BIOS...45 BIOS Setup...46 Entering BIOS Setup 46 Resetting BIOS...47 Updating BIOS...47 EZ Mode...49 Advanced Mode ...52 SETTINGS Menu...53 OC Menu...55 M-FLASH Menu...58 OC PROFILE Menu 59 HARDWARE MONITOR Menu 60 AMD RAID Configuration 62 Enabling RAIDXpert2 Configuration Utility 62 Initializing Disks...63 Creating Arrays...64 Deleting Arrays...65 Installing RAID Driver 66 Troubleshooting 67...
... RGB LED connectors 42 EZ Debug LED...43 LED_SW1: EZ LED Control 43 Installing OS, Drivers & Utilities 44 Installing Windows® 10 44 Installing Drivers 44 Installing Utilities 44 UEFI BIOS...45 BIOS Setup...46 Entering BIOS Setup 46 Resetting BIOS...47 Updating BIOS...47 EZ Mode...49 Advanced Mode ...52 SETTINGS Menu...53 OC Menu...55 M-FLASH Menu...58 OC PROFILE Menu 59 HARDWARE MONITOR Menu 60 AMD RAID Configuration 62 Enabling RAIDXpert2 Configuration Utility 62 Initializing Disks...63 Creating Arrays...64 Deleting Arrays...65 Installing RAID Driver 66 Troubleshooting 67...
User Manual
Page 15
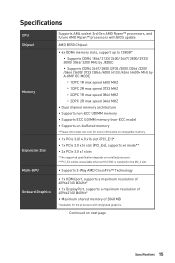
... installed in the M2_2 slot. ∙∙Supports 2-Way AMD CrossFire™ Technology ∙∙1x HDMI port, supports a maximum resolution of 4096x2160 @24Hz* ∙∙1x DisplayPort, supports a maximum resolution of 4096x2160 @60Hz* ∙∙Maximum shared memory of 2048 MB * Available for the processor with integrated graphics. Specifications CPU Chipset Memory Expansion Slot Multi-GPU Onboard Graphics Supports AM4 socket 3rd Gen AMD Ryzen™ processors, and future AMD Ryzen™ processors with BIOS update AMD...
... installed in the M2_2 slot. ∙∙Supports 2-Way AMD CrossFire™ Technology ∙∙1x HDMI port, supports a maximum resolution of 4096x2160 @24Hz* ∙∙1x DisplayPort, supports a maximum resolution of 4096x2160 @60Hz* ∙∙Maximum shared memory of 2048 MB * Available for the processor with integrated graphics. Specifications CPU Chipset Memory Expansion Slot Multi-GPU Onboard Graphics Supports AM4 socket 3rd Gen AMD Ryzen™ processors, and future AMD Ryzen™ processors with BIOS update AMD...
User Manual
Page 17
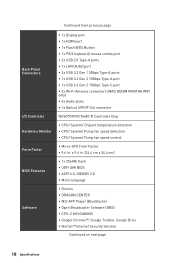
... 24-pin ATX main power connector ∙∙1x 8-pin ATX 12V power connector ∙∙6x SATA 6Gb/s connectors ∙∙2x M.2 slots (M-Key) ∙∙1x USB 3.2 Gen 1 5Gbps Type-C port ∙∙1x USB 3.2 Gen 1 5Gbps connector (supports additional 2 USB 3.2 Gen 1 5Gbps ports) ∙∙2x USB 2.0 connectors (supports additional 4 USB 2.0 ports) ∙∙1x 4-pin CPU fan connector ∙∙1x 4-pin water-pump fan connector ∙∙3x 4-pin system fan connectors ∙∙1x Front panel audio connector ∙∙2x System panel connectors ∙...
... 24-pin ATX main power connector ∙∙1x 8-pin ATX 12V power connector ∙∙6x SATA 6Gb/s connectors ∙∙2x M.2 slots (M-Key) ∙∙1x USB 3.2 Gen 1 5Gbps Type-C port ∙∙1x USB 3.2 Gen 1 5Gbps connector (supports additional 2 USB 3.2 Gen 1 5Gbps ports) ∙∙2x USB 2.0 connectors (supports additional 4 USB 2.0 ports) ∙∙1x 4-pin CPU fan connector ∙∙1x 4-pin water-pump fan connector ∙∙3x 4-pin system fan connectors ∙∙1x Front panel audio connector ∙∙2x System panel connectors ∙...
User Manual
Page 18
... page Back Panel Connectors I/O Controller Hardware Monitor Form Factor BIOS Features Software ∙∙1x Display port ∙∙1x HDMI port ∙∙1x Flash BIOS Button ∙∙1x PS/2 keyboard/ mouse combo port ∙∙2x USB 2.0 Type-A ports ∙∙1x LAN (RJ45) port ∙∙2x USB 3.2 Gen 1 5Gbps Type-A ports ∙∙1x USB 3.2 Gen 2 10Gbps Type-A port ∙∙1x USB 3.2 Gen 2 10Gbps Type-C port ∙∙2x Wi-Fi Antenna connectors (MAG B550M MORTAR WIFI...
... page Back Panel Connectors I/O Controller Hardware Monitor Form Factor BIOS Features Software ∙∙1x Display port ∙∙1x HDMI port ∙∙1x Flash BIOS Button ∙∙1x PS/2 keyboard/ mouse combo port ∙∙2x USB 2.0 Type-A ports ∙∙1x LAN (RJ45) port ∙∙2x USB 3.2 Gen 1 5Gbps Type-A ports ∙∙1x USB 3.2 Gen 2 10Gbps Type-A port ∙∙1x USB 3.2 Gen 2 10Gbps Type-C port ∙∙2x Wi-Fi Antenna connectors (MAG B550M MORTAR WIFI...
User Manual
Page 19
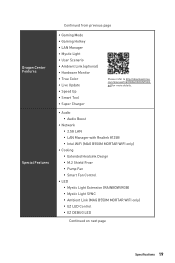
... to http://download.msi. com/manual/mb/DRAGONCENTER2. pdf for more details. ∙∙ Audio ▪▪Audio Boost ∙∙ Network ▪▪2.5G LAN ▪▪LAN Manager with Realtek 8125B ▪▪Intel WiFi (MAG B550M MORTAR WIFI only) ∙∙ Cooling ▪▪Extended Heatsink Design ▪▪M.2 Shield Frozr ▪▪Pump Fan ▪▪Smart Fan Control ∙∙ LED ▪▪...
... to http://download.msi. com/manual/mb/DRAGONCENTER2. pdf for more details. ∙∙ Audio ▪▪Audio Boost ∙∙ Network ▪▪2.5G LAN ▪▪LAN Manager with Realtek 8125B ▪▪Intel WiFi (MAG B550M MORTAR WIFI only) ∙∙ Cooling ▪▪Extended Heatsink Design ▪▪M.2 Shield Frozr ▪▪Pump Fan ▪▪Smart Fan Control ∙∙ LED ▪▪...

User Manual
Page 42
... JRAINBOW connector provide different voltages, and connecting the 5V LED strip to the JRGB connector will result in damage to the LED strip. ⚠⚠Important ∙∙The JRAINBOW connector supports up to 200 LEDs. ∙∙Always turn off the power supply and unplug the power cord from the power outlet before installing or removing the RGB LED strip. ∙∙Please use MSI's software to 75 LEDs WS2812B...
... JRAINBOW connector provide different voltages, and connecting the 5V LED strip to the JRGB connector will result in damage to the LED strip. ⚠⚠Important ∙∙The JRAINBOW connector supports up to 200 LEDs. ∙∙Always turn off the power supply and unplug the power cord from the power outlet before installing or removing the RGB LED strip. ∙∙Please use MSI's software to 75 LEDs WS2812B...

User Manual
Page 44
... Windows Control Panel, you must complete drivers installation. 1. Press F11 key during the computer POST (Power-On Self Test) to install. 4. Follow the instructions on the computer case. 4. Start up notification, then select Run DVDSetup.exe to choose what happens with this disc pop-up your computer. Installing Utilities Before you install utilities, you can still manually execute the DVDSetup.exe from the Boot Menu. 6. Click the Install button in the Drivers/Software...
... Windows Control Panel, you must complete drivers installation. 1. Press F11 key during the computer POST (Power-On Self Test) to install. 4. Follow the instructions on the computer case. 4. Start up notification, then select Run DVDSetup.exe to choose what happens with this disc pop-up your computer. Installing Utilities Before you install utilities, you can still manually execute the DVDSetup.exe from the Boot Menu. 6. Click the Install button in the Drivers/Software...

User Manual
Page 47
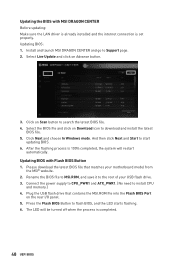
... your motherboard model from MSI website. Click the M-FLASH button and click on Yes to start recovering BIOS. 5. UEFI BIOS 47 Select a BIOS file to perform the BIOS update process. 4. And then save the BIOS file into the USB port. 2. Please refer the following methods to enter flash mode. ▪▪Reboot and press Ctrl + F5 key during POST to enter BIOS. When prompted click on Yes to reboot the system. 3. Updating BIOS Updating BIOS with M-FLASH Before updating: Please download...
... your motherboard model from MSI website. Click the M-FLASH button and click on Yes to start recovering BIOS. 5. UEFI BIOS 47 Select a BIOS file to perform the BIOS update process. 4. And then save the BIOS file into the USB port. 2. Please refer the following methods to enter flash mode. ▪▪Reboot and press Ctrl + F5 key during POST to enter BIOS. When prompted click on Yes to reboot the system. 3. Updating BIOS Updating BIOS with M-FLASH Before updating: Please download...
User Manual
Page 48
... In Windows mode. And then click Next and Start to flash BIOS, and the LED starts flashing. 6. Press the Flash BIOS Button to start updating BIOS. 6. Please download the latest BIOS file that contains the MSI.ROM file into the Flash BIOS Port on Advance button. 3. Connect the power supply to CPU_PWR1 and ATX_PWR1. (No need to download and install the latest BIOS file. 5. Select the BIOS file and click on Scan button to the root of your motherboard model from the MSI® website. 2. Plug the USB flash drive that...
... In Windows mode. And then click Next and Start to flash BIOS, and the LED starts flashing. 6. Press the Flash BIOS Button to start updating BIOS. 6. Please download the latest BIOS file that contains the MSI.ROM file into the Flash BIOS Port on Advance button. 3. Connect the power supply to CPU_PWR1 and ATX_PWR1. (No need to download and install the latest BIOS file. 5. Select the BIOS file and click on Scan button to the root of your motherboard model from the MSI® website. 2. Plug the USB flash drive that...

User Manual
Page 50
... buttons - click on this button to enter the M-Flash menu that allows you purchased. ∙∙ M-Flash - you can move the device icons to change the boot priority. click on this button or press the F3 key to update BIOS with the motherboard you to show the Favorites window. ∙∙ System information - enable or disable these functions by clicking on the CPU, Memory, Storage, Fan Info and Help buttons to manually control the fan speed...
... buttons - click on this button to enter the M-Flash menu that allows you purchased. ∙∙ M-Flash - you can move the device icons to change the boot priority. click on this button or press the F3 key to update BIOS with the motherboard you to show the Favorites window. ∙∙ System information - enable or disable these functions by clicking on the CPU, Memory, Storage, Fan Info and Help buttons to manually control the fan speed...

User Manual
Page 52
... options are available: ▪▪SETTINGS - allows you to adjust the frequency and voltage. provides the information of system. ▪▪BOARD EXPLORER - allows you to set the speeds of fans and monitor voltages of installed devices on this motherboard. ∙∙ Menu display - provides the way to manage overclocking profiles. ▪▪HARDWARE MONITOR - Advanced Mode Press Setup Mode switch or F7 function key can switch between EZ Mode and Advanced Mode in BIOS setup. BIOS menu selection BIOS menu...
... options are available: ▪▪SETTINGS - allows you to adjust the frequency and voltage. provides the information of system. ▪▪BOARD EXPLORER - allows you to set the speeds of fans and monitor voltages of installed devices on this motherboard. ∙∙ Menu display - provides the way to manage overclocking profiles. ▪▪HARDWARE MONITOR - Advanced Mode Press Setup Mode switch or F7 function key can switch between EZ Mode and Advanced Mode in BIOS setup. BIOS menu selection BIOS menu...

User Manual
Page 53
... is not displayed, turn off computer and re-check SATA/ M.2 cable and power cable connections of the device and motherboard. ▶▶System Information Shows detailed system information, including CPU type, BIOS version, and Memory (read only). ▶▶DMI Information Shows system information, desktop board information and chassis information. ▶▶Advanced sub-menu The Advanced sub-menu allows you to enter the sub-menu. ▶▶ACPI Settings Sets ACPI parameters of the...
... is not displayed, turn off computer and re-check SATA/ M.2 cable and power cable connections of the device and motherboard. ▶▶System Information Shows detailed system information, including CPU type, BIOS version, and Memory (read only). ▶▶DMI Information Shows system information, desktop board information and chassis information. ▶▶Advanced sub-menu The Advanced sub-menu allows you to enter the sub-menu. ▶▶ACPI Settings Sets ACPI parameters of the...

User Manual
Page 54
... to enter a new password. You can set password, press Enter when you to load the BIOS default values or factory default settings into the BIOS and exit the BIOS setup utility with IGP. ▶▶USB Configuration sub-menu Sets the onboard USB controller and device function. You also can optimize the system power consumption in this menu to prevent the unauthorized accessing for system. ▶▶Wake Up Event Setup sub-menu Sets system wake up behaviors for different sleep modes...
... to enter a new password. You can set password, press Enter when you to load the BIOS default values or factory default settings into the BIOS and exit the BIOS setup utility with IGP. ▶▶USB Configuration sub-menu Sets the onboard USB controller and device function. You also can optimize the system power consumption in this menu to prevent the unauthorized accessing for system. ▶▶Wake Up Event Setup sub-menu Sets system wake up behaviors for different sleep modes...

User Manual
Page 55
... default settings. ▶▶A-XMP [Disabled] Please enable A-XMP or select a profile of memory module for the OC settings of OC settings. [Normal] Provides the regular OC settings in BIOS setup. Read-only. User can only be available when the installed processor, memory modules and motherboard support this function. ▶▶Advanced CPU Configuration Press Enter to enter the sub-menu. OC Menu This menu allows you to use * as the symbol for overclocking the memory...
... default settings. ▶▶A-XMP [Disabled] Please enable A-XMP or select a profile of memory module for the OC settings of OC settings. [Normal] Provides the regular OC settings in BIOS setup. Read-only. User can only be available when the installed processor, memory modules and motherboard support this function. ▶▶Advanced CPU Configuration Press Enter to enter the sub-menu. OC Menu This menu allows you to use * as the symbol for overclocking the memory...

User Manual
Page 56
... clear the CMOS data, and enter the BIOS to load the default settings.) ▶▶DigitALL Power sub-menu Press Enter to enter the sub-menu. Please note the overclocking behavior is not guaranteed. ▶▶UCLK DIV1 Mode [Auto] Sets UCLK (Internal memory controller clock) mode. ▶▶Memory Try It ! [Disabled] It can set it manually. ▶▶CHIP Voltages control [Auto] (optional) These options allows you to set the voltages related to CPU. ▶▶FCLK Frequency [Auto] Sets the FCLK frequency (Internal Data Fabric clock of DRAM...
... clear the CMOS data, and enter the BIOS to load the default settings.) ▶▶DigitALL Power sub-menu Press Enter to enter the sub-menu. Please note the overclocking behavior is not guaranteed. ▶▶UCLK DIV1 Mode [Auto] Sets UCLK (Internal memory controller clock) mode. ▶▶Memory Try It ! [Disabled] It can set it manually. ▶▶CHIP Voltages control [Auto] (optional) These options allows you to set the voltages related to CPU. ▶▶FCLK Frequency [Auto] Sets the FCLK frequency (Internal Data Fabric clock of DRAM...
User Manual
Page 58
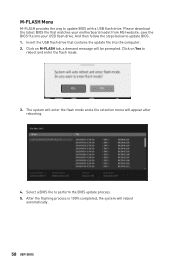
Please download the latest BIOS file that contains the update file into your motherboard model from MSI website, save the BIOS file into the computer. 2. The system will enter the flash mode and a file selection menu will be prompted. M-FLASH Menu M-FLASH provides the way to perform the BIOS update process. 5. Insert the USB flash drive that matches your USB flash drive. Select a BIOS file to update BIOS with a USB flash drive. Click on M-FLASH tab, a demand message will appear after rebooting. 4. And then follow...
Please download the latest BIOS file that contains the update file into your motherboard model from MSI website, save the BIOS file into the computer. 2. The system will enter the flash mode and a file selection menu will be prompted. M-FLASH Menu M-FLASH provides the way to perform the BIOS update process. 5. Insert the USB flash drive that matches your USB flash drive. Select a BIOS file to update BIOS with a USB flash drive. Click on M-FLASH tab, a demand message will appear after rebooting. 4. And then follow...

User Manual
Page 66
.... 8. admin 9. Change the credentials: ▪▪Create new username and password 10. Double-click the RAIDXpert2 icon to install a third party RAID driver. 2. Insert the MSI Driver Disc into the optical drive. exe from the Windows Control Panel, you to restart, click OK button to RAID Mode in BIOS 2. Click the Install button. 6. Set the SATA Mode to finish. 7. During the operating system installation, after the RAID volume is formatted, and Windows setup starts copying files.
.... 8. admin 9. Change the credentials: ▪▪Create new username and password 10. Double-click the RAIDXpert2 icon to install a third party RAID driver. 2. Insert the MSI Driver Disc into the optical drive. exe from the Windows Control Panel, you to restart, click OK button to RAID Mode in BIOS 2. Click the Install button. 6. Set the SATA Mode to finish. 7. During the operating system installation, after the RAID volume is formatted, and Windows setup starts copying files.

User Manual
Page 67
... memory module in Windows® Device Manager. ∙∙Connect the USB device to other USB port on the monitor. ∙∙If 3 long beeps are heard, remove and reinstall the graphics card and then restart the computer. ∙∙Test with another known working LAN cable. The computer does not boot after updating the BIOS ∙∙Clear the CMOS. ∙∙Use the secondary BIOS to the motherboard? ∙∙Some power supply units have a power button...
... memory module in Windows® Device Manager. ∙∙Connect the USB device to other USB port on the monitor. ∙∙If 3 long beeps are heard, remove and reinstall the graphics card and then restart the computer. ∙∙Test with another known working LAN cable. The computer does not boot after updating the BIOS ∙∙Clear the CMOS. ∙∙Use the secondary BIOS to the motherboard? ∙∙Some power supply units have a power button...


