User Guide
Page 2
... countries. NVIDIA, the NVIDIA logo, DualNet, and nForce are registered trademarks or trademarks of NVIDIA Corporation in the United States and/or other information: http://global.msi.com.tw/index.php? AMI® is a registered trademark of AMD Corporation. Copyright Notice The material in this document, but no solution can be obtained from the user's manual, please...
... countries. NVIDIA, the NVIDIA logo, DualNet, and nForce are registered trademarks or trademarks of NVIDIA Corporation in the United States and/or other information: http://global.msi.com.tw/index.php? AMI® is a registered trademark of AMD Corporation. Copyright Notice The material in this document, but no solution can be obtained from the user's manual, please...

User Guide
Page 3
...DO NOT LEAVETHIS EQUIPMENT INANENVIRONMENT UNCONDITIONED, STORAGE TEMPERATURE ABOVE 600 C (1400F), IT MAYDAMAGE THE EQUIPMENT. Safety Instructions 1. Keep this User's Manual for air convection hence protects the equip- ment from humidity. 4. All cautions and warnings on it work well or you can not step... on the equipment should be - fore connecting the equipment to User's Manual. † The equipment has dropped and damaged. † The equipment has obvious sign of the following situations arises, get it ....
...DO NOT LEAVETHIS EQUIPMENT INANENVIRONMENT UNCONDITIONED, STORAGE TEMPERATURE ABOVE 600 C (1400F), IT MAYDAMAGE THE EQUIPMENT. Safety Instructions 1. Keep this User's Manual for air convection hence protects the equip- ment from humidity. 4. All cautions and warnings on it work well or you can not step... on the equipment should be - fore connecting the equipment to User's Manual. † The equipment has dropped and damaged. † The equipment has obvious sign of the following situations arises, get it ....

User Guide
Page 21
Hardware Setup Installing Memory Modules 1. Manually check if the memory module has been locked in the DIMM slot. The plastic clip at the sides. Important You can barely see the golden ...
Hardware Setup Installing Memory Modules 1. Manually check if the memory module has been locked in the DIMM slot. The plastic clip at the sides. Important You can barely see the golden ...

User Guide
Page 24
To connect an LCD monitor, simply plug your monitor manual for connection to connect a LCD monitor. On (steady state) LAN link is communicating with another computer on the back panel provides connection to connect SATA ...
To connect an LCD monitor, simply plug your monitor manual for connection to connect a LCD monitor. On (steady state) LAN link is communicating with another computer on the back panel provides connection to connect SATA ...

User Guide
Page 29
... Bracket TPM Module Connector: JTPM1 This connector connects to connect the IEEE1394 device via an optional IEEE1394 bracket. Please refer to the TPM security platform manual for more details and usages. 2 14 1 13 JTPM1 Pin Signal Description 1 LCLK LPC clock 3 LRST# LPC reset 5 LAD0 LPC address & data pin0 7 LAD1 LPC address...
... Bracket TPM Module Connector: JTPM1 This connector connects to connect the IEEE1394 device via an optional IEEE1394 bracket. Please refer to the TPM security platform manual for more details and usages. 2 14 1 13 JTPM1 Pin Signal Description 1 LCLK LPC clock 3 LRST# LPC reset 5 LAD0 LPC address & data pin0 7 LAD1 LPC address...

User Guide
Page 36
...). Check the box 3. Right click on the system and install the NVIDIA SLI driver. Important If you disable the "SLI technology" function. 2-22 After the hardware installation is completed, power on windows desktop and select NVIDIA Control Panel. Go to your graphics card manual). It will be provided for Multi-GPU control. Then press Apply...
...). Check the box 3. Right click on the system and install the NVIDIA SLI driver. Important If you disable the "SLI technology" function. 2-22 After the hardware installation is completed, power on windows desktop and select NVIDIA Control Panel. Go to your graphics card manual). It will be provided for Multi-GPU control. Then press Apply...
User Guide
Page 57
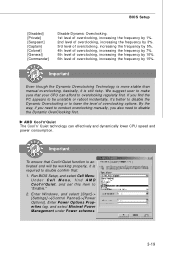
... way, if you need to conduct overclocking manually, you find AMD Cool'n'Quiet, and set this item to ...select Minimal Power Management under Power schemes. 3-19 Important Even though the Dynamic Overclocking Technology is more stable than manual overclocking, basically, it 's better to disable the Dynamic Overclocking or to make sure that : 1. If ...you also need to "Enable." 2. Enter Windows, and select [Start]-> [Settings]->[Control Pannel]->[Power Options]. AMD Cool'n'Quiet The Cool'n' Quiet technology can afford to overclocking regularly first. Under Cell Menu, find the PC...
... way, if you need to conduct overclocking manually, you find AMD Cool'n'Quiet, and set this item to ...select Minimal Power Management under Power schemes. 3-19 Important Even though the Dynamic Overclocking Technology is more stable than manual overclocking, basically, it 's better to disable the Dynamic Overclocking or to make sure that : 1. If ...you also need to "Enable." 2. Enter Windows, and select [Start]-> [Settings]->[Control Pannel]->[Power Options]. AMD Cool'n'Quiet The Cool'n' Quiet technology can afford to overclocking regularly first. Under Cell Menu, find the PC...
User Guide
Page 58
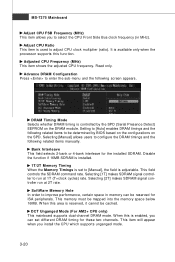
... be determined by the SPD (Serial Presence Detect) EEPROM on the SPD. Setting to [Auto] enables DRAM timings and the following related items manually. Bank Interleave This field selects 2-bank or 4-bank interleave for the installed SDRAM. Advance DRAM Configuration Press to configure the DRAM timings and the...Adjust CPU FSB Frequency (M Hz) This item allows you to select the CPU Front Side Bus clock frequency (in memory can set to [Manual], the field is used to adjust CPU clock multiplier (ratio). It is controlled by BIOS based on the configurations on the DRAM module. ...
... be determined by the SPD (Serial Presence Detect) EEPROM on the SPD. Setting to [Auto] enables DRAM timings and the following related items manually. Bank Interleave This field selects 2-bank or 4-bank interleave for the installed SDRAM. Advance DRAM Configuration Press to configure the DRAM timings and the...Adjust CPU FSB Frequency (M Hz) This item allows you to select the CPU Front Side Bus clock frequency (in memory can set to [Manual], the field is used to adjust CPU clock multiplier (ratio). It is controlled by BIOS based on the configurations on the DRAM module. ...
User Guide
Page 59
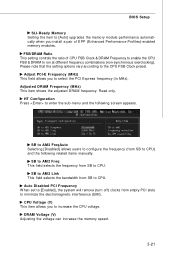
...DRAM Frequency (M Hz) This item shows the adjusted DRAM frequency. HT Configuration Press to enter the sub-menu and the following related items manually. CPU Voltage (V) This item allows you to the CPU FSB Clock preset. Please note that the setting options vary according to increase the ...allows you to select the PCI Express frequency (in MHz). DRAM Voltage (V) Adjusting the voltage can increase the memory speed. 3-21 BIOS Setup SLI-Ready Memory Setting the item to [Auto] upgrades the memory module performance automatically when you install a pair of CPU FSB Clock & DRAM Frequency...
...DRAM Frequency (M Hz) This item shows the adjusted DRAM frequency. HT Configuration Press to enter the sub-menu and the following related items manually. CPU Voltage (V) This item allows you to the CPU FSB Clock preset. Please note that the setting options vary according to increase the ...allows you to select the PCI Express frequency (in MHz). DRAM Voltage (V) Adjusting the voltage can increase the memory speed. 3-21 BIOS Setup SLI-Ready Memory Setting the item to [Auto] upgrades the memory module performance automatically when you install a pair of CPU FSB Clock & DRAM Frequency...

User Guide
Page 62
It supports up to 8-channel & SPDIF audio effect and allows users to operate 2-, 4-, 6-, or 8-channel audio function. A-1 X-Fi Xtreme Audio Card Appendix A X-Fi Xtreme Audio Card The X-Fi Xtreme Audio card is powered by Creative CA0110 Audio chip. This manual will tell you about the specifications of the card, how to install it to a mainboard, how to connect 2, 4, 6, or 8 speakers to it, and to attach 2, 4, 6, or 8 speakers for better surround sound effect.
It supports up to 8-channel & SPDIF audio effect and allows users to operate 2-, 4-, 6-, or 8-channel audio function. A-1 X-Fi Xtreme Audio Card Appendix A X-Fi Xtreme Audio Card The X-Fi Xtreme Audio card is powered by Creative CA0110 Audio chip. This manual will tell you about the specifications of the card, how to install it to a mainboard, how to connect 2, 4, 6, or 8 speakers to it, and to attach 2, 4, 6, or 8 speakers for better surround sound effect.

User Guide
Page 116
DOT FSB-UP Rate button DOT FSB-DOWN Rate button Important Even though the Dynamic Overclocking Technology is more stable than manual overclocking, basically, it is exceed the default threshold for a time, it will speed up the CPU and fan automatically to make sure that the ...powered only when users' PC runs huge amount of data, like 3D games or video process, and the motherboard/ graphicd card need to conduct overclocking manually, please do not to apply the DOT function. If you need to be several selections when you click the DOT rate button (include increase rate...
DOT FSB-UP Rate button DOT FSB-DOWN Rate button Important Even though the Dynamic Overclocking Technology is more stable than manual overclocking, basically, it is exceed the default threshold for a time, it will speed up the CPU and fan automatically to make sure that the ...powered only when users' PC runs huge amount of data, like 3D games or video process, and the motherboard/ graphicd card need to conduct overclocking manually, please do not to apply the DOT function. If you need to be several selections when you click the DOT rate button (include increase rate...

User Guide
Page 120
... status of your system. When you to change the fan speed to a section after clicking button. Select higher speed for you set the fan speed manually, please make sure to disabled the "CPU Smart FAN Target" item in the BIOS. 2. Only the curves of the fan speed. Important 1. In the default...
... status of your system. When you to change the fan speed to a section after clicking button. Select higher speed for you set the fan speed manually, please make sure to disabled the "CPU Smart FAN Target" item in the BIOS. 2. Only the curves of the fan speed. Important 1. In the default...


