
User Manual
Page 19
...;▪Mystic light SYNC ▪▪Ambient Link ▪▪EZ DEBUG LED Continued on next page Specifications 19 Creator Center Features Special Features Continued from previous page ∙∙Creator Optimization ∙∙Creator Hotkey ∙∙Mystic Light ∙∙Hardware Monitor ∙∙True Color ∙∙Live update ∙...
...;▪Mystic light SYNC ▪▪Ambient Link ▪▪EZ DEBUG LED Continued on next page Specifications 19 Creator Center Features Special Features Continued from previous page ∙∙Creator Optimization ∙∙Creator Hotkey ∙∙Mystic Light ∙∙Hardware Monitor ∙∙True Color ∙∙Live update ∙...
User Manual
Page 21
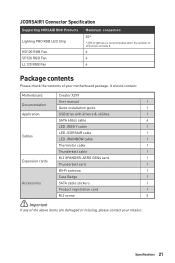
It should contain: Motherboard Creator X299 User manual 1 Documentation Quick installation guide 1 Application USB drive with drivers & utilities 1 SATA 6Gb/s cable 4 LED JRGB Y cable 1 LED JCORSAIR cable 1 Cables LED JRAINBOW cable 1 Thermistor cable 1 ...
It should contain: Motherboard Creator X299 User manual 1 Documentation Quick installation guide 1 Application USB drive with drivers & utilities 1 SATA 6Gb/s cable 4 LED JRGB Y cable 1 LED JCORSAIR cable 1 Cables LED JRAINBOW cable 1 Thermistor cable 1 ...

User Manual
Page 42
...dual fan radiator for better cooling and performance. ∙∙You can also control the OC GENIE 4 function in BIOS Setup or with MSI CREATOR CENTER software. ∙∙In order to optimize performance and improve system stability, when you activate the OC GENIE 4 function, please leave... the overclocking stage as you desire. 4. To disable OC GENIE 4: 1. 6 4 1 0 8 10 1 OC1: OC GENIE 4 Knob This knob allows you to manually select a stage from number 0 (default) to number 11 (extreme) for better compatibility when using OC GENIE 4 function. 42 Overview of your computer. Set the OC...
...dual fan radiator for better cooling and performance. ∙∙You can also control the OC GENIE 4 function in BIOS Setup or with MSI CREATOR CENTER software. ∙∙In order to optimize performance and improve system stability, when you activate the OC GENIE 4 function, please leave... the overclocking stage as you desire. 4. To disable OC GENIE 4: 1. 6 4 1 0 8 10 1 OC1: OC GENIE 4 Knob This knob allows you to manually select a stage from number 0 (default) to number 11 (extreme) for better compatibility when using OC GENIE 4 function. 42 Overview of your computer. Set the OC...

User Manual
Page 45
... Components 45 DC Mode fan connectors control fan speed by changing voltage. However, you to adjust fan speed in relation to PWM or DC Mode manually. 1 CPU_FAN1/ SYS_FAN1/ SYS_FAN4 (Default Auto mode) 1 SYS_FAN2/ SYS_FAN3 EXS_FAN1/ EXS_FAN2 (Default Auto mode) 1 PUMP_FAN1 (Default PWM mode) Switching fan mode and adjusting fan speed You...
... Components 45 DC Mode fan connectors control fan speed by changing voltage. However, you to adjust fan speed in relation to PWM or DC Mode manually. 1 CPU_FAN1/ SYS_FAN1/ SYS_FAN4 (Default Auto mode) 1 SYS_FAN2/ SYS_FAN3 EXS_FAN1/ EXS_FAN2 (Default Auto mode) 1 PUMP_FAN1 (Default PWM mode) Switching fan mode and adjusting fan speed You...

User Manual
Page 46
... system. 1 1 Ground 3 2 WFLOW PWR WFLOW IN T_SEN1: Thermal Sensor Connector This connector allows you to connect the theral sensor cable and use it to the manual of your multimeter for more information. Please refer to monitor the temperature of Components Sense GND Thermistor cable V-Check Points Lite These voltage checkpoints are...
... system. 1 1 Ground 3 2 WFLOW PWR WFLOW IN T_SEN1: Thermal Sensor Connector This connector allows you to connect the theral sensor cable and use it to the manual of your multimeter for more information. Please refer to monitor the temperature of Components Sense GND Thermistor cable V-Check Points Lite These voltage checkpoints are...

User Manual
Page 48
...;∙Note that the VCC and Ground pins must be connected correctly to avoid possible damage. ∙∙In order to the TPM security platform manual for TPM (Trusted Platform Module). JTPM1: TPM Module Connector This connector is for more details and usages. 2 14 1 13 1 LPC Clock 2 3V Standby power 3 LPC... 12 Ground 13 LPC Frame 14 Ground 48 Overview of Components Please refer to recharge your iPad,iPhone and iPod through USB ports, please install MSI® CREATOR CENTER utility.
...;∙Note that the VCC and Ground pins must be connected correctly to avoid possible damage. ∙∙In order to the TPM security platform manual for TPM (Trusted Platform Module). JTPM1: TPM Module Connector This connector is for more details and usages. 2 14 1 13 1 LPC Clock 2 3V Standby power 3 LPC... 12 Ground 13 LPC Frame 14 Ground 48 Overview of Components Please refer to recharge your iPad,iPhone and iPod through USB ports, please install MSI® CREATOR CENTER utility.

User Manual
Page 61
... lower-right corner of the window. 6. The installer will prompt you to boot from the root path of the MSI USB Drive. 4. Select the utilities you can still manually execute the DVDSetup.exe from CD or DVD... Restart your computer. message. 7. Follow the instructions on the screen ... 5. Press the Restart button on the computer. 2. Installing OS, Drivers & Utilities Please download and update the latest utilities and drivers at www.msi.com Installing Windows® 10 1. Press F11 key during the computer POST (Power-On Self Test) to restart. 7. Click the Install button ...
... lower-right corner of the window. 6. The installer will prompt you to boot from the root path of the MSI USB Drive. 4. Select the utilities you can still manually execute the DVDSetup.exe from CD or DVD... Restart your computer. message. 7. Follow the instructions on the screen ... 5. Press the Restart button on the computer. 2. Installing OS, Drivers & Utilities Please download and update the latest utilities and drivers at www.msi.com Installing Windows® 10 1. Press F11 key during the computer POST (Power-On Self Test) to restart. 7. Click the Install button ...

User Manual
Page 66
... boot priority. when enabled, set and keep the CPU to full speed mode to enter Favorites menu. allows you can move the device icons to manually control the fan speed by clicking on favorite page (Favorite 1~5) 2. allows you can save and access favorite/ frequently-used / favorite BIOS setting items in one...
... boot priority. when enabled, set and keep the CPU to full speed mode to enter Favorites menu. allows you can move the device icons to manually control the fan speed by clicking on favorite page (Favorite 1~5) 2. allows you can save and access favorite/ frequently-used / favorite BIOS setting items in one...

User Manual
Page 72
... Boot Sets the Windows secure boot to Custom. ▶▶Wake Up Event Setup Sets system wake up events will be available when MSI Fast Boot is enabled. [Standard] The system will appear when Secure Boot Mode sets to prevent the unauthorized accessing. Press to configure ...the secure boot settings and manually load the secure keys. ▶▶Key Management Manages the secure boot keys. Press Enter to boot up on a specified date/hour/minute...
... Boot Sets the Windows secure boot to Custom. ▶▶Wake Up Event Setup Sets system wake up events will be available when MSI Fast Boot is enabled. [Standard] The system will appear when Secure Boot Mode sets to prevent the unauthorized accessing. Press to configure ...the secure boot settings and manually load the secure keys. ▶▶Key Management Manages the secure boot keys. Press Enter to boot up on a specified date/hour/minute...

User Manual
Page 77
... cores as the symbol for the OC settings of Group X and Target CPU Turbo Ratio Group 1. OC ⚠⚠Important ∙∙Overclocking your PC manually is only recommended for advanced users. ∙∙Overclocking is not guaranteed, and if done improperly, it could void your warranty or severely damage your...
... cores as the symbol for the OC settings of Group X and Target CPU Turbo Ratio Group 1. OC ⚠⚠Important ∙∙Overclocking your PC manually is only recommended for advanced users. ∙∙Overclocking is not guaranteed, and if done improperly, it could void your warranty or severely damage your...

User Manual
Page 81
... digital powers related to CPU PWM. ▶▶CPU Voltages control [Auto] These options allows you can set it manually. ▶▶DRAM Voltages control [Auto] These options allows you to set it manually. ▶▶CPU Memory Changed Detect [Enabled]* Enables or disables the system to issue a warning message during boot...
... digital powers related to CPU PWM. ▶▶CPU Voltages control [Auto] These options allows you can set it manually. ▶▶DRAM Voltages control [Auto] These options allows you to set it manually. ▶▶CPU Memory Changed Detect [Enabled]* Enables or disables the system to issue a warning message during boot...
User Manual
Page 96
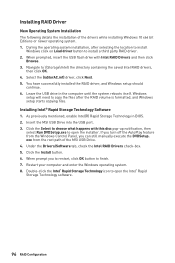
... Windows click on Load driver button to choose what happens with Intel RAID Drivers and then click Browse. 3. Insert the MSI USB Dirve into the USB port. 3. When prompt you can still manually execute the DVDSetup. Restart your computer and enter the Windows operating system. 8. Select the (iaStorAC.inf) driver, click Next... the RAID volume is formatted, and Windows setup starts copying files. Installing RAID Driver New Operating System Installation The following details the installation of the MSI USB Drive. 4.
... Windows click on Load driver button to choose what happens with Intel RAID Drivers and then click Browse. 3. Insert the MSI USB Dirve into the USB port. 3. When prompt you can still manually execute the DVDSetup. Restart your computer and enter the Windows operating system. 8. Select the (iaStorAC.inf) driver, click Next... the RAID volume is formatted, and Windows setup starts copying files. Installing RAID Driver New Operating System Installation The following details the installation of the MSI USB Drive. 4.
User Manual
Page 97
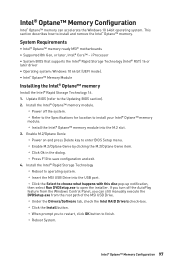
...8482; Memory Configuration 97 Intel® Optane™ Memory Configuration Intel® Optane™ memory can still manually execute the DVDSetup.exe from the root path of the MSI USB Drive. ▫▫Under the Drivers/Software tab, check the Intel RAID Drivers check-box. ▫...the Intel® Rapid Storage Technology ▫▫Reboot to operating system. ▫▫Insert the MSI USB Drive into the M.2 slot. 3. System Requirements ∙∙Intel® Optane™ memory ready MSI® motherboards ∙∙Supported 8th Gen, or later, Intel® Core™ - ...
...8482; Memory Configuration 97 Intel® Optane™ Memory Configuration Intel® Optane™ memory can still manually execute the DVDSetup.exe from the root path of the MSI USB Drive. ▫▫Under the Drivers/Software tab, check the Intel RAID Drivers check-box. ▫...the Intel® Rapid Storage Technology ▫▫Reboot to operating system. ▫▫Insert the MSI USB Drive into the M.2 slot. 3. System Requirements ∙∙Intel® Optane™ memory ready MSI® motherboards ∙∙Supported 8th Gen, or later, Intel® Core™ - ...


