
User Guide
Page 2
... the Keyboard (Optional 2-4 Positioning your System 2-6 Connecting Peripheral Devices 2-7 Connecting Power 2-11 3. System Operations 3-1 System Booting Setup for the first time 3-2 Creating System Recovery Disk 3-3 Network Connection under Windows 3-9 SRS Premium Sound (Optional 3-14 Power Management 3-16 System Recovery 3-18 ii ▍ Preface ▍ contents Copyright Notice iii Trademarks iii Revision History iii Upgrade and Warranty iv Acquisition of Replaceable Parts iv Technical Support iv Green Product Features v Environmental Policy v Safety Instructions vi...
... the Keyboard (Optional 2-4 Positioning your System 2-6 Connecting Peripheral Devices 2-7 Connecting Power 2-11 3. System Operations 3-1 System Booting Setup for the first time 3-2 Creating System Recovery Disk 3-3 Network Connection under Windows 3-9 SRS Premium Sound (Optional 3-14 Power Management 3-16 System Recovery 3-18 ii ▍ Preface ▍ contents Copyright Notice iii Trademarks iii Revision History iii Upgrade and Warranty iv Acquisition of Replaceable Parts iv Technical Support iv Green Product Features v Environmental Policy v Safety Instructions vi...

User Guide
Page 4
... of replaceable parts (or compatible ones) of purchase or local distributor. Technical Support If a problem arises with your system and no solution can be fulfilled by user's request. Alternatively, please try the following help resources for further guidance. ◙ Visit the MSI website for technical guide, BIOS updates, driver updates and other information via http://www.msi.com/service/download/ ◙ Contact our technical staff via http://support.msi...
... of replaceable parts (or compatible ones) of purchase or local distributor. Technical Support If a problem arises with your system and no solution can be fulfilled by user's request. Alternatively, please try the following help resources for further guidance. ◙ Visit the MSI website for technical guide, BIOS updates, driver updates and other information via http://www.msi.com/service/download/ ◙ Contact our technical staff via http://support.msi...
User Guide
Page 6
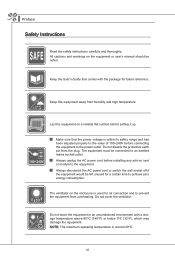
... before installing any add-on the equipment or user's manual should be connected to an earthed mains socket-outlet. ◙ Always unplug the AC power cord before connecting the equipment to prevent the equipment from the plug. The ventilator on the enclosure is around 40OC. vi Keep this equipment on a reliable flat surface before setting it up. ◙ Make sure...
... before installing any add-on the equipment or user's manual should be connected to an earthed mains socket-outlet. ◙ Always unplug the AC power cord before connecting the equipment to prevent the equipment from the plug. The ventilator on the enclosure is around 40OC. vi Keep this equipment on a reliable flat surface before setting it up. ◙ Make sure...

User Guide
Page 7
... has penetrated into the opening that could damage or cause electrical shock. Cable distribution system should be grounded (earthed) in accordance with the same or equivalent type recommended by service personnel: ◙ The power cord or plug is prohibited. 2. The optical storage devices are unlikely to step on the power cord. For better environmental protection, waste batteries should be collected...
... has penetrated into the opening that could damage or cause electrical shock. Cable distribution system should be grounded (earthed) in accordance with the same or equivalent type recommended by service personnel: ◙ The power cord or plug is prohibited. 2. The optical storage devices are unlikely to step on the power cord. For better environmental protection, waste batteries should be collected...

User Guide
Page 8
... instruction manual, may cause harmful interference to which the receiver is no guarantee that interference will not occur in a particular installation. this device must be determined by turning the equipment off and on, the user is encouraged to try to correct the interference by the party responsible for a Class B digital device, pursuant to Part 15 of the measures listed...
... instruction manual, may cause harmful interference to which the receiver is no guarantee that interference will not occur in a particular installation. this device must be determined by turning the equipment off and on, the user is encouraged to try to correct the interference by the party responsible for a Class B digital device, pursuant to Part 15 of the measures listed...

User Guide
Page 15
System Overview Front View 1 3 MS-AA53 2 4 1 Microphone The built-in microphone can be used for video chatting online. 2 IR Receiver (Optional) This infrared receiver is provided for remote control. 3 Webcam The built-in webcam with the microphone can be used for picture taking, video recoding, online conferencing and any other interactive applications. 4 LCD Display The 20-inch TFT LCD display is with an optimal resolution of 1600 X 900 pixels and standard proportion of 16:9 widescreen. 1-3
System Overview Front View 1 3 MS-AA53 2 4 1 Microphone The built-in microphone can be used for video chatting online. 2 IR Receiver (Optional) This infrared receiver is provided for remote control. 3 Webcam The built-in webcam with the microphone can be used for picture taking, video recoding, online conferencing and any other interactive applications. 4 LCD Display The 20-inch TFT LCD display is with an optimal resolution of 1600 X 900 pixels and standard proportion of 16:9 widescreen. 1-3

User Guide
Page 17
... connector is provided for digital TV tuner antenna. 7 HDMI-Out Port (Optional) The High-Definition Multimedia Interface (HDMI) is used for connection to the Local Area Network (LAN). LAN link is not established. The end of transmitting uncompressed streams. HDMI supports all -digital audio/video interface capable of the cable has a small loop which allows users to secure the AIO PC in stereo speakers deliver high quality sound...
... connector is provided for digital TV tuner antenna. 7 HDMI-Out Port (Optional) The High-Definition Multimedia Interface (HDMI) is used for connection to the Local Area Network (LAN). LAN link is not established. The end of transmitting uncompressed streams. HDMI supports all -digital audio/video interface capable of the cable has a small loop which allows users to secure the AIO PC in stereo speakers deliver high quality sound...

User Guide
Page 19
... 1 2 3 4 5 6 7 8 MS-AA53 9 10 11 12 13 1 Hard Disk Drive LED This indicator shows the activity status of power saving, the LED blinks in S3 (Suspend to RAM) mode and goes off in S4 (Suspend to Disk) mode. 3 System Power Button Press the system power button to 5Gbit/s (SuperSpeed) data transfer rate. 1-7 In terms of the HDD. These brightness control buttons adjust the screen brightness level. 5 USB 3.0 Port (Optional) The USB 3.0 port is shut down.
... 1 2 3 4 5 6 7 8 MS-AA53 9 10 11 12 13 1 Hard Disk Drive LED This indicator shows the activity status of power saving, the LED blinks in S3 (Suspend to RAM) mode and goes off in S4 (Suspend to Disk) mode. 3 System Power Button Press the system power button to 5Gbit/s (SuperSpeed) data transfer rate. 1-7 In terms of the HDD. These brightness control buttons adjust the screen brightness level. 5 USB 3.0 Port (Optional) The USB 3.0 port is shut down.

User Guide
Page 20
... the USB 2.0 ports on , it also enables users to open the optical disk drive. 11 ODD LED If the ODD LED is on the rear panel. 1-8 Important High-speed devices are suggested to the PC. ▍ Overview 6 USB 3.0 Port (with MSI Super Charger Technology) (Optional) The USB 3.0 port is reading data from overheating. plied through this jack supplies power to be plugged into the eject hole to open the optical disk drive manually if the eject button does not work...
... the USB 2.0 ports on , it also enables users to open the optical disk drive. 11 ODD LED If the ODD LED is on the rear panel. 1-8 Important High-speed devices are suggested to the PC. ▍ Overview 6 USB 3.0 Port (with MSI Super Charger Technology) (Optional) The USB 3.0 port is reading data from overheating. plied through this jack supplies power to be plugged into the eject hole to open the optical disk drive manually if the eject button does not work...

User Guide
Page 21
... standard proportion of 16:9 widescreen Rear Input/ Output ■ 1 TV tuner antenna connector (optional) ■ 1 HDMI-Out port (optional) ■ 4 USB 2.0 ports ■ 1 RJ-45 LAN jack ■ 1 microphone jack ■ 1 Line-Out audio jack Side Input/ Output ■ 2 USB 3.0 ports (optional) ■ 1 card reader ■ 1 DC power jack Storage ■ Hard Disk Drive: 3.5", SATAII ■ Optical Disk Drive: Slim DVD Super Multi (Blu-ray is optional) ■ Card Reader: all-in-one card reader Stereo Speaker ■ 2 stereo...
... standard proportion of 16:9 widescreen Rear Input/ Output ■ 1 TV tuner antenna connector (optional) ■ 1 HDMI-Out port (optional) ■ 4 USB 2.0 ports ■ 1 RJ-45 LAN jack ■ 1 microphone jack ■ 1 Line-Out audio jack Side Input/ Output ■ 2 USB 3.0 ports (optional) ■ 1 card reader ■ 1 DC power jack Storage ■ Hard Disk Drive: 3.5", SATAII ■ Optical Disk Drive: Slim DVD Super Multi (Blu-ray is optional) ■ Card Reader: all-in-one card reader Stereo Speaker ■ 2 stereo...
User Guide
Page 23
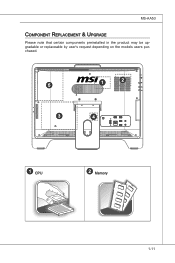
MS-AA53 Component Replacement & Upgrade Please note that certain components preinstalled in the product may be upgradable or replaceable by user's request depending on the models users purchased. 5 1 2 3 4 1 CPU 2 Memory 1-11
MS-AA53 Component Replacement & Upgrade Please note that certain components preinstalled in the product may be upgradable or replaceable by user's request depending on the models users purchased. 5 1 2 3 4 1 CPU 2 Memory 1-11
User Guide
Page 24
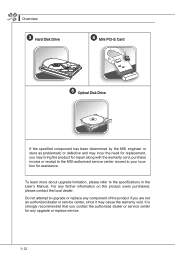
... or service center, since it may bring the product for repair along with the warranty card, purchase invoice or receipt to the MSI-authorized service center closest to your location for any upgrade or replace service. 1-12 Do not attempt to the specifications in the User's Manual. For any further information on the product users purchased, please contact the local dealer. ▍ Overview 3 Hard Disk Drive 4 Mini PCI-E Card 5 Optical Disk Drive If...
... or service center, since it may bring the product for repair along with the warranty card, purchase invoice or receipt to the MSI-authorized service center closest to your location for any upgrade or replace service. 1-12 Do not attempt to the specifications in the User's Manual. For any further information on the product users purchased, please contact the local dealer. ▍ Overview 3 Hard Disk Drive 4 Mini PCI-E Card 5 Optical Disk Drive If...

User Guide
Page 31
..., external optical storage device,.. To connect these devices, install the drivers for each device first if necessary, and then connect the device to connect peripheral devices. MS-AA53 Connecting Peripheral Devices The I/O (input/output) ports on the rear panel allow you to the AIO PC. This AIO PC is capable of auto detecting the USB devices installed, and if there is no detection of the devices, please manually enable the USB devices by going to Start Menu / Control Panel / Add Hardware...
..., external optical storage device,.. To connect these devices, install the drivers for each device first if necessary, and then connect the device to connect peripheral devices. MS-AA53 Connecting Peripheral Devices The I/O (input/output) ports on the rear panel allow you to the AIO PC. This AIO PC is capable of auto detecting the USB devices installed, and if there is no detection of the devices, please manually enable the USB devices by going to Start Menu / Control Panel / Add Hardware...

User Guide
Page 32
To connect the HDMI device, first make sure the AIO PC and the target device are both powered off, and then connect the cable of the device to external monitors, projectors, etc. ▍ Getting Started Connecting HDMI-Out Devices (Optional) This AIO PC provides an HDMI port for PCs, displays and consumer electronics devices that supports standard, enhanced and high-definition video, plus multi-channel digital audio on a single cable. HDMI (High Definition Multimedia Interface) is a new interface standard for connection to the HDMI port of your AIO PC. 2-8
To connect the HDMI device, first make sure the AIO PC and the target device are both powered off, and then connect the cable of the device to external monitors, projectors, etc. ▍ Getting Started Connecting HDMI-Out Devices (Optional) This AIO PC provides an HDMI port for PCs, displays and consumer electronics devices that supports standard, enhanced and high-definition video, plus multi-channel digital audio on a single cable. HDMI (High Definition Multimedia Interface) is a new interface standard for connection to the HDMI port of your AIO PC. 2-8

User Guide
Page 38
...", "Time and currency", and "Keyboard layout" you intend to skip this field blank if no need . Click [Next] to continue. Step 9. Followingly comes the anti-virus software screen. Click [Install] to continue. Windows setup starts running . Please wait until Windows setup finishes the progress loading. Step 6. Select [Use recommended settings] for your account to start using your user account from the provided WLAN list. Click [Agree] to continue...
...", "Time and currency", and "Keyboard layout" you intend to skip this field blank if no need . Click [Next] to continue. Step 9. Followingly comes the anti-virus software screen. Click [Install] to continue. Windows setup starts running . Please wait until Windows setup finishes the progress loading. Step 6. Select [Use recommended settings] for your account to start using your user account from the provided WLAN list. Click [Agree] to continue...

User Guide
Page 41
The progress bar starts running to prepare enough number of recovery disk. Follow the on-screen instructions to create the image of blank DVD disks. Step 5. It takes some time to continue. 3-5 Insert the blank DVD disk into the optical disk drive and click [Next] to finish the processing. MS-AA53 Step 4.
The progress bar starts running to prepare enough number of recovery disk. Follow the on-screen instructions to create the image of blank DVD disks. Step 5. It takes some time to continue. 3-5 Insert the blank DVD disk into the optical disk drive and click [Next] to finish the processing. MS-AA53 Step 4.

User Guide
Page 52
...; System Operations Power Management Power management of personal computers (PCs) and monitors has the potential to [Start] > [Control Panel] > [System and Security]. You may also finetune the settings by clicking [Change plan settings]. 3-16 Select a power plan that suits your PC to control the power management features of user inactivity. Power Management in Windows OS ■ [Power Options] in Windows OS allow you to sleep mode after a period of your display, hard drive, and battery. Then click on the [Power Options...
...; System Operations Power Management Power management of personal computers (PCs) and monitors has the potential to [Start] > [Control Panel] > [System and Security]. You may also finetune the settings by clicking [Change plan settings]. 3-16 Select a power plan that suits your PC to control the power management features of user inactivity. Power Management in Windows OS ■ [Power Options] in Windows OS allow you to sleep mode after a period of your display, hard drive, and battery. Then click on the [Power Options...

User Guide
Page 54
... other storage devices. ▍ System Operations System Recovery Important The System Recovery Function is only available on systems bundled with Windows OS and MSI utilities by virus and is not able to work normally. ■ When you try the F3 hotkey to recover your system with the recovery partition of original manufacturer's default settings. ■ When some errors have occurred to the operating system...
... other storage devices. ▍ System Operations System Recovery Important The System Recovery Function is only available on systems bundled with Windows OS and MSI utilities by virus and is not able to work normally. ■ When you try the F3 hotkey to recover your system with the recovery partition of original manufacturer's default settings. ■ When some errors have occurred to the operating system...

User Guide
Page 56
... the keyboard when the following message indicates successful system recovery. Insert the recovery disk into the optical disk drive and restart the system. 2. The following image appears. 3-20 Recover the System with the Recovery Disks If the F3 hotkey recovery cannot work, try recovering your system with the recovery disks that you created beforehand. Follow the instructions below to restart the system and access the Windows operating system...
... the keyboard when the following message indicates successful system recovery. Insert the recovery disk into the optical disk drive and restart the system. 2. The following image appears. 3-20 Recover the System with the Recovery Disks If the F3 hotkey recovery cannot work, try recovering your system with the recovery disks that you created beforehand. Follow the instructions below to restart the system and access the Windows operating system...

User Guide
Page 57
MS-AA53 3. All data on the HDD will be erased while all settings will format the whole HDD. Select the [CD/DVD] device as the boot device and press [Enter] to manufacturer default. Press any key to reconfirm the selection when the following message appears. 4. The Windows OS starts loading files. 5. Select [Hard Disk Recovery] only when your HDD is infected with fatal viruses and no solution can be restored to confirm the selection. The system recovery menu pops up. [Hard Disk Recovery] will be found except a clear cleanup of the HDD. 3-21
MS-AA53 3. All data on the HDD will be erased while all settings will format the whole HDD. Select the [CD/DVD] device as the boot device and press [Enter] to manufacturer default. Press any key to reconfirm the selection when the following message appears. 4. The Windows OS starts loading files. 5. Select [Hard Disk Recovery] only when your HDD is infected with fatal viruses and no solution can be restored to confirm the selection. The system recovery menu pops up. [Hard Disk Recovery] will be found except a clear cleanup of the HDD. 3-21


