

User Guide
Page 5
...Connector (915G/GV/GL 2-10 Serial Port Connector 2-11 USB Connectors 2-11 IEEE 1394 Port 2-11 LAN (RJ-45) Jack 2-12 Audio Port Connectors 2-12 Parallel Port Connector: LPT1 2-13 Connectors 2-14 Floppy Disk Drive Connector: FDD1 2-14 Fan Power Connectors: CPUFAN1/SYSFAN1 ...JCASE1 2-15 Serial ATA HDD Connectors: SATA1 & SATA2 2-16 Front Panel Connector: JF_P1 2-17 CD-In Connector: JAUX1 2-17 Front Panel Audio Connector: JAUD1 2-18 Serial Port Connector: JCOM1 2-19 Front USB Connectors: JUSB1 & JUSB2 2-19 v Getting Started 1-1 Mainboard Specifications 1-2 Mainboard Layout 1-4...
...Connector (915G/GV/GL 2-10 Serial Port Connector 2-11 USB Connectors 2-11 IEEE 1394 Port 2-11 LAN (RJ-45) Jack 2-12 Audio Port Connectors 2-12 Parallel Port Connector: LPT1 2-13 Connectors 2-14 Floppy Disk Drive Connector: FDD1 2-14 Fan Power Connectors: CPUFAN1/SYSFAN1 ...JCASE1 2-15 Serial ATA HDD Connectors: SATA1 & SATA2 2-16 Front Panel Connector: JF_P1 2-17 CD-In Connector: JAUX1 2-17 Front Panel Audio Connector: JAUD1 2-18 Serial Port Connector: JCOM1 2-19 Front USB Connectors: JUSB1 & JUSB2 2-19 v Getting Started 1-1 Mainboard Specifications 1-2 Mainboard Layout 1-4...

User Guide
Page 6
... 4-2 Installation for W indows 2000/XP 4-2 Software Configuration 4-4 Sound Effect 4-5 Mixer 4-8 AudioIO 4-13 Microphone 4-18 3D Audio Demo 4-19 Information 4-20 Using 2-, 4-, 6- & 8- Channel Audio Function 4-22 vi BIOS Setup 3-1 Entering Setup 3-2 Selecting the First Boot Device 3-2 Control Keys 3-2 Getting Help 3-2 Main Menu 3-2 Default Settings 3-2 The Main Menu 3-3 Standard CMOS ...
... 4-2 Installation for W indows 2000/XP 4-2 Software Configuration 4-4 Sound Effect 4-5 Mixer 4-8 AudioIO 4-13 Microphone 4-18 3D Audio Demo 4-19 Information 4-20 Using 2-, 4-, 6- & 8- Channel Audio Function 4-22 vi BIOS Setup 3-1 Entering Setup 3-2 Selecting the First Boot Device 3-2 Control Keys 3-2 Getting Help 3-2 Main Menu 3-2 Default Settings 3-2 The Main Menu 3-3 Standard CMOS ...
User Guide
Page 7
Introduction to DigiCell 5-1 Main...5-2 Introduction 5-2 H/W Diagnostic 5-4 Communication 5-5 Software Access Point 5-6 Terminology 5-6 Access Point Mode 5-7 W LAN Card Mode 5-8 Live Update 5-9 MEGA STICK 5-10 Basic Function 5-10 Non-Unicode programs supported 5-12 Core Center (for Pentium 4 CPU 5-14 Left-wing: Current system status 5-15 Right-wing: PC hardware status during real time operation..........5-15 Audio Speaker Setting 5-16 Power on Agent 5-18 Power On 5-18 Power Off / Restart 5-19 Start With 5-19 Auto Login 5-20 vii Chapter 5.
Introduction to DigiCell 5-1 Main...5-2 Introduction 5-2 H/W Diagnostic 5-4 Communication 5-5 Software Access Point 5-6 Terminology 5-6 Access Point Mode 5-7 W LAN Card Mode 5-8 Live Update 5-9 MEGA STICK 5-10 Basic Function 5-10 Non-Unicode programs supported 5-12 Core Center (for Pentium 4 CPU 5-14 Left-wing: Current system status 5-15 Right-wing: PC hardware status during real time operation..........5-15 Audio Speaker Setting 5-16 Power on Agent 5-18 Power On 5-18 Power Off / Restart 5-19 Start With 5-19 Auto Login 5-20 vii Chapter 5.
User Guide
Page 9
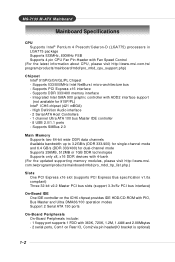
... 1GB DDR technologies † Supports only x8, x16 DDR devices with 4-bank (For the updated supporting memory modules, please visit http://www.msi. php) Chipset † Intel® 915P/G/GV/GL/PL Chipset - com.tw/program/products/mainboard/mbd/pro_mbd_trp_list.php.) Slots † ... floppy port supports 1 FDD with Fan Speed Control (For the latest information about CPU, please visit http://www.msi.com.tw/ prog ram/produc ts / mainboard/mbd/ pro_mbd _c pu_s upport. High Definition Audio interface - 2 Serial ATA Host Controllers - 1 channel Ultra ATA 100 bus Master IDE controller - 8 USB ...
... 1GB DDR technologies † Supports only x8, x16 DDR devices with 4-bank (For the updated supporting memory modules, please visit http://www.msi. php) Chipset † Intel® 915P/G/GV/GL/PL Chipset - com.tw/program/products/mainboard/mbd/pro_mbd_trp_list.php.) Slots † ... floppy port supports 1 FDD with Fan Speed Control (For the latest information about CPU, please visit http://www.msi.com.tw/ prog ram/produc ts / mainboard/mbd/ pro_mbd _c pu_s upport. High Definition Audio interface - 2 Serial ATA Host Controllers - 1 channel Ultra ATA 100 bus Master IDE controller - 8 USB ...

User Guide
Page 10
...and Dimension † M-ATX Form Factor: 24.5 cm (W ) x 24.5 cm (L) † 8 mounting holes 1-3 Audio † High Definition link controller integrated in ICH6 † Realtek ALC 880 8 channels (HDA) audio codec - Compliane with PCI 2.2. - Getting Started - 1 VGA port (for 915G/GV/GL only) - 1 parallel ...port supports SPP/EPP/ECP mode - 1 Line-In / Line-Out / MIC-In / Rear Speaker Out / Center-Subwoofer Speaker Out / SPDIF out optical audio port - 8 USB 2.0/1.1 ports (Rear * 4/ Front * 4) - 1 RJ-45 connector - 1 1394 ports On-board LAN † Realtek 8110S Gb LAN/8100C LAN...
...and Dimension † M-ATX Form Factor: 24.5 cm (W ) x 24.5 cm (L) † 8 mounting holes 1-3 Audio † High Definition link controller integrated in ICH6 † Realtek ALC 880 8 channels (HDA) audio codec - Compliane with PCI 2.2. - Getting Started - 1 VGA port (for 915G/GV/GL only) - 1 parallel ...port supports SPP/EPP/ECP mode - 1 Line-In / Line-Out / MIC-In / Rear Speaker Out / Center-Subwoofer Speaker Out / SPDIF out optical audio port - 8 USB 2.0/1.1 ports (Rear * 4/ Front * 4) - 1 RJ-45 connector - 1 1394 ports On-board LAN † Realtek 8110S Gb LAN/8100C LAN...
User Guide
Page 23
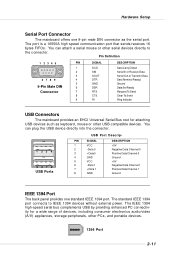
... Send Clear To Send Ring Indicate USB Connectors The mainboard provides an EHCI Universal Serial Bus root for a wide range of devices, including consumer electronics audio/video (A/V) appliances, storage peripherals, other USB-compatible devices. The IEEE 1394 high-speed serial bus complements USB by providing enhanced PC connectivity for attaching USB...
... Send Clear To Send Ring Indicate USB Connectors The mainboard provides an EHCI Universal Serial Bus root for a wide range of devices, including consumer electronics audio/video (A/V) appliances, storage peripherals, other USB-compatible devices. The IEEE 1394 high-speed serial bus complements USB by providing enhanced PC connectivity for attaching USB...
User Guide
Page 24
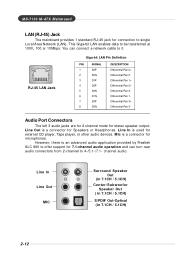
...D1N 7 D3P 8 D3N DESCRIPTION Differential Pair 0+ Differential Pair 0Differential Pair 1+ Differential Pair 2+ Differential Pair 2Differential Pair 1Differential Pair 3+ Differential Pair 3- channel audio. M S-7133 M -ATX M ainboard LAN (RJ-45) Jack The mainboard provides 1 standard RJ-45 jack for connection to be transferred at 1000,... 100 or 10Mbps. Line In is a connector for external CD player, Tape player, or other audio devices. Line In Line Out MIC Surround Speaker Out (in 7.1CH / 5.1CH) Center/Subwoofer Speaker Out ( in 7.1CH / ...
...D1N 7 D3P 8 D3N DESCRIPTION Differential Pair 0+ Differential Pair 0Differential Pair 1+ Differential Pair 2+ Differential Pair 2Differential Pair 1Differential Pair 3+ Differential Pair 3- channel audio. M S-7133 M -ATX M ainboard LAN (RJ-45) Jack The mainboard provides 1 standard RJ-45 jack for connection to be transferred at 1000,... 100 or 10Mbps. Line In is a connector for external CD player, Tape player, or other audio devices. Line In Line Out MIC Surround Speaker Out (in 7.1CH / 5.1CH) Center/Subwoofer Speaker Out ( in 7.1CH / ...

User Guide
Page 29
... the front panel switches and LEDs. Do not use. Hardware Setup Front Panel Connector: JF_P1 The mainboard provides one front panel connectors for CD-ROM audio connector. GND L R JAUX1 2-17 CD-In Connector: JAUX1 The connector is compliant with Intel® Front Panel I/O Connectivity Design Guide. JF_P1 is for electrical connection...
... the front panel switches and LEDs. Do not use. Hardware Setup Front Panel Connector: JF_P1 The mainboard provides one front panel connectors for CD-ROM audio connector. GND L R JAUX1 2-17 CD-In Connector: JAUX1 The connector is compliant with Intel® Front Panel I/O Connectivity Design Guide. JF_P1 is for electrical connection...
User Guide
Page 30
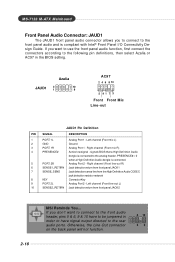
...Jack detection return from front panel JACK1 7 SENSE_SEND Jack detection sense line from front panel JACK2 2-18 MSI Reminds You... If you to connect to the front panel audio and is compliant with Intel® Front Panel I/O Connectivity Design Guide. Left channel (Front line-out... L) 10 SENSE2_RETIRN Jack detection return from the High Definition Audio CODEC jack detection resistor network 8 KEY Connector Key 9 PORT 2L Analog Port 2 - JAUD1 Azalia 2 10 1 9 AC97 2 4 6 8 10 ...
...Jack detection return from front panel JACK1 7 SENSE_SEND Jack detection sense line from front panel JACK2 2-18 MSI Reminds You... If you to connect to the front panel audio and is compliant with Intel® Front Panel I/O Connectivity Design Guide. Left channel (Front line-out... L) 10 SENSE2_RETIRN Jack detection return from the High Definition Audio CODEC jack detection resistor network 8 KEY Connector Key 9 PORT 2L Analog Port 2 - JAUD1 Azalia 2 10 1 9 AC97 2 4 6 8 10 ...
User Guide
Page 48
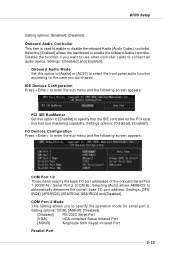
...], [3E8/IRQ4], [2E8/IRQ3] and [Disabled]. Disable the function if you to connect an audio device. Selecting [Enabled] allows the mainboard to enable or disable the onboard Azalia (Audio Codec) controller. I/O Devices Configuration Press to enter the sub-menu and the following screen appears: PCI... items specify the base I /O port address. Onboard Audio Controller This item is used to enable the onboard Azalia controller. Onboard Audio Mode Set this option to [Azalia] or [AC97] to select the front panel audio function according to the case you purchased, IDE Devices ...
...], [3E8/IRQ4], [2E8/IRQ3] and [Disabled]. Disable the function if you to connect an audio device. Selecting [Enabled] allows the mainboard to enable or disable the onboard Azalia (Audio Codec) controller. I/O Devices Configuration Press to enter the sub-menu and the following screen appears: PCI... items specify the base I /O port address. Onboard Audio Controller This item is used to enable the onboard Azalia controller. Onboard Audio Mode Set this option to [Azalia] or [AC97] to select the front panel audio function according to the case you purchased, IDE Devices ...

User Guide
Page 61
Introduction to Realtek ALC880 The mainboard is equipped with Realtek ALC880 chip, which provides support for better surround sound effect. IaIntrtrdroowddauurcecttSiiooentnutptoo RDeigailCteekllALC880 Introduction to Realtek ALC 880 CChhaapppttteeerrr244..H. ALC880 allows the board to install and use 2-, 4-, 6- The section will tell you how to attach 2, 4, 6 or 8 speakers for 8-channel audio output, including 2 Front, 2 Rear, 2 Side, 1 Center and 1 Subwoofer channel. or 8-channel audio function on the board. 4-1
Introduction to Realtek ALC880 The mainboard is equipped with Realtek ALC880 chip, which provides support for better surround sound effect. IaIntrtrdroowddauurcecttSiiooentnutptoo RDeigailCteekllALC880 Introduction to Realtek ALC 880 CChhaapppttteeerrr244..H. ALC880 allows the board to install and use 2-, 4-, 6- The section will tell you how to attach 2, 4, 6 or 8 speakers for 8-channel audio output, including 2 Front, 2 Rear, 2 Side, 1 Center and 1 Subwoofer channel. or 8-channel audio function on the board. 4-1
User Guide
Page 62
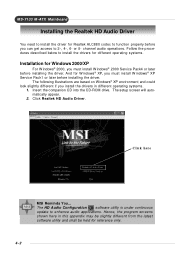
...the drivers for different operating systems. Installation for Windows 2000/XP For W indows® 2000, you can get access to enhance audio applications. The following illustrations are based on Windows® XP environment and could look slightly different if you must install W indows...® 2000 Service Pack4 or later before installing the driver. The HD Audio Configuration software utility is under continuous update to 2-, 4-, 6- or 8- Click Realtek HD Audio Driver. Click here MSI Reminds You... And for reference only. 4-2 Hence, the program screens shown here in...
...the drivers for different operating systems. Installation for Windows 2000/XP For W indows® 2000, you can get access to enhance audio applications. The following illustrations are based on Windows® XP environment and could look slightly different if you must install W indows...® 2000 Service Pack4 or later before installing the driver. The HD Audio Configuration software utility is under continuous update to 2-, 4-, 6- or 8- Click Realtek HD Audio Driver. Click here MSI Reminds You... And for reference only. 4-2 Hence, the program screens shown here in...
User Guide
Page 63
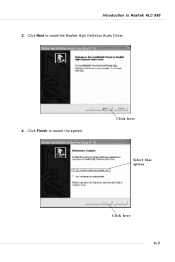
Click here Select this option Click here 4-3 Click Finish to Realtek ALC 880 3. Introduction to restart the system. Click Next to install the Realtek High Definition Audio Driver. 4.
Click here Select this option Click here 4-3 Click Finish to Realtek ALC 880 3. Introduction to restart the system. Click Next to install the Realtek High Definition Audio Driver. 4.

User Guide
Page 64
M S-7133 M -ATX M ainboard Software Configuration After installing the audio driver, you are able to enable the audio driver by clicking the Azalia HD Sound Effect Manager from the system tray at the lower-right corner of the screen to activate the HD Audio Configuration. It is also available to use the 2-, 4-, 6- channel audio feature now. Click the audio icon from the Control Panel. Double click 4-4 or 8-
M S-7133 M -ATX M ainboard Software Configuration After installing the audio driver, you are able to enable the audio driver by clicking the Azalia HD Sound Effect Manager from the system tray at the lower-right corner of the screen to activate the HD Audio Configuration. It is also available to use the 2-, 4-, 6- channel audio feature now. Click the audio icon from the Control Panel. Double click 4-4 or 8-
User Guide
Page 65
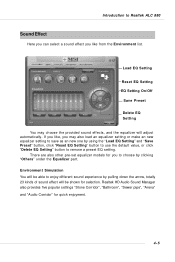
... new equalizer setting to save as an new one by clicking "Others" under the Equalizer part. Realtek HD Audio Sound Manager also provides five popular settings "Stone Corridor", "Bathroom", "Sewer pipe", "Arena" and "Audio Corridor" for selection. If you like, you like from the Environment list. Environment Simulation You will be shown...
... new equalizer setting to save as an new one by clicking "Others" under the Equalizer part. Realtek HD Audio Sound Manager also provides five popular settings "Stone Corridor", "Bathroom", "Sewer pipe", "Arena" and "Audio Corridor" for selection. If you like, you like from the Environment list. Environment Simulation You will be shown...

User Guide
Page 67
Introduction to Realtek ALC 880 Frequently Used Equalizer Setting Realtek HD Audio Sound Manager provides you certain optimized equalizer settings that singer! 2.Key Adjustment: Using "Up / Down Arrow" to find a key which better fits your range. 1.Vocal ...
Introduction to Realtek ALC 880 Frequently Used Equalizer Setting Realtek HD Audio Sound Manager provides you certain optimized equalizer settings that singer! 2.Key Adjustment: Using "Up / Down Arrow" to find a key which better fits your range. 1.Vocal ...

User Guide
Page 68
... of the rear and front panels individually. 1. M S-7133 M -ATX M ainboard Mixer In the Mixer part, you may play different audio sources simultaneously and let them output respectively from the indicated real panel or front panel. We strongly recommend that you may adjust the volumes of...2 people are well plugged in front or rear panel by select the Realtek HD Audio rear output or Realtek HD Audio front output items. MSI Reminds You... MSI Reminds You... The Realtek HD Audio front output item will appear. Multi-Stream Function ALC880 supports an outstanding feature called Multi...
... of the rear and front panels individually. 1. M S-7133 M -ATX M ainboard Mixer In the Mixer part, you may play different audio sources simultaneously and let them output respectively from the indicated real panel or front panel. We strongly recommend that you may adjust the volumes of...2 people are well plugged in front or rear panel by select the Realtek HD Audio rear output or Realtek HD Audio front output items. MSI Reminds You... MSI Reminds You... The Realtek HD Audio front output item will appear. Multi-Stream Function ALC880 supports an outstanding feature called Multi...
User Guide
Page 69
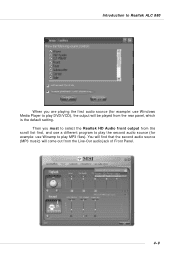
Introduction to Realtek ALC 880 W hen you must to select the Realtek HD Audio front output from the scroll list first, and use a different program to play the second audio source (for example: use W inamp to play MP3 files). You will find that the second audio source (MP3 music) will be played from the Line-Out audio jack of Front Panel. 4-9 Then you are playing the first audio source (for example: use W indows Media Player to play DVD/VCD), the output will come out from the rear panel, which is the default setting.
Introduction to Realtek ALC 880 W hen you must to select the Realtek HD Audio front output from the scroll list first, and use a different program to play the second audio source (for example: use W inamp to play MP3 files). You will find that the second audio source (MP3 music) will be played from the Line-Out audio jack of Front Panel. 4-9 Then you are playing the first audio source (for example: use W indows Media Player to play DVD/VCD), the output will come out from the rear panel, which is the default setting.
User Guide
Page 70
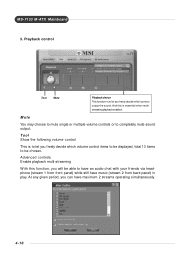
... decide which volume control items to be chosen. At any given period, you will be able to be displayed, total 13 items to have an audio chat with your friends via headphone (stream 1 from front panel) while still have maximum 2 streams operating simultaneously. 4-10 M S-7133 M -ATX M ainboard 3. And this function, you...
... decide which volume control items to be chosen. At any given period, you will be able to be displayed, total 13 items to have an audio chat with your friends via headphone (stream 1 from front panel) while still have maximum 2 streams operating simultaneously. 4-10 M S-7133 M -ATX M ainboard 3. And this function, you...
User Guide
Page 71
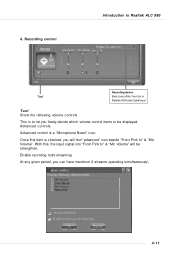
... volume control items to be strengthen. Recording control Introduction to Realtek ALC 880 Tool Recording device Back Line in/Mic, Front Lin in Realtek HD Audio Digital Input Tool Show the following volume controls This is a "Microphone Boost" icon.
... volume control items to be strengthen. Recording control Introduction to Realtek ALC 880 Tool Recording device Back Line in/Mic, Front Lin in Realtek HD Audio Digital Input Tool Show the following volume controls This is a "Microphone Boost" icon.
