User Guide
Page 8
... (Waste Electrical and Electronic Equipment) Statement v Chapter 1 Getting Started 1-1 Mainboard Specifications 1-2 Mainboard Layout 1-4 Packing Checklist 1-5 Chapter 2 Hardware Setup 2-1 Quick Components Guide 2-2 CPU (Central Processing Unit 2-3 Memory 2-6 Power Supply 2-8 Back Panel 2-9 Connectors 2-11 Jumpers 2-17 Switch 2-18 Slots 2-19 LED Status Indicators 2-20 Chapter 3 BIOS Setup 3-1 Entering Setup 3-2 The Main Menu 3-4 Standard...
... (Waste Electrical and Electronic Equipment) Statement v Chapter 1 Getting Started 1-1 Mainboard Specifications 1-2 Mainboard Layout 1-4 Packing Checklist 1-5 Chapter 2 Hardware Setup 2-1 Quick Components Guide 2-2 CPU (Central Processing Unit 2-3 Memory 2-6 Power Supply 2-8 Back Panel 2-9 Connectors 2-11 Jumpers 2-17 Switch 2-18 Slots 2-19 LED Status Indicators 2-20 Chapter 3 BIOS Setup 3-1 Entering Setup 3-2 The Main Menu 3-4 Standard...
User Guide
Page 12
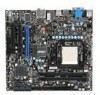
...9632; AMD® processors in AM3 package ■ Up to 6000+ and higher CPU (For the latest information about CPU, please visit http://www.msi.com/index.php?func=cpuform2) HyperTransport ■ Supports HyperTransport(HT) 3.0 Technology Chipset ■ North Bridge: AMD® 785G chipset ■ South... Bridge: AMD® SB710 chipset Memory Support ■ DDR2 667/ 800/ 1066 SDRAM (8GB Max) ■ 2 DDR2 DIMMs (240pin / 1.8V) (For more information on compatible components, please visit http://www.msi.com/index.php?func=testreport) LAN ■ Supports LAN 10/...
...9632; AMD® processors in AM3 package ■ Up to 6000+ and higher CPU (For the latest information about CPU, please visit http://www.msi.com/index.php?func=cpuform2) HyperTransport ■ Supports HyperTransport(HT) 3.0 Technology Chipset ■ North Bridge: AMD® 785G chipset ■ South... Bridge: AMD® SB710 chipset Memory Support ■ DDR2 667/ 800/ 1066 SDRAM (8GB Max) ■ 2 DDR2 DIMMs (240pin / 1.8V) (For more information on compatible components, please visit http://www.msi.com/index.php?func=testreport) LAN ■ Supports LAN 10/...
User Guide
Page 22
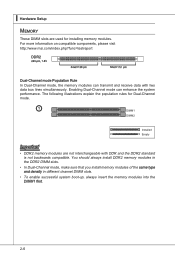
...the population rules for Dual-Channel mode. 1 DIMM1 DIMM2 Installed Empty Important • DDR2 memory modules are used for installing memory modules. For more information on compatible components, please visit http://www.msi.com/index.php?func=testreport DDR2 240-pin, 1.8V 64x2=128 pin 56x2=112 pin... Dual-Channel mode Population Rule In Dual-Channel mode, the memory modules can enhance the system performance. ▍ Hardware Setup Memory These DIMM slots are not ...
...the population rules for Dual-Channel mode. 1 DIMM1 DIMM2 Installed Empty Important • DDR2 memory modules are used for installing memory modules. For more information on compatible components, please visit http://www.msi.com/index.php?func=testreport DDR2 240-pin, 1.8V 64x2=128 pin 56x2=112 pin... Dual-Channel mode Population Rule In Dual-Channel mode, the memory modules can enhance the system performance. ▍ Hardware Setup Memory These DIMM slots are not ...

User Guide
Page 23
... inserted in the DIMM slot. Important You can barely see the golden finger if the memory module is properly seated. 3. Then push it in until the golden finger on the center and will automatically close when the memory module is properly inserted in the right orientation. 2. Manually check if the... memory module has been locked in place by the DIMM slot clips at each side of the DIMM slot will...
... inserted in the DIMM slot. Important You can barely see the golden finger if the memory module is properly seated. 3. Then push it in until the golden finger on the center and will automatically close when the memory module is properly inserted in the right orientation. 2. Manually check if the... memory module has been locked in place by the DIMM slot clips at each side of the DIMM slot will...
User Guide
Page 38
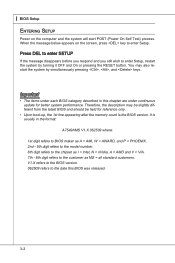
... (Power On Self Test) process. Important • The items under continuous update for reference only. • Upon boot-up, the 1st line appearing after the memory count is usually in this BIOS was released. 3-2 V1.X refers to the BIOS version. 062509 refers to the date this chapter are under each BIOS...
... (Power On Self Test) process. Important • The items under continuous update for reference only. • Upon boot-up, the 1st line appearing after the memory count is usually in this BIOS was released. 3-2 V1.X refers to the BIOS version. 062509 refers to the date this chapter are under each BIOS...

User Guide
Page 39
... arrow keys ( ↑↓ ) to . Main Menu The main menu lists the setup functions you can make changes General Help Enter CPU Specifications submenu Enter Memory-Z submenu Load Optimized Defaults Load Fail-Safe Defaults Save all the CMOS changes and exit Getting Help After entering the Setup menu, the first menu...
... arrow keys ( ↑↓ ) to . Main Menu The main menu lists the setup functions you can make changes General Help Enter CPU Specifications submenu Enter Memory-Z submenu Load Optimized Defaults Load Fail-Safe Defaults Save all the CMOS changes and exit Getting Help After entering the Setup menu, the first menu...
User Guide
Page 43
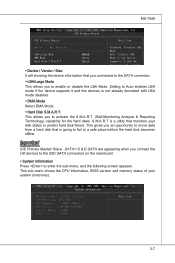
... it and the devices is going to fail to enable or disable the LBA Mode. This sub-menu shows the CPU information, BIOS version and memory status of your disk status to enter the sub-menu, and the following screen appears. S.M.A.R.T is a utility that is not already formatted with LBA mode...
... it and the devices is going to fail to enable or disable the LBA Mode. This sub-menu shows the CPU information, BIOS version and memory status of your disk status to enter the sub-menu, and the following screen appears. S.M.A.R.T is a utility that is not already formatted with LBA mode...
User Guide
Page 45
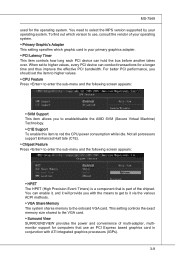
...an PCI Express based graphics card in conjunction with the means to get to it via the various ACPI methods. ▶ VGA Share Memory The system shares memory to enter the sub-menu and the following screen appears: ▶ HPET The HPET (High Precision Event Timers) is a component that... conduct transactions for the operating system. For better PCI performance, you with ATI integrated graphics processors (IGPs). 3-9 This setting controls the exact memory size shared to higher values, every PCI device can hold the bus before another takes over. To find out which graphic card is part...
...an PCI Express based graphics card in conjunction with the means to get to it via the various ACPI methods. ▶ VGA Share Memory The system shares memory to enter the sub-menu and the following screen appears: ▶ HPET The HPET (High Precision Event Timers) is a component that... conduct transactions for the operating system. For better PCI performance, you with ATI integrated graphics processors (IGPs). 3-9 This setting controls the exact memory size shared to higher values, every PCI device can hold the bus before another takes over. To find out which graphic card is part...
User Guide
Page 46
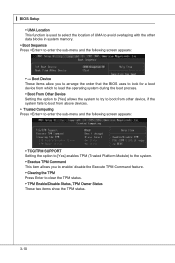
... boot process. ▶ Boot From Other Device Setting the option to [Yes] allows the system to try to boot from other data blocks in system memory. ▶ Boot Sequence Press to clear the TPM status. ▶ TPM Enable/Disable Status, TPM Owner Status These two items show the TPM status. 3-10...
... boot process. ▶ Boot From Other Device Setting the option to [Yes] allows the system to try to boot from other data blocks in system memory. ▶ Boot Sequence Press to clear the TPM status. ▶ TPM Enable/Disable Status, TPM Owner Status These two items show the TPM status. 3-10...

User Guide
Page 49
..., such as Windows 2000/XP, select [Enabled]. ▶ ACPI Standby State This item specifies the power saving modes for ACPI function. The information stored in memory will be used to main memory that remains powered while most other hardware compo-
..., such as Windows 2000/XP, select [Enabled]. ▶ ACPI Standby State This item specifies the power saving modes for ACPI function. The information stored in memory will be used to main memory that remains powered while most other hardware compo-

User Guide
Page 53
... now will replace any part of your system configuration. 3-17 You may also press to confirm the password. This prevents an unauthorized person from CMOS memory. Retype the password and press . Once the password is disabled, the system will boot and you are prompted to six characters in length, and press...
... now will replace any part of your system configuration. 3-17 You may also press to confirm the password. This prevents an unauthorized person from CMOS memory. Retype the password and press . Once the password is disabled, the system will boot and you are prompted to six characters in length, and press...

User Guide
Page 54
Read-only. ▶ CPU Specifications Press to enter the sub-menu and the following screen appears. This submenu shows the information of CPU and Memory speed. ▍ BIOS Setup Cell Menu Important Change these settings only if you are familiar with the chipset. ▶ Current CPU/ DRAM Frequency These items show the current clocks of installed CPU. 3-18
Read-only. ▶ CPU Specifications Press to enter the sub-menu and the following screen appears. This submenu shows the information of CPU and Memory speed. ▍ BIOS Setup Cell Menu Important Change these settings only if you are familiar with the chipset. ▶ Current CPU/ DRAM Frequency These items show the current clocks of installed CPU. 3-18
User Guide
Page 55
... item allows you to set the CPU FSB frequency (in order to be working properly, it shows the installed CPU technologies. In this function. ▶ Memory-Z Press to enter the sub-menu.
... item allows you to set the CPU FSB frequency (in order to be working properly, it shows the installed CPU technologies. In this function. ▶ Memory-Z Press to enter the sub-menu.

User Guide
Page 56
...set this field to select the ratio of FSB/ DRAM. ▶ Adjusted DRAM Frequency (MHz) It shows the adjusted Memory frequency. ▍ BIOS Setup ▶ DIMM1~4 Memory SPD Information Press to [Auto], the system will appear and selectable. DCT 0 controls channel A and DCT1 controls channel ...B. ▶ 1T/2T Memory Timing When the DRAM Timing Mode sets to automatically detect all of installed memory. ▶ Advance DRAM Configuration Press to enter the sub-menu and the following screen appears. Selecting...
...set this field to select the ratio of FSB/ DRAM. ▶ Adjusted DRAM Frequency (MHz) It shows the adjusted Memory frequency. ▍ BIOS Setup ▶ DIMM1~4 Memory SPD Information Press to [Auto], the system will appear and selectable. DCT 0 controls channel A and DCT1 controls channel ...B. ▶ 1T/2T Memory Timing When the DRAM Timing Mode sets to automatically detect all of installed memory. ▶ Advance DRAM Configuration Press to enter the sub-menu and the following screen appears. Selecting...

User Guide
Page 57
... if you to select the PCIE frequency (in clock speed which may just cause your local EMI regulation. • Remember to adjust the voltage of memory and chipset. ▶ Spread Spectrum When the mainboard's clock generator pulses, the extreme values (spikes) of the pulses are used to disable Spread Spectrum if...
... if you to select the PCIE frequency (in clock speed which may just cause your local EMI regulation. • Remember to adjust the voltage of memory and chipset. ▶ Spread Spectrum When the mainboard's clock generator pulses, the extreme values (spikes) of the pulses are used to disable Spread Spectrum if...
User Guide
Page 95
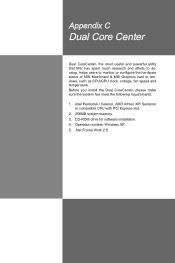
... or compatible CPU with PCI Express slot. 2. 256MB system memory. 3. Appendix C Dual Core Center Dual CoreCenter, the most useful and powerful utility that MSI has spent much research and efforts to develop, helps users to monitor or configure the hardware status of MSI Mainboard & MSI Graphics card in windows, such as CPU/GPU clock...
... or compatible CPU with PCI Express slot. 2. 256MB system memory. 3. Appendix C Dual Core Center Dual CoreCenter, the most useful and powerful utility that MSI has spent much research and efforts to develop, helps users to monitor or configure the hardware status of MSI Mainboard & MSI Graphics card in windows, such as CPU/GPU clock...

User Guide
Page 97
... Click DOT button to execute the function. C-3 MB Click MB button to read current GPU temperature, GPU clock and memory clock of mainboard will show below . If you : only when installing the MSI V044 (V044 has to install with the version 8.26 or newer driver)/ V046 or V060 graphics card can activate... the full function of the MSI mainboard would be available. MS-7549 Main Before using this utility, we have to remind you install a graphics card of other brand, only hardware status...
... Click DOT button to execute the function. C-3 MB Click MB button to read current GPU temperature, GPU clock and memory clock of mainboard will show below . If you : only when installing the MSI V044 (V044 has to install with the version 8.26 or newer driver)/ V046 or V060 graphics card can activate... the full function of the MSI mainboard would be available. MS-7549 Main Before using this utility, we have to remind you install a graphics card of other brand, only hardware status...
User Guide
Page 99
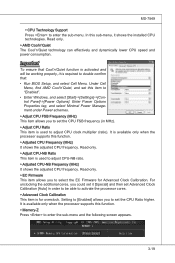
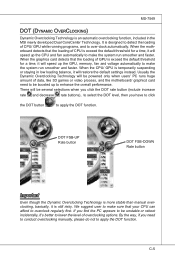
...loading of GPU is more stable than manual overclocking, basically, it will speed up the GPU, memory, fan and voltage automatically to apply the DOT function. It is designed to over-clock automatically. .... Usually the Dynamic Overclocking Technology will speed up to apply the DOT function. When the motherboard detects that your CPU can afford to be powered only when users' PC runs huge amount... of CPU is temporarily suspending or staying in the MSI newly developed Dual CoreCenter Technology. If you find the PC appears to be several ...
...loading of GPU is more stable than manual overclocking, basically, it will speed up the GPU, memory, fan and voltage automatically to apply the DOT function. It is designed to over-clock automatically. .... Usually the Dynamic Overclocking Technology will speed up to apply the DOT function. When the motherboard detects that your CPU can afford to be powered only when users' PC runs huge amount... of CPU is temporarily suspending or staying in the MSI newly developed Dual CoreCenter Technology. If you find the PC appears to be several ...

User Guide
Page 100
... button is not available. Important In the user profile, clicking the Save button can see clock status (including FSB/ CPU clock of mainboard and GPU/ memory clock of graphics card) of your system. In the default profile, the Save button is lit up with red color will be shown. ▍ Dual...
... button is not available. Important In the user profile, clicking the Save button can see clock status (including FSB/ CPU clock of mainboard and GPU/ memory clock of graphics card) of your system. In the default profile, the Save button is lit up with red color will be shown. ▍ Dual...

User Guide
Page 101
... increase the voltage, or click the minus sign button to it shows the graphs of your system, and you can see voltage status (including Vcore, memory, GPU voltage... It will be shown. Or click the Default button to apply the adjustments. And finally, click the Apply button to restore the default...
... increase the voltage, or click the minus sign button to it shows the graphs of your system, and you can see voltage status (including Vcore, memory, GPU voltage... It will be shown. Or click the Default button to apply the adjustments. And finally, click the Apply button to restore the default...


