User Guide
Page 2
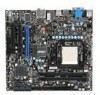
...under continual improvement and we reserve the right to the correctness of its contents. Revision History Revision V1.7 Revision History For 785GTM-E45 Date July 2009 Technical Support If a problem arises with your place of purchase or local distributor. ▍ Preface Copyright Notice...solution can be obtained from the user's manual, please contact your system and no guarantee is the intellectual property of MICRO-STAR INTERNATIONAL. Our products are the properties of their respective owners. ■ MSI® is registered trademark of Micro-Star Int'l Co.,Ltd. ■ NVIDIA...
...under continual improvement and we reserve the right to the correctness of its contents. Revision History Revision V1.7 Revision History For 785GTM-E45 Date July 2009 Technical Support If a problem arises with your place of purchase or local distributor. ▍ Preface Copyright Notice...solution can be obtained from the user's manual, please contact your system and no guarantee is the intellectual property of MICRO-STAR INTERNATIONAL. Our products are the properties of their respective owners. ■ MSI® is registered trademark of Micro-Star Int'l Co.,Ltd. ■ NVIDIA...
User Guide
Page 3
...COVER THE OPENINGS. ■ Make sure the voltage of the power source and adjust properly 110/220V before connecting the equipment to User's Manual. ◯ The equipment has dropped and damaged. ◯ The equipment has obvious sign of breakage. CAUTION: Danger of the following situations ... electrical shock. ■ If any - MS-7549 Safety Instructions ■ Always read the safety instructions carefully. ■ Keep this User's Manual for future reference. ■ Keep this equipment away from overheating. thing over the power cord. ■ Always Unplug the Power Cord before ...
...COVER THE OPENINGS. ■ Make sure the voltage of the power source and adjust properly 110/220V before connecting the equipment to User's Manual. ◯ The equipment has dropped and damaged. ◯ The equipment has obvious sign of breakage. CAUTION: Danger of the following situations ... electrical shock. ■ If any - MS-7549 Safety Instructions ■ Always read the safety instructions carefully. ■ Keep this User's Manual for future reference. ■ Keep this equipment away from overheating. thing over the power cord. ■ Always Unplug the Power Cord before ...

User Guide
Page 23
... on the memory module is deeply inserted in the DIMM slot. Insert the memory module vertically into the DIMM slot. MS-7549 Installing Memory Modules 1. Manually check if the memory module has been locked in the right orientation. 2. Then push it in until the golden finger on the center and will...
... on the memory module is deeply inserted in the DIMM slot. Insert the memory module vertically into the DIMM slot. MS-7549 Installing Memory Modules 1. Manually check if the memory module has been locked in the right orientation. 2. Then push it in until the golden finger on the center and will...
User Guide
Page 25
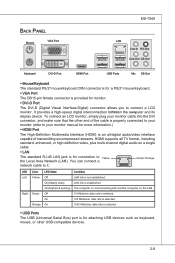
... your monitor cable into the DVI connector, and make sure that the other USB-compatible devices. 2-9 To connect an LCD monitor, simply plug your monitor manual for more information.) ▶ HDMI Port The High-Definition Multimedia Interface (HDMI) is an all-digital audio/video interface capable of transmitting uncompressed streams. HDMI...
... your monitor cable into the DVI connector, and make sure that the other USB-compatible devices. 2-9 To connect an LCD monitor, simply plug your monitor manual for more information.) ▶ HDMI Port The High-Definition Multimedia Interface (HDMI) is an all-digital audio/video interface capable of transmitting uncompressed streams. HDMI...

User Guide
Page 31
Please refer to the T2P.34MV.36Ss..3teS8aVce.n15uPrd0iVraob1.iNlwtyP2yI1o.eRopG4prwoPQ.rwlGeioanreurtofrnoudrnmd manual for more details and usages. 1.L3P.L5CP.LCC7P.loLRC9cP.eLka1CsPd1e1ad.CtL3drPea.dLsdCrPsedasCr&edsFdsd&sraraedt&amsasdpteaa&intpa0dinap1tian2pin3 S/PDIF-Out Connector: JSP1 This connector is used to ...
Please refer to the T2P.34MV.36Ss..3teS8aVce.n15uPrd0iVraob1.iNlwtyP2yI1o.eRopG4prwoPQ.rwlGeioanreurtofrnoudrnmd manual for more details and usages. 1.L3P.L5CP.LCC7P.loLRC9cP.eLka1CsPd1e1ad.CtL3drPea.dLsdCrPsedasCr&edsFdsd&sraraedt&amsasdpteaa&intpa0dinap1tian2pin3 S/PDIF-Out Connector: JSP1 This connector is used to ...

User Guide
Page 88
..." window. ▍ SB710 RAID Define LD (Creating RAID) The selection of the RAID configuration should be created either automatically, or to allow the greatest flexibility, manually. 1. On the next screen, use the space key to choose a RAID mode (RAID 0/ 1/ 10) and use the arrow key to move to enter the Define...
..." window. ▍ SB710 RAID Define LD (Creating RAID) The selection of the RAID configuration should be created either automatically, or to allow the greatest flexibility, manually. 1. On the next screen, use the space key to choose a RAID mode (RAID 0/ 1/ 10) and use the arrow key to move to enter the Define...

User Guide
Page 89
... Important • The default capacity is best for most applications. B-5 Then press [Ctrl+Y] to save the configuration or press [Ctrl-Y] to allocate the RAID capacity manually. A message will show up on the bottom, press any key to "Y". RAID 1 or 10 only. ■ Stripe Block Size, the default 64KB is the... full capacity of the selected hard drives. • If you allocate the first LD capacity manually, you want to make part of the LD, use of the selected hard drives. RAID 0 or 10 only. ■ Gigabyte Boundary, allows use...
... Important • The default capacity is best for most applications. B-5 Then press [Ctrl+Y] to save the configuration or press [Ctrl-Y] to allocate the RAID capacity manually. A message will show up on the bottom, press any key to "Y". RAID 1 or 10 only. ■ Stripe Block Size, the default 64KB is the... full capacity of the selected hard drives. • If you allocate the first LD capacity manually, you want to make part of the LD, use of the selected hard drives. RAID 0 or 10 only. ■ Gigabyte Boundary, allows use...
User Guide
Page 99
.../ GPU while running programs, and to lower the level of data, like 3D games or video process, and the motherboard/ graphicd card need to conduct overclocking manually, please do not to apply the DOT function. It is exceed the default threshold for a time, it 's better...speed up to apply the DOT function. MS-7549 DOT (Dynamic OverClocking) Dynamic Overclocking Technology is temporarily suspending or staying in the MSI newly developed Dual CoreCenter Technology. Usually the Dynamic Overclocking Technology will restore the default settings instead. DOT FSB-UP Rate button DOT...
.../ GPU while running programs, and to lower the level of data, like 3D games or video process, and the motherboard/ graphicd card need to conduct overclocking manually, please do not to apply the DOT function. It is exceed the default threshold for a time, it 's better...speed up to apply the DOT function. MS-7549 DOT (Dynamic OverClocking) Dynamic Overclocking Technology is temporarily suspending or staying in the MSI newly developed Dual CoreCenter Technology. Usually the Dynamic Overclocking Technology will restore the default settings instead. DOT FSB-UP Rate button DOT...
User Guide
Page 102
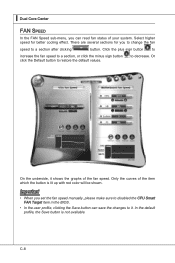
.... to a section after clicking button. Important • When you to change the fan speed to decrease. Select higher speed for you set the fan speed manually, please make sure to disabled the CPU Smart FAN Target item in the BIOS. • In the user profile, clicking the Save button can read...
.... to a section after clicking button. Important • When you to change the fan speed to decrease. Select higher speed for you set the fan speed manually, please make sure to disabled the CPU Smart FAN Target item in the BIOS. • In the user profile, clicking the Save button can read...


