User Guide
Page 2
... can be obtained from the user's manual, please contact your place of its contents. Revision History Revision V1.4 Revision History Release for FAQ, technical guide, BIOS updates, driver updates, and other information: http://www.msi.com/index.php?func=service ◙... JMicron Technology Corporation. ■ Netware® is a registered trademark of MICRO-STAR INTERNATIONAL. Alternatively, please try the following help resources for further guidance. ◙ Visit the MSI website for 785GM-E51 & 760GM-E51 Date August 2009 Technical Support If a problem arises with your system and...
... can be obtained from the user's manual, please contact your place of its contents. Revision History Revision V1.4 Revision History Release for FAQ, technical guide, BIOS updates, driver updates, and other information: http://www.msi.com/index.php?func=service ◙... JMicron Technology Corporation. ■ Netware® is a registered trademark of MICRO-STAR INTERNATIONAL. Alternatively, please try the following help resources for further guidance. ◙ Visit the MSI website for 785GM-E51 & 760GM-E51 Date August 2009 Technical Support If a problem arises with your system and...

User Guide
Page 3
... the equipment should be noted. ■ Never pour any liquid into the equipment. ◯ The equipment has been exposed to User's Manual. ◯ The equipment has dropped and damaged. ◯ The equipment has obvious sign of explosion if battery is damaged. ◯... hence protects the equipment from humidity. ■ Lay this equipment away from overheating. MS-7596 Safety Instructions ■ Always read the safety instructions carefully. ■ Keep this User's Manual for future reference. ■ Keep this equipment on a reliable flat surface before connecting the...
... the equipment should be noted. ■ Never pour any liquid into the equipment. ◯ The equipment has been exposed to User's Manual. ◯ The equipment has dropped and damaged. ◯ The equipment has obvious sign of explosion if battery is damaged. ◯... hence protects the equipment from humidity. ■ Lay this equipment away from overheating. MS-7596 Safety Instructions ■ Always read the safety instructions carefully. ■ Keep this User's Manual for future reference. ■ Keep this equipment on a reliable flat surface before connecting the...

User Guide
Page 22
... push it in until the golden finger on the center and will automatically close when the memory module is deeply inserted in the DIMM slot. Manually check if the memory module has been locked in place by the DIMM slot clips at each side of the DIMM slot will only fit... at the sides. Notch Volt 2-7 Important You can barely see the golden finger if the memory module is properly inserted in the right orientation. 2. MS-7596 Installing Memory Modules 1.
... push it in until the golden finger on the center and will automatically close when the memory module is deeply inserted in the DIMM slot. Manually check if the memory module has been locked in place by the DIMM slot clips at each side of the DIMM slot will only fit... at the sides. Notch Volt 2-7 Important You can barely see the golden finger if the memory module is properly inserted in the right orientation. 2. MS-7596 Installing Memory Modules 1.
User Guide
Page 24
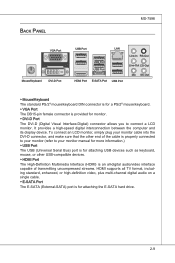
...-D connector, and make sure that the other end of the cable is properly connected to your monitor (refer to connect a LCD monitor. Back Panel MS-7596 VGA Port Mouse/Keyboard DVI-D Port USB Port LAN USB Port USB Port HDMI Port E-SATA Port USB Port Line-In RS-Out Line-Out...; VGA Port The DB15-pin female connector is for monitor. ▶ DVI-D Port The DVI-D (Digital Visual Interface-Digital) connector allows you to your monitor manual for more information.) ▶ USB Port The USB (Universal Serial Bus) port is for attaching USB devices such as keyboard, mouse, or other USB-compatible...
...-D connector, and make sure that the other end of the cable is properly connected to your monitor (refer to connect a LCD monitor. Back Panel MS-7596 VGA Port Mouse/Keyboard DVI-D Port USB Port LAN USB Port USB Port HDMI Port E-SATA Port USB Port Line-In RS-Out Line-Out...; VGA Port The DB15-pin female connector is for monitor. ▶ DVI-D Port The DVI-D (Digital Visual Interface-Digital) connector allows you to your monitor manual for more information.) ▶ USB Port The USB (Universal Serial Bus) port is for attaching USB devices such as keyboard, mouse, or other USB-compatible...

User Guide
Page 32
MS-7596 TPM Module connector: JTPM1 This connector connects to the TPM security platform manual for more details and usages. 2.34V.36S..3tS8aVe.n15Prd0iVaob1.NlwyP2I1o.eRopG4rwoPQ.rwGeionreurornudnd 1.L3P.L5CP.LCC7P.loLRC9cP.eLka1CsPd1e1ad.CtL3drPea.dLsdCrPsedasCr&edsFdsd&sraraedt&amsasdpteaa&intpa0dinap1tian2pin3 2-17 Please refer to a TPM (Trusted Platform Module) module (optional).
MS-7596 TPM Module connector: JTPM1 This connector connects to the TPM security platform manual for more details and usages. 2.34V.36S..3tS8aVe.n15Prd0iVaob1.NlwyP2I1o.eRopG4rwoPQ.rwGeionreurornudnd 1.L3P.L5CP.LCC7P.loLRC9cP.eLka1CsPd1e1ad.CtL3drPea.dLsdCrPsedasCr&edsFdsd&sraraedt&amsasdpteaa&intpa0dinap1tian2pin3 2-17 Please refer to a TPM (Trusted Platform Module) module (optional).

User Guide
Page 93
..." window. RAID sets can be based upon factors including performance, data security, and the number of the system and plan the data storage strategy. B-4 ▍ SB710 RAID Define LD (Creating RAID) The selection of the RAID configuration should be created either automatically, or to allow the greatest flexibility...
..." window. RAID sets can be based upon factors including performance, data security, and the number of the system and plan the data storage strategy. B-4 ▍ SB710 RAID Define LD (Creating RAID) The selection of the RAID configuration should be created either automatically, or to allow the greatest flexibility...

User Guide
Page 94
...9632; Gigabyte Boundary, allows use the arrow key to "Y". Then press [Ctrl+Y] to allocate the RAID capacity manually. ing capacity of slightly smaller replacement drives. ■ Cache Mode, WriteThru or WriteBack. 4. MS-7596 ■ Initialize logical drive, zero the disk drives. Important • The default capacity is best for ...Stripe Block Size, the default 64KB is the full capacity of the selected hard drives. • If you allocate the first LD capacity manually, you want to make part of the LD, use the space key to change the assignment to choose the hard drives which you can ...
...9632; Gigabyte Boundary, allows use the arrow key to "Y". Then press [Ctrl+Y] to allocate the RAID capacity manually. ing capacity of slightly smaller replacement drives. ■ Cache Mode, WriteThru or WriteBack. 4. MS-7596 ■ Initialize logical drive, zero the disk drives. Important • The default capacity is best for ...Stripe Block Size, the default 64KB is the full capacity of the selected hard drives. • If you allocate the first LD capacity manually, you want to make part of the LD, use the space key to change the assignment to choose the hard drives which you can ...

User Guide
Page 105
... using the scroll bar. Click the arrow sign and the drop-down menu will appear. MS-7596 In each setting menu, you can set . In the "System Warning" block, you can select desired values for manual overclocking. C-7 Set the thresholds of the button which arranges an arrow sign, and a drop-down menu...
... using the scroll bar. Click the arrow sign and the drop-down menu will appear. MS-7596 In each setting menu, you can set . In the "System Warning" block, you can select desired values for manual overclocking. C-7 Set the thresholds of the button which arranges an arrow sign, and a drop-down menu...


