
User Guide
Page 9
MS-7596 User Settings 3-27 Load Fail-Safe/ Optimized Defaults 3-28 Appendix A Realtek Audio A-1 Installing the Realtek HD Audio Driver A-2 Software Configuration A-4 Hardware Setup A-19 Appendix B SB710 RAID B-1 RAID Configuration B-2 Appendix C Overclocking Center C-1 Activating Overclocking Center C-2 System Info C-3 DOT C-5 ix
MS-7596 User Settings 3-27 Load Fail-Safe/ Optimized Defaults 3-28 Appendix A Realtek Audio A-1 Installing the Realtek HD Audio Driver A-2 Software Configuration A-4 Hardware Setup A-19 Appendix B SB710 RAID B-1 RAID Configuration B-2 Appendix C Overclocking Center C-1 Activating Overclocking Center C-2 System Info C-3 DOT C-5 ix
User Guide
Page 11
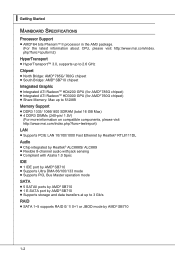
... GHz Chipset ■ North Bridge: AMD® 785G/ 760G chipset ■ South Bridge: AMD® SB710 chipset Integrated Graphic ■ Integrated ATI RadeonTM HD4200 GPU (for AMD® 785G chipset) ■ Integrated ATI RadeonTM HD3000 GPU (for AMD® 760G chipset) ■ Share...msi.com/index.php?func=testreport) LAN ■ Supports PCIE LAN 10/100/1000 Fast Ethernet by Realtek® RTL8111DL Audio ■ Chip integrated by Realtek® ALC888S/ ALC889 ■ Flexible 8-channel audio with jack sensing ■ Compliant with Azalia 1.0 Spec IDE ■ 1 IDE port by AMD® SB710...
... GHz Chipset ■ North Bridge: AMD® 785G/ 760G chipset ■ South Bridge: AMD® SB710 chipset Integrated Graphic ■ Integrated ATI RadeonTM HD4200 GPU (for AMD® 785G chipset) ■ Integrated ATI RadeonTM HD3000 GPU (for AMD® 760G chipset) ■ Share...msi.com/index.php?func=testreport) LAN ■ Supports PCIE LAN 10/100/1000 Fast Ethernet by Realtek® RTL8111DL Audio ■ Chip integrated by Realtek® ALC888S/ ALC889 ■ Flexible 8-channel audio with jack sensing ■ Compliant with Azalia 1.0 Spec IDE ■ 1 IDE port by AMD® SB710...

User Guide
Page 12
...Panel Audio connector - 1 SPDIF-out connector - 1 TPM Module connector - 1 Overclock FSB switch Slots ■ 1 PCI Express Gen2 x16 slot ■ 1 PCI Express x1 slot ■ 2 PCI slots, support 3.3V/ 5V PCI bus Interface Form Factor ■ Micro-ATX (24.4cm X 24.4 cm) Mounting ■ 8 mounting holes MS-7596 ...If you need to purchase accessories and request the part numbers, you could search the product web page and find details on our web address below http://www.msi.com/index.php 1-3
...Panel Audio connector - 1 SPDIF-out connector - 1 TPM Module connector - 1 Overclock FSB switch Slots ■ 1 PCI Express Gen2 x16 slot ■ 1 PCI Express x1 slot ■ 2 PCI slots, support 3.3V/ 5V PCI bus Interface Form Factor ■ Micro-ATX (24.4cm X 24.4 cm) Mounting ■ 8 mounting holes MS-7596 ...If you need to purchase accessories and request the part numbers, you could search the product web page and find details on our web address below http://www.msi.com/index.php 1-3
User Guide
Page 24
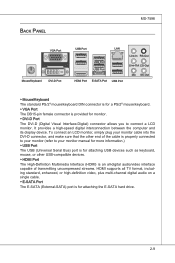
It provides a high-speed digital interconnection between the computer and its display device. Back Panel MS-7596 VGA Port Mouse/Keyboard DVI-D Port USB Port LAN USB Port USB Port HDMI Port E-SATA Port USB Port Line-In RS-Out Line-Out ... attaching USB devices such as keyboard, mouse, or other USB-compatible devices. ▶ HDMI Port The High-Definition Multimedia Interface (HDMI) is an all-digital audio/video interface capable of transmitting uncompressed streams. HDMI supports all TV format, including standard, enhanced, or high-definition video, plus multi-channel digital...
It provides a high-speed digital interconnection between the computer and its display device. Back Panel MS-7596 VGA Port Mouse/Keyboard DVI-D Port USB Port LAN USB Port USB Port HDMI Port E-SATA Port USB Port Line-In RS-Out Line-Out ... attaching USB devices such as keyboard, mouse, or other USB-compatible devices. ▶ HDMI Port The High-Definition Multimedia Interface (HDMI) is an all-digital audio/video interface capable of transmitting uncompressed streams. HDMI supports all TV format, including standard, enhanced, or high-definition video, plus multi-channel digital...

User Guide
Page 25
▍ Hardware Setup ▶ LAN The standard RJ-45 LAN jack is for connection to the color of audio jacks. ■ Line-In (Blue) - It is easy to differentiate between audio effects according to Yellow the Local Area Network (LAN). Rear-Surround Out in 5.1/ 7.1 channel mode. ■ ...selected. 1000 Mbits/sec data rate is a connector for microphones. ■ RS-Out (Black) - Line Out, is selected. ▶ Audio Ports These audio connectors are used for audio devices. You can connect a network cable to it. Line In, is a connector for speakers or headphones. ■ Mic (Pink) ...
▍ Hardware Setup ▶ LAN The standard RJ-45 LAN jack is for connection to the color of audio jacks. ■ Line-In (Blue) - It is easy to differentiate between audio effects according to Yellow the Local Area Network (LAN). Rear-Surround Out in 5.1/ 7.1 channel mode. ■ ...selected. 1000 Mbits/sec data rate is a connector for microphones. ■ RS-Out (Black) - Line Out, is selected. ▶ Audio Ports These audio connectors are used for audio devices. You can connect a network cable to it. Line In, is a connector for speakers or headphones. ■ Mic (Pink) ...
User Guide
Page 28
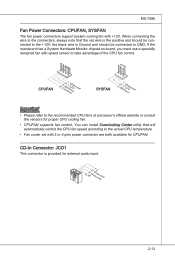
... 3.S2.e+1n1.sG2orVround Important • Please refer to the recommended CPU fans at processor's official website or consult the vendors for external audio input. 4.R3.G2.rG1o.urLonudnd 2-13 MS-7596 Fan Power Connectors: CPUFAN, SYSFAN The fan power connectors support system cooling fan with 3 or 4 pins power connector are both available...
... 3.S2.e+1n1.sG2orVround Important • Please refer to the recommended CPU fans at processor's official website or consult the vendors for external audio input. 4.R3.G2.rG1o.urLonudnd 2-13 MS-7596 Fan Power Connectors: CPUFAN, SYSFAN The fan power connectors support system cooling fan with 3 or 4 pins power connector are both available...

User Guide
Page 29
PowPoewr LeEr DSwi2tc.h+41.0-6..N+8o.-Pin 1.+3.-5.-7.H+9D.RDReLseEesDrevteSdwitch S/PDIF-Out Connector: JSP1 This connector is used to the front panel switches and LEDs. ▍ Hardware Setup Front Panel Connector: JFP1 This connector is for electrical connection to connect S/PDIF (Sony & Philips Digital Interconnect Format) interface for digital audio transmission. 1.V2C.S3C.PGDrIoFund S/PDIF Bracket (Optional) 2-14 The JFP1 is compliant with Intel® Front Panel I/O Connectivity Design Guide.
PowPoewr LeEr DSwi2tc.h+41.0-6..N+8o.-Pin 1.+3.-5.-7.H+9D.RDReLseEesDrevteSdwitch S/PDIF-Out Connector: JSP1 This connector is used to the front panel switches and LEDs. ▍ Hardware Setup Front Panel Connector: JFP1 This connector is for electrical connection to connect S/PDIF (Sony & Philips Digital Interconnect Format) interface for digital audio transmission. 1.V2C.S3C.PGDrIoFund S/PDIF Bracket (Optional) 2-14 The JFP1 is compliant with Intel® Front Panel I/O Connectivity Design Guide.

User Guide
Page 30
...7596 Front USB Connector: JUSB1 / JUSB2 / JUSB3 This connector, compliant with Intel® I/O Connectivity Design Guide, is compliant with Intel® Front Panel I/O Connectivity Design Guide. 2.G4r.oP6uR.Mn8Ed.1INSC0Eo.DHNPeeCitnaeEdc#tPiohnone Detection 1.M3.IMC5.ILHC7e.RS9a.EdHNPeShaEodn_PeShERoNneDL 2-15 Front Panel Audio... Connector: JAUD1 This connector allows you to connect the front panel audio and is ideal for connecting high-speed USB interface peripherals such as USB...
...7596 Front USB Connector: JUSB1 / JUSB2 / JUSB3 This connector, compliant with Intel® I/O Connectivity Design Guide, is compliant with Intel® Front Panel I/O Connectivity Design Guide. 2.G4r.oP6uR.Mn8Ed.1INSC0Eo.DHNPeeCitnaeEdc#tPiohnone Detection 1.M3.IMC5.ILHC7e.RS9a.EdHNPeShaEodn_PeShERoNneDL 2-15 Front Panel Audio... Connector: JAUD1 This connector allows you to connect the front panel audio and is ideal for connecting high-speed USB interface peripherals such as USB...
User Guide
Page 51
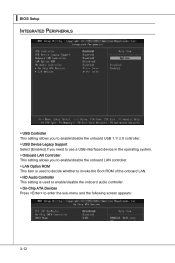
.... ▶ LAN Option ROM This item is used to decide whether to invoke the Boot ROM of the onboard LAN. ▶ HD Audio Controller This setting is used to enable/disable the onboard audio controller. ▶ On-Chip ATA Devices Press to enter the sub-menu and the following screen appears: 3-12
.... ▶ LAN Option ROM This item is used to decide whether to invoke the Boot ROM of the onboard LAN. ▶ HD Audio Controller This setting is used to enable/disable the onboard audio controller. ▶ On-Chip ATA Devices Press to enter the sub-menu and the following screen appears: 3-12

User Guide
Page 68
Appendix A Realtek Audio The Realtek audio provides 10-channel DAC that simultaneously supports 7.1 sound playback and 2 channels of independent stereo sound output (multiple streaming) through the Front-Out-Left and Front-Out-Right channels. A-A-1
Appendix A Realtek Audio The Realtek audio provides 10-channel DAC that simultaneously supports 7.1 sound playback and 2 channels of independent stereo sound output (multiple streaming) through the Front-Out-Left and Front-Out-Right channels. A-A-1

User Guide
Page 69
... in this section may be slightly different from the latest software utility and shall be held for reference only. Click Realtek HD Audio Drivers button. cally appear. 2. Hence, the program screens shown here in different operating systems. 1. The setup screen will automati... slightly different if you can get access to 2-, 4-, 6-, 8- channel or 7.1+2 channel audio operations. ▍ Realtek Audio Installing the Realtek HD Audio Driver You need to install the HD audio driver for Realtek audio codec to function properly before installing the driver. Click here Important The HD...
... in this section may be slightly different from the latest software utility and shall be held for reference only. Click Realtek HD Audio Drivers button. cally appear. 2. Hence, the program screens shown here in different operating systems. 1. The setup screen will automati... slightly different if you can get access to 2-, 4-, 6-, 8- channel or 7.1+2 channel audio operations. ▍ Realtek Audio Installing the Realtek HD Audio Driver You need to install the HD audio driver for Realtek audio codec to function properly before installing the driver. Click here Important The HD...

User Guide
Page 70
Click Finish to install the Realtek High Definition Audio Driver. Click Next to restart the system. Click here Select this option Click here Click here A-3 MS-7596 4. 3.
Click Finish to install the Realtek High Definition Audio Driver. Click Next to restart the system. Click here Select this option Click here Click here A-3 MS-7596 4. 3.

User Guide
Page 71
It is also available to use the 2-, 4-, 6- ▍ Realtek Audio Software Configuration After installing the audio driver, you are able to enable the audio driver by clicking the Realtek HD Audio Manager from the system tray at the lower-right corner of the screen to activate the HD Audio Configuration. Double click A-4 or 8- Click the audio icon from the Control Panel. channel audio feature now.
It is also available to use the 2-, 4-, 6- ▍ Realtek Audio Software Configuration After installing the audio driver, you are able to enable the audio driver by clicking the Realtek HD Audio Manager from the system tray at the lower-right corner of the screen to activate the HD Audio Configuration. Double click A-4 or 8- Click the audio icon from the Control Panel. channel audio feature now.

User Guide
Page 72
... load an equalizer setting or make an new equalizer setting to remove a preset EQ setting. A-5 If you like from the Environment list. MS-7596 ■ Environment Simulation You will be able to enjoy different sound experience by using the "Load EQ Setting" and "Save Preset" button, click... EQ Setting" button to save as an new one by pulling down the arrow, totally 23 kinds of sound effect will adjust automatically. Realtek HD Audio Sound Manager also provides five popular settings "Stone Corridor", "Bathroom", "Sewer pipe", "Arena" and "Auditorium" for you like , you may choose...
... load an equalizer setting or make an new equalizer setting to remove a preset EQ setting. A-5 If you like from the Environment list. MS-7596 ■ Environment Simulation You will be able to enjoy different sound experience by using the "Load EQ Setting" and "Save Preset" button, click... EQ Setting" button to save as an new one by pulling down the arrow, totally 23 kinds of sound effect will adjust automatically. Realtek HD Audio Sound Manager also provides five popular settings "Stone Corridor", "Bathroom", "Sewer pipe", "Arena" and "Auditorium" for you like , you may choose...

User Guide
Page 73
... you would like to use Reset 10 bands of equalizer, ranging from 100Hz to 16KHz. Save The settings are created from default settings; ▍ Realtek Audio ■ Equalizer Selection Equalizer frees users from previous steps.
... you would like to use Reset 10 bands of equalizer, ranging from 100Hz to 16KHz. Save The settings are created from default settings; ▍ Realtek Audio ■ Equalizer Selection Equalizer frees users from previous steps.

User Guide
Page 74
By leveraging our long experience at audio field, Realtek HD Audio Sound Manager provides you certain optimized equalizer settings that singer! 2. Key Adjustment: Using "Up / Down Arrow" to find more optimized settings available to you. ■ ... music is still in "Others" you will find a key which better fits your range. 1. Remove the human voice Raise the key Lower the key A-7 MS-7596 Frequently Used Equalizer Setting Realtek recognizes the needs that you eliminate the vocal of the song would be that are frequently used for your quick...
By leveraging our long experience at audio field, Realtek HD Audio Sound Manager provides you certain optimized equalizer settings that singer! 2. Key Adjustment: Using "Up / Down Arrow" to find more optimized settings available to you. ■ ... music is still in "Others" you will find a key which better fits your range. 1. Remove the human voice Raise the key Lower the key A-7 MS-7596 Frequently Used Equalizer Setting Realtek recognizes the needs that you eliminate the vocal of the song would be that are frequently used for your quick...

User Guide
Page 75
... the jacks on the rear and front panel first before enable the multi-stream function. Important You have to save the setup. The Realtek HD Audio front output item will appear. Click the button and the Mixer ToolBox menu will appear after you pluged in front or rear panel by select... the Realtek HD Audio rear output or Realtek HD Audio front output items. Important Before set up, please make sure the playback devices are using the same computer together for different purposes...
... the jacks on the rear and front panel first before enable the multi-stream function. Important You have to save the setup. The Realtek HD Audio front output item will appear. Click the button and the Mixer ToolBox menu will appear after you pluged in front or rear panel by select... the Realtek HD Audio rear output or Realtek HD Audio front output items. Important Before set up, please make sure the playback devices are using the same computer together for different purposes...

User Guide
Page 76
A-9 Then you are playing the first audio source (for example: use Windows Media Player to play DVD/VCD), the output will come out from the Line-Out audio jack of Front Panel. MS-7596 When you must to select the Realtek HD Audio 2nd output from the scroll list first, and use a different program to play the second audio source (for example: use Winamp to play MP3 files). You will find that the second audio source (MP3 music) will be played from the rear panel, which is the default setting.
A-9 Then you are playing the first audio source (for example: use Windows Media Player to play DVD/VCD), the output will come out from the Line-Out audio jack of Front Panel. MS-7596 When you must to select the Realtek HD Audio 2nd output from the scroll list first, and use a different program to play the second audio source (for example: use Winamp to play MP3 files). You will find that the second audio source (MP3 music) will be played from the rear panel, which is the default setting.

User Guide
Page 77
...multiple volume controls or to output the sound. And this function, you will be displayed. - Advanced controls - ▍ Realtek Audio ■ Playback control Tool Mute Playback device This function is to let you freely decide which volume control items to be able ...have maximum 2 streams operating simultaneously. Tool - Show the following volume controls This is essential when multistreaming playback enabled. - Realtek HD Audio Rear Output - A-10 At any given period, you freely decide which ports to completely mute sound output. Enable playback multi-streaming ...
...multiple volume controls or to output the sound. And this function, you will be displayed. - Advanced controls - ▍ Realtek Audio ■ Playback control Tool Mute Playback device This function is to let you freely decide which volume control items to be able ...have maximum 2 streams operating simultaneously. Tool - Show the following volume controls This is essential when multistreaming playback enabled. - Realtek HD Audio Rear Output - A-10 At any given period, you freely decide which ports to completely mute sound output. Enable playback multi-streaming ...

User Guide
Page 78
Show the following 4 channels to record. ■ Recording control MS-7596 Tool Mute Recording device -Back Line in/ Mic, Front Lin in -Realtek HD Audio Input Mute You may choose 1 of the following volume controls This is to let you freely decide which volume control items to record... the CD, Line, Mic and Stereo Mix channels simultaneously, frees you from mixing efforts. Tool - Enable recording multi-streaming Important Realtek audio allows you may choose to mute single or multiple volume controls or to completely mute sound input. At any given period, you to be ...
Show the following 4 channels to record. ■ Recording control MS-7596 Tool Mute Recording device -Back Line in/ Mic, Front Lin in -Realtek HD Audio Input Mute You may choose 1 of the following volume controls This is to let you freely decide which volume control items to record... the CD, Line, Mic and Stereo Mix channels simultaneously, frees you from mixing efforts. Tool - Enable recording multi-streaming Important Realtek audio allows you may choose to mute single or multiple volume controls or to completely mute sound input. At any given period, you to be ...
