User Guide
Page 7
... Configurations 3-21 PC Health Status 3-23 Frequency/Voltage Control 3-24 Load Fail-Safe/Optimized Defaults 3-25 Set Supervisor/User Password 3-26 Chapter 4. Introduction to SiS964 SATA RAID 4-1 Introduction 4-2 System Requirement 4-2 RAID Basics 4-2 Performance hints and recommend setting 4-2 RAID 0 (Striping array 4-3 RAID 1 (Mirror array 4-3 JBOD (Spanning array 4-3 System BIOS Setup 4-4 BIOS...4-12 Create a JBOD Array for performance 4-16 Delete a RAID array 4-18 Installing Software 4-21 Install Driver in Windows XP/2000 4-21 Installation of SiS SATA RAID Driver 4-22 vii
... Configurations 3-21 PC Health Status 3-23 Frequency/Voltage Control 3-24 Load Fail-Safe/Optimized Defaults 3-25 Set Supervisor/User Password 3-26 Chapter 4. Introduction to SiS964 SATA RAID 4-1 Introduction 4-2 System Requirement 4-2 RAID Basics 4-2 Performance hints and recommend setting 4-2 RAID 0 (Striping array 4-3 RAID 1 (Mirror array 4-3 JBOD (Spanning array 4-3 System BIOS Setup 4-4 BIOS...4-12 Create a JBOD Array for performance 4-16 Delete a RAID array 4-18 Installing Software 4-21 Install Driver in Windows XP/2000 4-21 Installation of SiS SATA RAID Driver 4-22 vii

User Guide
Page 62
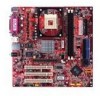
...connect your drive and improving the airflow inside your files. MSI Reminds You... All the information/volumes listed in your system might differ from the illustrations in parallel to SiS964 SATA RAID The optional southbridge SiS964 SATA controller only support two Serial ATA on two independent ports.... Introduction to 150MB/sec. Serial ATA (SATA) is the latest generation of your PC. Please note that ...
...connect your drive and improving the airflow inside your files. MSI Reminds You... All the information/volumes listed in your system might differ from the illustrations in parallel to SiS964 SATA RAID The optional southbridge SiS964 SATA controller only support two Serial ATA on two independent ports.... Introduction to 150MB/sec. Serial ATA (SATA) is the latest generation of your PC. Please note that ...

User Guide
Page 64
... the disk array 4-3 HDD Population Rules for RAID 0 (Striping) Ultra ATA (Master) Ultra ATA (Slave) Serial ATA (Master 1) Serial ATA (Master 2) X X V V V = Selected; Introduction to SiS964 SATA RAID RAID 0 (Striping array) Any combination to 2, 3 or 4 Hard disks would combine to a JBOD system.
... the disk array 4-3 HDD Population Rules for RAID 0 (Striping) Ultra ATA (Master) Ultra ATA (Slave) Serial ATA (Master 1) Serial ATA (Master 2) X X V V V = Selected; Introduction to SiS964 SATA RAID RAID 0 (Striping array) Any combination to 2, 3 or 4 Hard disks would combine to a JBOD system.

User Guide
Page 66
... 2003-2005 Silicon Integrated Systems Corp. Y ->Occurs when the controller has broken Raid 1 and single HDD existing simultaneously and the location of two SATA HDD change owing to rebuild RAID 1? See below : a. Do you can select [Y] to enter setup menu to ignore this is wrong!! c. ...No RAID Install !! -> Not any completed RAID exists. Boot your system. Press to enter Setup Menu or to SiS964 SATA RAID BIOS Configuration Starting BIOS Utility 1. Y -> You can select [N] to handle it 's rebuild conditions. Do you want to enter Setup Menu ...
... 2003-2005 Silicon Integrated Systems Corp. Y ->Occurs when the controller has broken Raid 1 and single HDD existing simultaneously and the location of two SATA HDD change owing to rebuild RAID 1? See below : a. Do you can select [Y] to enter setup menu to ignore this is wrong!! c. ...No RAID Install !! -> Not any completed RAID exists. Boot your system. Press to enter Setup Menu or to SiS964 SATA RAID BIOS Configuration Starting BIOS Utility 1. Y -> You can select [N] to handle it 's rebuild conditions. Do you want to enter Setup Menu ...

User Guide
Page 68
Introduction to SiS964 SATA RAID [b]. No available disk existing but have RAID existing: [c]. Available disks and RAID existing simultaneously: 4-7
Introduction to SiS964 SATA RAID [b]. No available disk existing but have RAID existing: [c]. Available disks and RAID existing simultaneously: 4-7

User Guide
Page 70
The result after auto creating will be selected by its default value "64K". Besides, you can select Manual Create, see following steps. 4. Press -- You will be shown on step 6. The Blocksize will have two selections to select Block Size. (Default: 64K) 4-9 If you select Auto Create, you also can create a RAID 0 array faster and easier. keys and to create a RAID 0 array. The default value is . Introduction to SiS964 SATA RAID 3.
The result after auto creating will be selected by its default value "64K". Besides, you can select Manual Create, see following steps. 4. Press -- You will be shown on step 6. The Blocksize will have two selections to select Block Size. (Default: 64K) 4-9 If you select Auto Create, you also can create a RAID 0 array faster and easier. keys and to create a RAID 0 array. The default value is . Introduction to SiS964 SATA RAID 3.

User Guide
Page 72
Starting splitting action, the following frame will be shown. 8. Introduction to SiS964 SATA RAID 7. After all steps finished, press until escape the setup menu and RAID 0 array will be shown on the top of the main frame. 4-11
Starting splitting action, the following frame will be shown. 8. Introduction to SiS964 SATA RAID 7. After all steps finished, press until escape the setup menu and RAID 0 array will be shown on the top of the main frame. 4-11

User Guide
Page 74
You will be the SOURCE disk. 4-13 Besides, you wanted, the RAID Type will be changed from Single to create a RAID 1 array. The result after creating will be shown on step 5. The default value is . Use< > < > to select disk , and press to select disk, to SiS964 SATA RAID 3. When you press on the disk you also can create a RAID 1 array faster and easier. The same as RAID 0, the disk you can select Manual Create, see following steps. 4. If you select Auto Create, you select first will have two selections to RAID 1. Introduction to exit.
You will be the SOURCE disk. 4-13 Besides, you wanted, the RAID Type will be changed from Single to create a RAID 1 array. The result after creating will be shown on step 5. The default value is . Use< > < > to select disk , and press to select disk, to SiS964 SATA RAID 3. When you press on the disk you also can create a RAID 1 array faster and easier. The same as RAID 0, the disk you can select Manual Create, see following steps. 4. If you select Auto Create, you select first will have two selections to RAID 1. Introduction to exit.

User Guide
Page 76
Introduction to FDISK and FORMAT the array as the creation of the main frame. 8. Once the array has been created, you will need to SiS964 SATA RAID 7. After all steps finished, press until exit this BIOS utility and the red message frame will be shown on the top of the RAID 0 array. Press and to save changes. 9. Press until escape the setup menu and RAID 1 array will show as the same as if it were a new single hard drive. 4-15
Introduction to FDISK and FORMAT the array as the creation of the main frame. 8. Once the array has been created, you will need to SiS964 SATA RAID 7. After all steps finished, press until exit this BIOS utility and the red message frame will be shown on the top of the RAID 0 array. Press and to save changes. 9. Press until escape the setup menu and RAID 1 array will show as the same as if it were a new single hard drive. 4-15

User Guide
Page 78
Use< > < > to select disk , and press to select disk, to FDISK and FORMAT the array as if it were a new single hard drive. 4-17 When you press on the top of the main frame. 6. Once the array has been created, you wanted, the RAID Type will need to exit. After all steps finished, press until escape the setup menu and JBOD array will be shown on the disk you will be changed from Single to SiS964 SATA RAID 4. Introduction to JBOD. 5.
Use< > < > to select disk , and press to select disk, to FDISK and FORMAT the array as if it were a new single hard drive. 4-17 When you press on the top of the main frame. 6. Once the array has been created, you wanted, the RAID Type will need to exit. After all steps finished, press until escape the setup menu and JBOD array will be shown on the disk you will be changed from Single to SiS964 SATA RAID 4. Introduction to JBOD. 5.

User Guide
Page 80
will show on this RAID array will be changed from RAID 0 to delete. And the RAID Type of all disk members of this frame. 4. Introduction to delete this RAID?" Press and , the deleting action finish. And a message "Are you want to Single. 4-19 Press to select the RAID array that you sure to SiS964 SATA RAID 3.
will show on this RAID array will be changed from RAID 0 to delete. And the RAID Type of all disk members of this frame. 4. Introduction to delete this RAID?" Press and , the deleting action finish. And a message "Are you want to Single. 4-19 Press to select the RAID array that you sure to SiS964 SATA RAID 3.
User Guide
Page 82
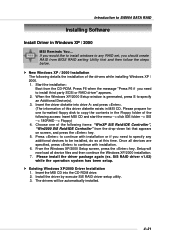
...steps below. Please prepare for one of the following access: Insert MSI CD and start the menu --> click IDE folder --> SIS --> 180RAID --> Floppy) 4. Choose one formatted floppy disk to be automatically installed. 4-21 Insert the MSI CD into drive A: and press . (The information of this time.... When the Windows XP/2000 Setup window is generated, press S to SiS964 SATA RAID Installing Software Install Driver in Windows XP / 2000 MSI Reminds You... From the Windows XP/2000 Setup screen, press the key. Please install the driver package again (ex...
...steps below. Please prepare for one of the following access: Insert MSI CD and start the menu --> click IDE folder --> SIS --> 180RAID --> Floppy) 4. Choose one formatted floppy disk to be automatically installed. 4-21 Insert the MSI CD into drive A: and press . (The information of this time.... When the Windows XP/2000 Setup window is generated, press S to SiS964 SATA RAID Installing Software Install Driver in Windows XP / 2000 MSI Reminds You... From the Windows XP/2000 Setup screen, press the key. Please install the driver package again (ex...
User Guide
Page 83
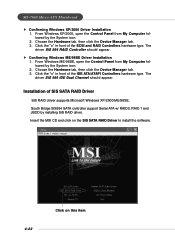
... click the Device Manager tab. 3. From Windows ME/98SE, open the Control Panel from My Computer followed by the System icon. 2. MS-7060 Micro ATX Mainboard h Confirming Windows XP/2000 Driver Installation 1. From Windows XP/2000, open the Control Panel from My Computer followed by installing SiS RAID driver.... Installation of SiS SATA RAID Driver SiS RAID driver supports Microsoft Windows XP/2000/ME/98SE. Insert the MSI CD and click on the SiS SATA RAID Driver to install the software. 4-22 Click on this item South Bridge...
... click the Device Manager tab. 3. From Windows ME/98SE, open the Control Panel from My Computer followed by the System icon. 2. MS-7060 Micro ATX Mainboard h Confirming Windows XP/2000 Driver Installation 1. From Windows XP/2000, open the Control Panel from My Computer followed by installing SiS RAID driver.... Installation of SiS SATA RAID Driver SiS RAID driver supports Microsoft Windows XP/2000/ME/98SE. Insert the MSI CD and click on the SiS SATA RAID Driver to install the software. 4-22 Click on this item South Bridge...
