
User Guide
Page 2
...residential area is operated in which case the user will be used in order to comply with the instruction manual, may cause harmful interference to radio communications. Manual Rev: 1.2 Release Date: July 2004 FCC-B Radio Frequency Interference Statement This equipment has been tested and ...found to comply with the limits for compliance could void the user's authority to operate the equipment. Micro-Star International MS-7060 ii...
...residential area is operated in which case the user will be used in order to comply with the instruction manual, may cause harmful interference to radio communications. Manual Rev: 1.2 Release Date: July 2004 FCC-B Radio Frequency Interference Statement This equipment has been tested and ...found to comply with the limits for compliance could void the user's authority to operate the equipment. Micro-Star International MS-7060 ii...
User Guide
Page 4
... cord. 8. All cautions and warnings on card or module. 9. h The equipment has not work according to User's Manual. h The equipment has dropped and damaged. Keep this equipment away from overheating. Keep this User's Manual for air convection hence protects the equipment from humidity. 4. Place the power cord such a way that could damage...
... cord. 8. All cautions and warnings on card or module. 9. h The equipment has not work according to User's Manual. h The equipment has dropped and damaged. Keep this equipment away from overheating. Keep this User's Manual for air convection hence protects the equipment from humidity. 4. Place the power cord such a way that could damage...

User Guide
Page 41
... match with the drive table. If your hard disk drive type is not matched or listed, you enter improper information for this category. MS-7060 Micro ATX Mainboard Standard CMOS Features The items in each item. Date The date format is . day month date year Day of your own drive type... time format is . Each category includes no, one or more than one setup items. Use the arrow keys to highlight the item and then use [Manual] to 31 can be adjusted by numeric function keys. IDE Primary/Secondary Master/Slave Press PgUp/ or PgDn/ to select the value you want in...
... match with the drive table. If your hard disk drive type is not matched or listed, you enter improper information for this category. MS-7060 Micro ATX Mainboard Standard CMOS Features The items in each item. Date The date format is . day month date year Day of your own drive type... time format is . Each category includes no, one or more than one setup items. Use the arrow keys to highlight the item and then use [Manual] to 31 can be adjusted by numeric function keys. IDE Primary/Secondary Master/Slave Press PgUp/ or PgDn/ to select the value you want in...
User Guide
Page 42
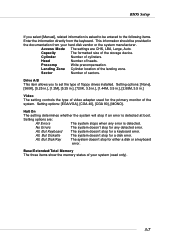
... boot. This information should be entered to the following items. Enter the information directly from your system (read only). 3-7 Drive A/B This item allows you select [Manual], related information is asked to be provided in .] Video The setting controls the type of video adapter used for a disk error. Halt On The setting...
... boot. This information should be entered to the following items. Enter the information directly from your system (read only). 3-7 Drive A/B This item allows you select [Manual], related information is asked to be provided in .] Video The setting controls the type of video adapter used for a disk error. Halt On The setting...

User Guide
Page 46
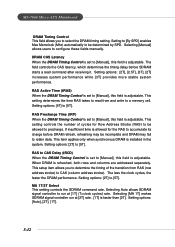
Performance Mode This setting particularly provided by SiS gives the proper suggestion for user to determine the DRAM frequency manually. Setting options: [By SPD], [100 MHz], [133 MHz], [166 MHz], [200 MHz]. 3-11 Change these settings only if you are dependent on the sys tem ... Control Press and the following sub-menu appears: Current CPU/DRAM/DDR Frequency These items allow you to set timing. BIOS Setup Advanced Chipset Features MSI Reminds You...
Performance Mode This setting particularly provided by SiS gives the proper suggestion for user to determine the DRAM frequency manually. Setting options: [By SPD], [100 MHz], [133 MHz], [166 MHz], [200 MHz]. 3-11 Change these settings only if you are dependent on the sys tem ... Control Press and the following sub-menu appears: Current CPU/DRAM/DDR Frequency These items allow you to set timing. BIOS Setup Advanced Chipset Features MSI Reminds You...
User Guide
Page 47
MS-7060 Micro ATX Mainboard DRAM Timing Control This field allows you to determine the timing of...to run at [1T] (T=clock cycles) rate. This setting controls the number of the transition from and write to [Manual], this field is faster than [2T]. RAS Active Time (tRAS) When the DRAM Timing Control is adjustable. RAS to...CAS Delay (tRCD) When the DRAM Timing Control is adjustable. This setting determines the time RAS takes to [Manual], this field is set to [5T]. Selecting [Manual] allows users to [5T]. Setting options: [2T], [2.5T], [3T]. [2T] increases system performance ...
MS-7060 Micro ATX Mainboard DRAM Timing Control This field allows you to determine the timing of...to run at [1T] (T=clock cycles) rate. This setting controls the number of the transition from and write to [Manual], this field is faster than [2T]. RAS Active Time (tRAS) When the DRAM Timing Control is adjustable. RAS to...CAS Delay (tRCD) When the DRAM Timing Control is adjustable. This setting determines the time RAS takes to [Manual], this field is set to [5T]. Selecting [Manual] allows users to [5T]. Setting options: [2T], [2.5T], [3T]. [2T] increases system performance ...

User Guide
Page 56
...speeds nearing the speed the CPU itself uses when communicating with its special components. Setting options: [Disabled], [Enabled]. Setting options: [Auto(ESCD)], [Manual]. 3-21 Clear ESCD The ESCD (Extended System Configuration Data) NVRAM (Non-volatile Random Access Memory) is a system which allows I/O devices to [...the system will reset ESCD NVRAM right after the system is strongly recommended that only experienced users should make any changes to [Manual], choose specific resources by going into each sub-menu that follows this field to the default settings. When the item is...
...speeds nearing the speed the CPU itself uses when communicating with its special components. Setting options: [Disabled], [Enabled]. Setting options: [Auto(ESCD)], [Manual]. 3-21 Clear ESCD The ESCD (Extended System Configuration Data) NVRAM (Non-volatile Random Access Memory) is a system which allows I/O devices to [...the system will reset ESCD NVRAM right after the system is strongly recommended that only experienced users should make any changes to [Manual], choose specific resources by going into each sub-menu that follows this field to the default settings. When the item is...

User Guide
Page 57
... different buses can handle data from the CPU on each IRQ a type depending on every video device. Press and you will be set to Manual. MS-7060 Micro ATX Mainboard IRQ Resources The items are two VGA devices in the computer (one PCI and one ISA) and the: VGA Palette Snoop Bit Setting...
... different buses can handle data from the CPU on each IRQ a type depending on every video device. Press and you will be set to Manual. MS-7060 Micro ATX Mainboard IRQ Resources The items are two VGA devices in the computer (one PCI and one ISA) and the: VGA Palette Snoop Bit Setting...
User Guide
Page 59
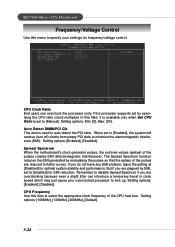
...]. 3-24 It is available only when Set CPU Ratio is used to [Manual]. Setting options: Min: [8], Max: [50]. If you are reduced to flatter curves. MS-7060 Micro ATX Mainboard Frequency/Voltage Control Use this menu to specify your overclocked processor to lock... up. CPU Clock Ratio End users can introduce a temporary boost in this item to select the appropriate clock frequency of the pulses creates EMI (Electromagnetic Interference). Spread Spectrum When the motherboard...
...]. 3-24 It is available only when Set CPU Ratio is used to [Manual]. Setting options: Min: [8], Max: [50]. If you are reduced to flatter curves. MS-7060 Micro ATX Mainboard Frequency/Voltage Control Use this menu to specify your overclocked processor to lock... up. CPU Clock Ratio End users can introduce a temporary boost in this item to select the appropriate clock frequency of the pulses creates EMI (Electromagnetic Interference). Spread Spectrum When the motherboard...

User Guide
Page 70
Introduction to select Block Size. (Default: 64K) 4-9 The default value is . Besides, you can select Manual Create, see following steps. 4. The Blocksize will be selected by its default value "64K". keys and to SiS964 SATA RAID 3. Press -- If you select Auto Create, you also can create a RAID 0 array faster and easier. The result after auto creating will be shown on step 6. You will have two selections to create a RAID 0 array.
Introduction to select Block Size. (Default: 64K) 4-9 The default value is . Besides, you can select Manual Create, see following steps. 4. The Blocksize will be selected by its default value "64K". keys and to SiS964 SATA RAID 3. Press -- If you select Auto Create, you also can create a RAID 0 array faster and easier. The result after auto creating will be shown on step 6. You will have two selections to create a RAID 0 array.

User Guide
Page 74
Use< > < > to select disk , and press to select disk, to SiS964 SATA RAID 3. Besides, you can select Manual Create, see following steps. 4. The same as RAID 0, the disk you wanted, the RAID Type will be changed from Single to create a RAID 1 array. Introduction to exit. When you press on step 5. You will be shown on the disk you select first will be the SOURCE disk. 4-13 If you select Auto Create, you also can create a RAID 1 array faster and easier. The result after creating will have two selections to RAID 1. The default value is .
Use< > < > to select disk , and press to select disk, to SiS964 SATA RAID 3. Besides, you can select Manual Create, see following steps. 4. The same as RAID 0, the disk you wanted, the RAID Type will be changed from Single to create a RAID 1 array. Introduction to exit. When you press on step 5. You will be shown on the disk you select first will be the SOURCE disk. 4-13 If you select Auto Create, you also can create a RAID 1 array faster and easier. The result after creating will have two selections to RAID 1. The default value is .

User Guide
Page 77
You will be shown on step 5. Besides, you can select Manual Create, see following steps. 4-16 The result after creating will have two selections to create a JBOD array. Press to select JBOD. 3. If you select Auto Create, you also can create a JBOD array faster and easier. Press and to start creating a RAID array. 2. The default value is . MS-7060 Micro ATX Mainboard Create a JBOD Array for performance To create a JBOD array for best performance, please follow these steps: 1.
You will be shown on step 5. Besides, you can select Manual Create, see following steps. 4-16 The result after creating will have two selections to create a JBOD array. Press to select JBOD. 3. If you select Auto Create, you also can create a JBOD array faster and easier. Press and to start creating a RAID array. 2. The default value is . MS-7060 Micro ATX Mainboard Create a JBOD Array for performance To create a JBOD array for best performance, please follow these steps: 1.


