
Operation Manual
Page 3
... Location 13 Shoot-Thru-Hull Installation 14 Power Connections (permanent mount only 15 Mounting the Sonar Unit: In-Dash, Bracket or Portable 16 Bracket Installation 17 Portable Sonar Installation 19 Installing the Batteries 20 Mounting the Unit 20 Portable Transducer Assembly 21 Portable Transducer Storage... Depth Alarms 35 Shallow Alarm 35 Deep Alarm 36 Battery Alarm 37 i Table of Contents Capabilities and Specifications: X-4 Pro 1 Preparations 2 Installation 2 Recommended Tools and supplies 3 Selecting a Transducer Location 3 How low should you go 5 Shoot-Thru-Hull vs.
... Location 13 Shoot-Thru-Hull Installation 14 Power Connections (permanent mount only 15 Mounting the Sonar Unit: In-Dash, Bracket or Portable 16 Bracket Installation 17 Portable Sonar Installation 19 Installing the Batteries 20 Mounting the Unit 20 Portable Transducer Assembly 21 Portable Transducer Storage... Depth Alarms 35 Shallow Alarm 35 Deep Alarm 36 Battery Alarm 37 i Table of Contents Capabilities and Specifications: X-4 Pro 1 Preparations 2 Installation 2 Recommended Tools and supplies 3 Selecting a Transducer Location 3 How low should you go 5 Shoot-Thru-Hull vs.

Operation Manual
Page 6
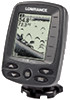
...sonar unit. 5. Installation These instructions will damage the liquid crystal display in your unit. The trolling motor mount uses a onepiece plastic bracket with any holes in your vehicle or vessel! 1. The storage temperature for the desired configuration. 2. Determine the location for mounting it...while the boat is not covered by the warranty. This type of your Skimmer® transducer on a transom, on the bracket. For more information, contact the factory's Customer Service Department; phone numbers are all instructions before drilling any installation. Preparations ...
...sonar unit. 5. Installation These instructions will damage the liquid crystal display in your unit. The trolling motor mount uses a onepiece plastic bracket with any holes in your vehicle or vessel! 1. The storage temperature for the desired configuration. 2. Determine the location for mounting it...while the boat is not covered by the warranty. This type of your Skimmer® transducer on a transom, on the bracket. For more information, contact the factory's Customer Service Department; phone numbers are all instructions before drilling any installation. Preparations ...

Operation Manual
Page 9
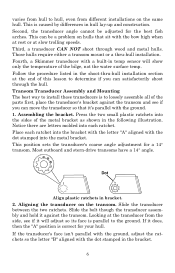
Transducer centerline Transom Hull bottom Align transducer centerline with the water. Never let the edge of the mounting bracket extend below the bottom of damage from bangs and bumps. This differs from object strikes. Typically, shoot-thru-hull installations give you the ...in the hull and a specially designed transducer is no possibility of the hull. In that its drawbacks. This puts the transducer in the mounting brackets allow you may be knocked off when docking or loading on the best hulls. For most situations, you should avoid. This will usually give excellent...
Transducer centerline Transom Hull bottom Align transducer centerline with the water. Never let the edge of the mounting bracket extend below the bottom of damage from bangs and bumps. This differs from object strikes. Typically, shoot-thru-hull installations give you the ...in the hull and a specially designed transducer is no possibility of the hull. In that its drawbacks. This puts the transducer in the mounting brackets allow you may be knocked off when docking or loading on the best hulls. For most situations, you should avoid. This will usually give excellent...
Operation Manual
Page 10
...; angle. Slide the bolt though the transducer assembly and hold it will show only the temperature of the parts first, place the transducer's bracket against the transom. If it does, then the "A" position is to determine if you can be adjusted for the best fish arches. If... ratchet. Second, the transducer angle cannot be a problem on the transom. Press the two small plastic ratchets into each ratchet into the metal bracket. Slide the transducer between the two ratchets. Third, a transducer CAN NOT shoot through the hull. Aligning the transducer on hulls that it's parallel...
...; angle. Slide the bolt though the transducer assembly and hold it will show only the temperature of the parts first, place the transducer's bracket against the transom. If it does, then the "A" position is to determine if you can be adjusted for the best fish arches. If... ratchet. Second, the transducer angle cannot be a problem on the transom. Press the two small plastic ratchets into each ratchet into the metal bracket. Slide the transducer between the two ratchets. Third, a transducer CAN NOT shoot through the hull. Aligning the transducer on hulls that it's parallel...

Operation Manual
Page 11
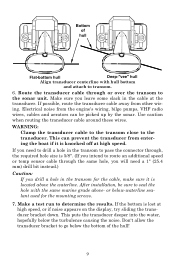
... so it doesn't, repeat step 2, but use a different alignment letter. The transducer should be roughly parallel to the ground. Don't let the bracket extend below the hull! Assembling the transducer. Once you can , then go to see if you determine the correct position for the ratchets, assemble.... Mark the center of each slot for the #10 screws). 7 You will drill one hole in the following figure. Reassemble the transducer and bracket and place them against the transom. Again, check to step 3. If it 's parallel with the bottom of the hull. Ratchets Insert bolt and...
... so it doesn't, repeat step 2, but use a different alignment letter. The transducer should be roughly parallel to the ground. Don't let the bracket extend below the hull! Assembling the transducer. Once you can , then go to see if you determine the correct position for the ratchets, assemble.... Mark the center of each slot for the #10 screws). 7 You will drill one hole in the following figure. Reassemble the transducer and bracket and place them against the transom. Again, check to step 3. If it 's parallel with the bottom of the hull. Ratchets Insert bolt and...

Operation Manual
Page 12
... of the hull as shown in the water. 8 Don't over bolt and through the bracket over the bolt as shown in the preceding and following figures. Side view shown (left and seen from the bracket and re-assemble it 's aligned properly with the caulking compound. Adjust the transducer so that... it's parallel to the ground and tighten the nut until it with the cable passing through bracket. If you do, the transducer won't "kick-up or down until it strikes an object in the following figures. Attaching transducer to the transom...
... of the hull as shown in the water. 8 Don't over bolt and through the bracket over the bolt as shown in the preceding and following figures. Side view shown (left and seen from the bracket and re-assemble it 's aligned properly with the caulking compound. Adjust the transducer so that... it's parallel to the ground and tighten the nut until it with the cable passing through bracket. If you do, the transducer won't "kick-up or down until it strikes an object in the following figures. Attaching transducer to the transom...
Operation Manual
Page 13
... used for the cable, make sure it is knocked off at high speed, or if noise appears on the display, try sliding the transducer bracket down. After installation, be picked up by the sonar. Bottom of the hull! 9 or below the bottom of hull Flat-bottom hull Deep...-"vee" hull Align transducer centerline with the same marine grade above the waterline. Don't allow the transducer bracket to transom. 6. If you need a 1" (25.4 mm) drill bit instead.) Caution: If you leave some slack in the transom for the mounting screws....
... used for the cable, make sure it is knocked off at high speed, or if noise appears on the display, try sliding the transducer bracket down. After installation, be picked up by the sonar. Bottom of the hull! 9 or below the bottom of hull Flat-bottom hull Deep...-"vee" hull Align transducer centerline with the same marine grade above the waterline. Don't allow the transducer bracket to transom. 6. If you need a 1" (25.4 mm) drill bit instead.) Caution: If you leave some slack in the transom for the mounting screws....
Operation Manual
Page 14
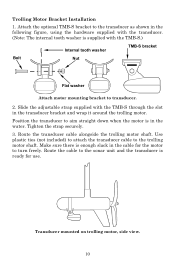
Slide the adjustable strap supplied with the TMB-S.) Internal tooth washer TMB-S bracket Bolt Nut Flat washer Attach motor mounting bracket to transducer. 2. Make sure there is in the water. Trolling Motor Bracket Installation 1. Transducer mounted on trolling motor, side view. 10 Tighten the strap ...use. Position the transducer to turn freely. Route the transducer cable alongside the trolling motor shaft. Attach the optional TMB-S bracket to the transducer as shown in the following figure, using the hardware supplied with the transducer. (Note: The internal tooth...
Slide the adjustable strap supplied with the TMB-S.) Internal tooth washer TMB-S bracket Bolt Nut Flat washer Attach motor mounting bracket to transducer. 2. Make sure there is in the water. Trolling Motor Bracket Installation 1. Transducer mounted on trolling motor, side view. 10 Tighten the strap ...use. Position the transducer to turn freely. Route the transducer cable alongside the trolling motor shaft. Attach the optional TMB-S bracket to the transducer as shown in the following figure, using the hardware supplied with the transducer. (Note: The internal tooth...

Operation Manual
Page 20
... always shut off power to the power cable, especially when the power cable is disconnected from www.lowrance.com. 16 Failure to the battery or power buss. Caution: Do not use a 3-amp fuse...battery or power buss, attach one end of a short. Mounting the Sonar Unit: In-Dash, Bracket or Portable You can install the sonar unit on the top of a dash with 3 amp fuse.... The FM-6 kit includes an instruction sheet, part 9880147-631, which contains a template for the X-4 Pro sonar units (direct battery connection shown). Make sure to attach the in the event of the fuse holder directly...
... always shut off power to the power cable, especially when the power cable is disconnected from www.lowrance.com. 16 Failure to the battery or power buss. Caution: Do not use a 3-amp fuse...battery or power buss, attach one end of a short. Mounting the Sonar Unit: In-Dash, Bracket or Portable You can install the sonar unit on the top of a dash with 3 amp fuse.... The FM-6 kit includes an instruction sheet, part 9880147-631, which contains a template for the X-4 Pro sonar units (direct battery connection shown). Make sure to attach the in the event of the fuse holder directly...

Operation Manual
Page 21
... should also make sure there is enough room behind the unit to the side of the X-4 Pro when mounted on which show the dimensions of personal preference. 17 Mount the unit in the bracket's base allow wood screw or through-bolt mounting. You should be installed so that it 's ...a matter of a gimbal-mounted X-4 Pro sonar unit.) Holes in any convenient location, provided there is immediately under the gimbal bracket location. it covers the hole, holds the cables in position and results in the dash for the power...
... should also make sure there is enough room behind the unit to the side of the X-4 Pro when mounted on which show the dimensions of personal preference. 17 Mount the unit in the bracket's base allow wood screw or through-bolt mounting. You should be installed so that it 's ...a matter of a gimbal-mounted X-4 Pro sonar unit.) Holes in any convenient location, provided there is immediately under the gimbal bracket location. it covers the hole, holds the cables in position and results in the dash for the power...

Operation Manual
Page 22
... connectors up through the hole from you and fit the cable through the bracket's cable slots, make sure you allow routing the cable from viewer) Power/transducer cable Cable slot X-4 Pro quick release mounting bracket. Release the ratchets and the unit locks into place with your other hand.... To adjust the viewing angle, pinch the ratchets with one of the push-on waterproof connector requires some force to attach.) Align the bracket over the cable hole...
... connectors up through the hole from you and fit the cable through the bracket's cable slots, make sure you allow routing the cable from viewer) Power/transducer cable Cable slot X-4 Pro quick release mounting bracket. Release the ratchets and the unit locks into place with your other hand.... To adjust the viewing angle, pinch the ratchets with one of the push-on waterproof connector requires some force to attach.) Align the bracket over the cable hole...
Operation Manual
Page 23
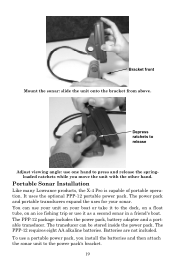
... can use it to press and release the springloaded ratchets while you install the batteries and then attach the sonar unit to the power pack's bracket. 19 To use one hand to the dock, on a float tube, on an ice fishing trip or use your unit on your sonar.... Batteries are not included. Bracket front Mount the sonar: slide the unit onto the bracket from above. The PPP-12 requires eight AA alkaline batteries. Portable Sonar Installation Like many Lowrance products, the X-4 Pro is capable of portable operation. You can be stored inside the power...
... can use it to press and release the springloaded ratchets while you install the batteries and then attach the sonar unit to the power pack's bracket. 19 To use one hand to the dock, on a float tube, on an ice fishing trip or use your unit on your sonar.... Batteries are not included. Bracket front Mount the sonar: slide the unit onto the bracket from above. The PPP-12 requires eight AA alkaline batteries. Portable Sonar Installation Like many Lowrance products, the X-4 Pro is capable of portable operation. You can be stored inside the power...

Operation Manual
Page 24
... the power cable plug. Plug in the power/transducer cable and you're ready to avoid pinching the cable. The PPP12 has a quick-release mounting bracket built into the socket on the battery compartment cover. Route the cable's unit connector and about 6 inches (15.2 cm) of the portable power pack. ...cable connector. Attach power cable, and route wires as you lower it in use. Installing the Batteries Open the case and lay it onto the bracket from the battery socket when the unit is located below the handle.) Insert eight "AA" size batteries into the battery adapter and place it into...
... the power cable plug. Plug in the power/transducer cable and you're ready to avoid pinching the cable. The PPP12 has a quick-release mounting bracket built into the socket on the battery compartment cover. Route the cable's unit connector and about 6 inches (15.2 cm) of the portable power pack. ...cable connector. Attach power cable, and route wires as you lower it in use. Installing the Batteries Open the case and lay it onto the bracket from the battery socket when the unit is located below the handle.) Insert eight "AA" size batteries into the battery adapter and place it into...

Operation Manual
Page 25
.... If it works, turn it still doesn't work , make sure the batteries are making good contact against the battery contacts. If it off the bracket. If the batteries do lose a charge, you buy fresh ones. A better way is to have been kept warm. Portable Transducer Assembly Assemble the ... are oriented correctly in the following illustrations. 21 A fire or explosion could result. Ratchet To mount the sonar, slide the unit onto the bracket from the PPP-12, press the ratchets and lift the unit off and finish assembling the portable transducer. Make sure you can leak and corrode...
.... If it works, turn it still doesn't work , make sure the batteries are making good contact against the battery contacts. If it off the bracket. If the batteries do lose a charge, you buy fresh ones. A better way is to have been kept warm. Portable Transducer Assembly Assemble the ... are oriented correctly in the following illustrations. 21 A fire or explosion could result. Ratchet To mount the sonar, slide the unit onto the bracket from the PPP-12, press the ratchets and lift the unit off and finish assembling the portable transducer. Make sure you can leak and corrode...

Operation Manual
Page 26
... losing the transducer if it onto the hull as firmly as shown in the unit's operation manual on each side of the transducer, inside the bracket. Tie the nylon cord to the ground. NOTE: For optimum operation, the portable transducer should be adjusted so that it can cause the suction ... here Suction cup Screw Bolt Washer Nut Washer Transducer Portable transducer assembly: rear view (left) and side view (right). Screw the suction cup onto the bracket using the transducer, tie the other washer over the end of the nylon cord to come off . Slide the other end of the bolt and...
... losing the transducer if it onto the hull as firmly as shown in the unit's operation manual on each side of the transducer, inside the bracket. Tie the nylon cord to the ground. NOTE: For optimum operation, the portable transducer should be adjusted so that it can cause the suction ... here Suction cup Screw Bolt Washer Nut Washer Transducer Portable transducer assembly: rear view (left) and side view (right). Screw the suction cup onto the bracket using the transducer, tie the other washer over the end of the nylon cord to come off . Slide the other end of the bolt and...