

Manual
Page 5
USB connector English 1 When prompted to connect camera cable to USB port, do the following: • Pivot notebook mount so camera can attach to notebook) 1. 1 Camera Features Focus ring Activity LED Snap button Lens Microphone Integrated notebook mount 2 Set Up the Camera Lens cover (pivots up to protect lens when camera is stored, pivots down for attachment to notebook. • Insert camera cable into computer's USB port. • Complete software and hardware installation. Install software first and follow on-screen instructions. 2.
USB connector English 1 When prompted to connect camera cable to USB port, do the following: • Pivot notebook mount so camera can attach to notebook) 1. 1 Camera Features Focus ring Activity LED Snap button Lens Microphone Integrated notebook mount 2 Set Up the Camera Lens cover (pivots up to protect lens when camera is stored, pivots down for attachment to notebook. • Insert camera cable into computer's USB port. • Complete software and hardware installation. Install software first and follow on-screen instructions. 2.
Manual
Page 6
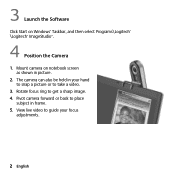
View live video to get a sharp image. 4. 3 Launch the Software Click Start on notebook screen as shown in frame. 5. Rotate focus ring to guide your hand to snap a picture or to place subject in picture. 2. Pivot camera forward or back to take a video. 3. The camera can also be held in your focus adjustments. 2 English Mount camera on Windows® Taskbar, and then select Programs\Logitech® \Logitech® ImageStudio™. 4 Position the Camera 1.
View live video to get a sharp image. 4. 3 Launch the Software Click Start on notebook screen as shown in frame. 5. Rotate focus ring to guide your hand to snap a picture or to place subject in picture. 2. Pivot camera forward or back to take a video. 3. The camera can also be held in your focus adjustments. 2 English Mount camera on Windows® Taskbar, and then select Programs\Logitech® \Logitech® ImageStudio™. 4 Position the Camera 1.
Manual
Page 7
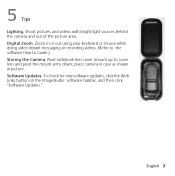
Pivot notebook lens cover /mount up to Guide.) Storing the Camera. English 3 Zoom in picture. 5 Tips Lighting. Digital Zoom. To check for new software updates, click the Web Links button on the ImageStudio™ software taskbar, and then click "Software Updates." Shoot pictures and videos with bright light sources behind the camera and out of the picture area...
Pivot notebook lens cover /mount up to Guide.) Storing the Camera. English 3 Zoom in picture. 5 Tips Lighting. Digital Zoom. To check for new software updates, click the Web Links button on the ImageStudio™ software taskbar, and then click "Software Updates." Shoot pictures and videos with bright light sources behind the camera and out of the picture area...
Manual
Page 8
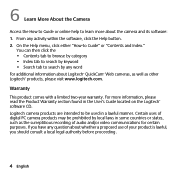
...or online help to learn more information, please read the Product Warranty section found in the User's Guide located on the Logitech® software CD. Logitech camera products are intended to Guide" or "Contents and Index." Warranty This product comes with a limited two-year warranty. ..."How-to be prohibited by any word For additional information about the camera and its software: 1. If you have any activity within the software, click the Help button. 2. For more about Logitech® QuickCam® Web cameras, as well as the surreptitious recording of your product is lawful, you...
...or online help to learn more information, please read the Product Warranty section found in the User's Guide located on the Logitech® software CD. Logitech camera products are intended to Guide" or "Contents and Index." Warranty This product comes with a limited two-year warranty. ..."How-to be prohibited by any word For additional information about the camera and its software: 1. If you have any activity within the software, click the Help button. 2. For more about Logitech® QuickCam® Web cameras, as well as the surreptitious recording of your product is lawful, you...


