Manual
Page 3
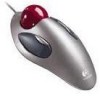
...PS/2 port. The receiver is achieved with great reliability using radio waves. For a PS/2 mouse port installation only, turn on the computer. 1 Connect the receiver to the computer's PS/2 6-pin mouse port or its 9-pin serial port using a 9-pin adapter, connect the adapter to the computer... screws, and connect Attaching the 9-pin adapter the data cable to your computer's serial port. For a PS/2 mouse port installation only, turn off your computer. 1. PS/2 6-pin mouse port 9-pin serial port When using a 9-pin adapter. Be sure to your computer. does not have a bulky...
...PS/2 port. The receiver is achieved with great reliability using radio waves. For a PS/2 mouse port installation only, turn on the computer. 1 Connect the receiver to the computer's PS/2 6-pin mouse port or its 9-pin serial port using a 9-pin adapter, connect the adapter to the computer... screws, and connect Attaching the 9-pin adapter the data cable to your computer's serial port. For a PS/2 mouse port installation only, turn off your computer. 1. PS/2 6-pin mouse port 9-pin serial port When using a 9-pin adapter. Be sure to your computer. does not have a bulky...
Manual
Page 5
..., then click the Add Device button. If your pointing device is not displayed, click the Devices tab to have device recognized by double-clicking the Mouse icon in the Windows Control Panel. 5. From the Run dialog box, select (or type) A:\SETUP or B:\SETUP and click OK. When software installation is finished...
..., then click the Add Device button. If your pointing device is not displayed, click the Devices tab to have device recognized by double-clicking the Mouse icon in the Windows Control Panel. 5. From the Run dialog box, select (or type) A:\SETUP or B:\SETUP and click OK. When software installation is finished...
Manual
Page 6
.... 4 icon on -screen instructions. 5. Follow the on the Windows 3.1x desktop. Make sure a picture of your device is not displayed, click the Add Mouse... Preview window Add Mouse button TrackMan Live! Icon 6. button. Windows displays the Run dialog box. 3. Installing the Software Windows 3.1x 1. If your pointing device is finished, display the...
.... 4 icon on -screen instructions. 5. Follow the on the Windows 3.1x desktop. Make sure a picture of your device is not displayed, click the Add Mouse... Preview window Add Mouse button TrackMan Live! Icon 6. button. Windows displays the Run dialog box. 3. Installing the Software Windows 3.1x 1. If your pointing device is finished, display the...
Manual
Page 8
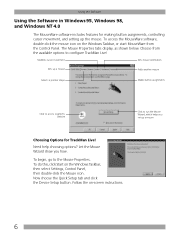
...! Let the Mouse Wizard show you set up a mouse Choosing Options for making button assignments, controlling cursor movement, and setting up a mouse Adds another mouse Selects a pointer shape Makes button assignments Click to access Logitech's website Click to the Mouse Properties. To ...access the MouseWare software, double-click the mouse icon on -screen instructions. 6 Now choose...
...! Let the Mouse Wizard show you set up a mouse Choosing Options for making button assignments, controlling cursor movement, and setting up a mouse Adds another mouse Selects a pointer shape Makes button assignments Click to access Logitech's website Click to the Mouse Properties. To ...access the MouseWare software, double-click the mouse icon on -screen instructions. 6 Now choose...
Manual
Page 9
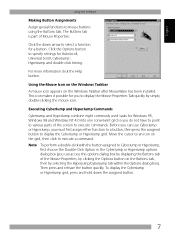
... icon makes it possible for Windows 95, Windows 98 and Windows NT 4.0 into one convenient grid so you to display the Mouse Properties Tab quickly by selecting the Hyperjump/Cyberjump tab within the Options dialog box). Executing CyberJump and HyperJump Commands CyberJump and HyperJump ...or HyperJump options dialog box (you can use CyberJump or HyperJump, you can access this options dialog box by displaying the Buttons tab of Mouse Properties. Note To perform a double-click with the button assigned to execute commands. To display the CyberJump or HyperJump grid, press and hold...
... icon makes it possible for Windows 95, Windows 98 and Windows NT 4.0 into one convenient grid so you to display the Mouse Properties Tab quickly by selecting the Hyperjump/Cyberjump tab within the Options dialog box). Executing CyberJump and HyperJump Commands CyberJump and HyperJump ...or HyperJump options dialog box (you can use CyberJump or HyperJump, you can access this options dialog box by displaying the Buttons tab of Mouse Properties. Note To perform a double-click with the button assigned to execute commands. To display the CyberJump or HyperJump grid, press and hold...
Manual
Page 10
...as well as CyberJump and HyperJump functions are also available as individual assignments on the Buttons tab. Returns to configure the mouse. Menu Minimize Close Recall Vertical Scroll Start Resize Horizontal Scroll These functions are not supported in the Windows Control Panel).... Using the Software in Windows 3.1x Double-click the MouseWare icon located in the Logitech® MouseWare group window (or in Windows 3.1x. * Designed for Netscape® 3.x/4.0, Microsoft® Internet Explorer 3.x. 8 Choose from...
...as well as CyberJump and HyperJump functions are also available as individual assignments on the Buttons tab. Returns to configure the mouse. Menu Minimize Close Recall Vertical Scroll Start Resize Horizontal Scroll These functions are not supported in the Windows Control Panel).... Using the Software in Windows 3.1x Double-click the MouseWare icon located in the Logitech® MouseWare group window (or in Windows 3.1x. * Designed for Netscape® 3.x/4.0, Microsoft® Internet Explorer 3.x. 8 Choose from...
Manual
Page 11
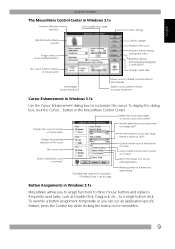
...Use the Cursor Enhancement dialog box to customize the cursor. To override a button assignment temporarily so you to assign functions to three mouse buttons and replaces frequently used tasks, such as it moves* Places the tracker icon on top of the cursor Sets cursor size Sets ... speed Saves settings Identifies button being pressed Assigns shortcuts to second/third buttons Sets cursor travel in relation to mouse speed Interchanges button functions Cancels changes Enhances the cursor Provides channel setting and battery status Redetects devices after plugging/unplugging a serial...
...Use the Cursor Enhancement dialog box to customize the cursor. To override a button assignment temporarily so you to assign functions to three mouse buttons and replaces frequently used tasks, such as it moves* Places the tracker icon on top of the cursor Sets cursor size Sets ... speed Saves settings Identifies button being pressed Assigns shortcuts to second/third buttons Sets cursor travel in relation to mouse speed Interchanges button functions Cancels changes Enhances the cursor Provides channel setting and battery status Redetects devices after plugging/unplugging a serial...
Manual
Page 12
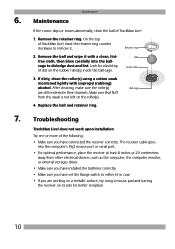
Remove the ball and wipe it . Ball Inside roller 3. Retainer ring 2. If dirty, clean the roller(s) using a mouse pad and turning the receiver on the rubber roller(s) inside the ball-cage. The receiver cable goes into the ballcage to dislodge dust and ... swab is not left on a metallic surface, try using a cotton swab moistened lightly with a clean, lintfree cloth, then blow carefully into the computer's PS/2 mouse port or serial port. • For optimal performance, place the receiver at least 8 inches or 20 centimeters away from other electrical devices, such as the...
Remove the ball and wipe it . Ball Inside roller 3. Retainer ring 2. If dirty, clean the roller(s) using a mouse pad and turning the receiver on the rubber roller(s) inside the ball-cage. The receiver cable goes into the ballcage to dislodge dust and ... swab is not left on a metallic surface, try using a cotton swab moistened lightly with a clean, lintfree cloth, then blow carefully into the computer's PS/2 mouse port or serial port. • For optimal performance, place the receiver at least 8 inches or 20 centimeters away from other electrical devices, such as the...
Manual
Page 13
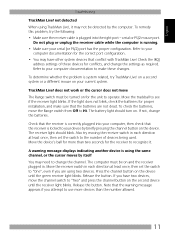
... sure the receiver cable is plugged into your computer documentation for the receiver to "One", even if you are not dead. Move the trackball to your computer, then check that the batteries are using two devices. The battery light should blink. Press the channel button on the ... Range switch must be detected by briefly pressing the channel button on the second device until the green receiver light blinks. serial or PS/2 mouse port. Check that the receiver is using TrackMan Live!, it . A warning message displays indicating another device is correctly plugged into the right...
... sure the receiver cable is plugged into your computer documentation for the receiver to "One", even if you are not dead. Move the trackball to your computer, then check that the batteries are using two devices. The battery light should blink. Press the channel button on the ... Range switch must be detected by briefly pressing the channel button on the second device until the green receiver light blinks. serial or PS/2 mouse port. Check that the receiver is using TrackMan Live!, it . A warning message displays indicating another device is correctly plugged into the right...


