

Quick Installation Guide
Page 1
Wireless Home Audio Stereo Speaker Kit Wired Accessory DMSPK50 Quick Installation Guide
Wireless Home Audio Stereo Speaker Kit Wired Accessory DMSPK50 Quick Installation Guide
Quick Installation Guide
Page 2
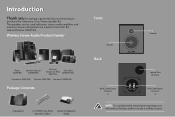
Wireless Home Audio Product Family† Player (DMP100) Remote Control (DMRIR500) Docking Station for iPod (MCCI40) Controller (DMRW1000) Conductor (DMC350) Director (DMC250) Speakers (DMSPK50) Package Contents 2 Speakers 2 16 AWG Two-Wire Quick Installation Speaker Cables Guide Front Woofer Tweeter Back Vented Port Opening Black Coded Input Terminal (-) Red Coded Input Terminal (+) NOTE: Do not block the vented port opening, as it will reduce the bass and/or create a rattling sound. The speakers can be a perfect match for the Linksys Director (DMC250...
Wireless Home Audio Product Family† Player (DMP100) Remote Control (DMRIR500) Docking Station for iPod (MCCI40) Controller (DMRW1000) Conductor (DMC350) Director (DMC250) Speakers (DMSPK50) Package Contents 2 Speakers 2 16 AWG Two-Wire Quick Installation Speaker Cables Guide Front Woofer Tweeter Back Vented Port Opening Black Coded Input Terminal (-) Red Coded Input Terminal (+) NOTE: Do not block the vented port opening, as it will reduce the bass and/or create a rattling sound. The speakers can be a perfect match for the Linksys Director (DMC250...
Quick Installation Guide
Page 3
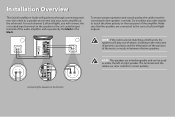
... your audio amplifier at both ends, the speakers will connect the red coded input terminal on the speaker to the red coded output terminal of the audio amplifier, and equivalently the black to touch the other end. The terminals and the cables are not matching at the other polarity or the rear panel of the amplifier. Installation Overview This Quick Installation Guide will guide you through connecting each channel (Left and Right), you will play...
... your audio amplifier at both ends, the speakers will connect the red coded input terminal on the speaker to the red coded output terminal of the audio amplifier, and equivalently the black to touch the other end. The terminals and the cables are not matching at the other polarity or the rear panel of the amplifier. Installation Overview This Quick Installation Guide will guide you through connecting each channel (Left and Right), you will play...
Quick Installation Guide
Page 4
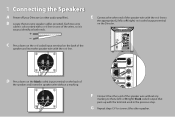
... the speaker wire with the red line. 1 Connecting the Speakers A Power off your Director (or other end of the speaker wire without a marking. Each two-wire cable is color coded with the terminal used in the previous step. B Locate the two-wire speaker cables provided. D Press down on the red coded input terminal on the back of the speaker and insert the speaker wire without any marking to the appropriate L (left) or R (right) red coded output...
... the speaker wire with the red line. 1 Connecting the Speakers A Power off your Director (or other end of the speaker wire without a marking. Each two-wire cable is color coded with the terminal used in the previous step. B Locate the two-wire speaker cables provided. D Press down on the red coded input terminal on the back of the speaker and insert the speaker wire without any marking to the appropriate L (left) or R (right) red coded output...
Quick Installation Guide
Page 5
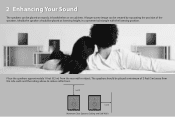
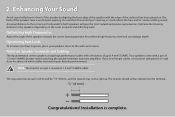
2 Enhancing Your Sound The speakers can be created by separating the position of 3 feet (1m) away from the rear wall or object. The speakers should be placed at listening height, in bookshelves or on cabinets. Ideally the speakers should be placed on stands, in a symmetrical triangle with the listening position. Place the speakers approximately 1 foot (0.3 m) from the side walls and the ceiling above to reduce reflections. 1m/3ft 1m/3ft Minimum Clear Space to Ceiling and Side Walls A larger stereo image can be placed a minimum of the speakers.
2 Enhancing Your Sound The speakers can be created by separating the position of 3 feet (1m) away from the rear wall or object. The speakers should be placed at listening height, in bookshelves or on cabinets. Ideally the speakers should be placed on stands, in a symmetrical triangle with the listening position. Place the speakers approximately 1 foot (0.3 m) from the side walls and the ceiling above to reduce reflections. 1m/3ft 1m/3ft Minimum Clear Space to Ceiling and Side Walls A larger stereo image can be placed a minimum of the speakers.
Quick Installation Guide
Page 6
... a maximum 1.5 mm²/16AWG cable. An equal distance to 4 mm²/10AWG. Optimizing Bass Level To increase your bass response, place your listening environment. Optimize the listening distance to the walls and corners. Optimizing High Frequencies Adjust the angle of the speakers towards the center listening position for both speakers will reduce the bass and/or create a rattling sound. The strands should be...
... a maximum 1.5 mm²/16AWG cable. An equal distance to 4 mm²/10AWG. Optimizing Bass Level To increase your bass response, place your listening environment. Optimize the listening distance to the walls and corners. Optimizing High Frequencies Adjust the angle of the speakers towards the center listening position for both speakers will reduce the bass and/or create a rattling sound. The strands should be...

Quick Installation Guide
Page 7
... the web at www.linksys.com/support Troubleshooting I am not hearing any sound. • Make sure that the speaker wires are properly connected. They should be going from a red output terminal on the amplifier to a red input terminal on the speakers and from a black output terminal on the amplifier to a black input terminal on the speakers. • Make sure you need additional support, contact us on your amplifier is up. • Check...
... the web at www.linksys.com/support Troubleshooting I am not hearing any sound. • Make sure that the speaker wires are properly connected. They should be going from a red output terminal on the amplifier to a red input terminal on the speakers and from a black output terminal on the amplifier to a black input terminal on the speakers. • Make sure you need additional support, contact us on your amplifier is up. • Check...

Quick Installation Guide
Page 9
Thank you enjoy hours of rich, quality sound. We hope you for purchasing the Linksys by Cisco Speaker Kit.
Thank you enjoy hours of rich, quality sound. We hope you for purchasing the Linksys by Cisco Speaker Kit.
Quick Installation Guide
Page 10
... Standard 802.11 specifications. Performance depends on the Linksys by Cisco Wireless Home Audio products, visit the following web address: www.linksysbycisco.com/wirelesshomeaudio/ug Refer to the User Guide for the Director or Conductor for wireless is derived from the access point, volume of network traffic, building materials and construction, operating system used, mix of RealNetworks, Inc. Phone Support (North America) 866...
... Standard 802.11 specifications. Performance depends on the Linksys by Cisco Wireless Home Audio products, visit the following web address: www.linksysbycisco.com/wirelesshomeaudio/ug Refer to the User Guide for the Director or Conductor for wireless is derived from the access point, volume of network traffic, building materials and construction, operating system used, mix of RealNetworks, Inc. Phone Support (North America) 866...