
GT- Logic 4 Installation Manual
Page 2
... Bracket 10 Attach the Track to the Header Bracket 11 Hang the Operator 11 Attach the Door Arm 12 HOIST AND JACKSHAFT OPERATORS 13-17 Carton Inventory 13 Operator Specifications 13-14 Maximum Door Area 14 Weights and Dimensions 15 ASSEMBLY 16 Assemble ... Operator 16 TYPICAL INSTALLATION 16-17 Determine Mounting Location 16 Mounting 17 Install the Manual Disconnect 17 WIRING 18-19 Power and Ground 18 Control Station 19 ENTRAPMENT PROTECTION 20-22 LiftMaster Monitored Entrapment Protection (LMEP 20 Install the Photoelectric Sensors (Provided 21 Mount the ...
... Bracket 10 Attach the Track to the Header Bracket 11 Hang the Operator 11 Attach the Door Arm 12 HOIST AND JACKSHAFT OPERATORS 13-17 Carton Inventory 13 Operator Specifications 13-14 Maximum Door Area 14 Weights and Dimensions 15 ASSEMBLY 16 Assemble ... Operator 16 TYPICAL INSTALLATION 16-17 Determine Mounting Location 16 Mounting 17 Install the Manual Disconnect 17 WIRING 18-19 Power and Ground 18 Control Station 19 ENTRAPMENT PROTECTION 20-22 LiftMaster Monitored Entrapment Protection (LMEP 20 Install the Photoelectric Sensors (Provided 21 Mount the ...
GT- Logic 4 Installation Manual
Page 13
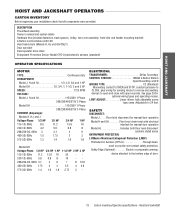
... Hoist and Jackshaft SAFETY DISCONNECT: Model J . . . . .Floor level disconnect for manual door operation Model H and GH Floor level chain hoist with electrical interlock for manual door operation Model HJ Includes both floor level disconnect systems stated above ENTRAPMENT PROTECTION: LiftMaster Monitored Entrapment ... and STOP, constant pressure to CLOSE, plus wiring for optional wiring types and operating modes. HOIST AND JACKSHAFT HOIST AND JACKSHAFT OPERATORS CARTON INVENTORY Before beginning your installation check that all components were provided. See page 29 for sensing...
... Hoist and Jackshaft SAFETY DISCONNECT: Model J . . . . .Floor level disconnect for manual door operation Model H and GH Floor level chain hoist with electrical interlock for manual door operation Model HJ Includes both floor level disconnect systems stated above ENTRAPMENT PROTECTION: LiftMaster Monitored Entrapment ... and STOP, constant pressure to CLOSE, plus wiring for optional wiring types and operating modes. HOIST AND JACKSHAFT HOIST AND JACKSHAFT OPERATORS CARTON INVENTORY Before beginning your installation check that all components were provided. See page 29 for sensing...
GT- Logic 4 Installation Manual
Page 16
... letter of the door jamb. The hand chain wheel cannot be mounted on either the right or left side. EXAMPLE: Right Hand HOIST AND JACKSHAFT TYPICAL INSTALLATION DEATDERVMEINRETMEOUNNCTIIANG LOCATION 1 The operator may NOT reverse when required. • NEVER try to the door shaft. 1 Select handing. This..., ALL of which are under EXTREME tension and can be used if installing ANY brackets. Be rigid to be fastened securely and with manual hand chain systems, the handing of balance. c. Permit the operator to prevent play between PRECAUCIÓN the door shaft and operator drive...
... letter of the door jamb. The hand chain wheel cannot be mounted on either the right or left side. EXAMPLE: Right Hand HOIST AND JACKSHAFT TYPICAL INSTALLATION DEATDERVMEINRETMEOUNNCTIIANG LOCATION 1 The operator may NOT reverse when required. • NEVER try to the door shaft. 1 Select handing. This..., ALL of which are under EXTREME tension and can be used if installing ANY brackets. Be rigid to be fastened securely and with manual hand chain systems, the handing of balance. c. Permit the operator to prevent play between PRECAUCIÓN the door shaft and operator drive...

GT- Logic 4 Installation Manual
Page 17
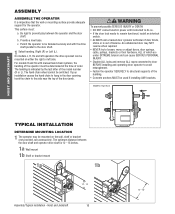
NOTE: It is highly recommended to add a thread adhesive to secure the set screws. Hoist and Jackshaft MOUNTING 1 Place the door sprocket on the door shaft. 2 Place the operator drive sprocket on the appropriate side of the operator for your .... 3 Wrap the drive chain around the door sprocket and the drive sprocket then secure with the set screws in place. 1 4 3 2 HOIST AND JACKSHAFT INSTALL THE MANUAL DISCONNECT 1 Fasten Door retaining bracket 4 feet above the floor. 1 Door retaining bracket Door retaining bracket 17 Typical installation - Insert keys and fasten...
NOTE: It is highly recommended to add a thread adhesive to secure the set screws. Hoist and Jackshaft MOUNTING 1 Place the door sprocket on the door shaft. 2 Place the operator drive sprocket on the appropriate side of the operator for your .... 3 Wrap the drive chain around the door sprocket and the drive sprocket then secure with the set screws in place. 1 4 3 2 HOIST AND JACKSHAFT INSTALL THE MANUAL DISCONNECT 1 Fasten Door retaining bracket 4 feet above the floor. 1 Door retaining bracket Door retaining bracket 17 Typical installation - Insert keys and fasten...


