
Wiring Diagram For Rail Trolley Garage Door Operators
Page 1
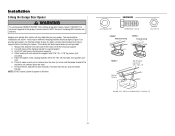
..., IL 60523 LiftMaster.com © 2019, The Chamberlain Group, Inc. - Safety Sensors (Installed 6" In. Max Above Floors) 2. Door Control Gang Box - (Door Control Can be in . of 12" in a plastic junction box with safe operation of these conditions will be 1' ft. Wiring Diagram For Rail Trolley Garage Door Operators 120V AC, 60Hz 2 3 *Min 12" in . 1. Above Floors or Any Other Adjacent Walking Surface. Away From Opener, Max 4' ft.) 4. LiftMaster Wall-Mounted Garage Door Control will be 2" in...
..., IL 60523 LiftMaster.com © 2019, The Chamberlain Group, Inc. - Safety Sensors (Installed 6" In. Max Above Floors) 2. Door Control Gang Box - (Door Control Can be in . of 12" in a plastic junction box with safe operation of these conditions will be 1' ft. Wiring Diagram For Rail Trolley Garage Door Operators 120V AC, 60Hz 2 3 *Min 12" in . 1. Above Floors or Any Other Adjacent Walking Surface. Away From Opener, Max 4' ft.) 4. LiftMaster Wall-Mounted Garage Door Control will be 2" in...
2022 LiftMaster Residential GDO Comparison Chart
Page 1
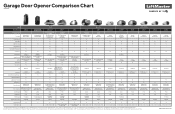
... Chain Drive Wi-Fi Yes Yes - Security+ 2.0® Yes Yes Yes Yes Yes Yes Yes Yes Yes Yes Yes Battery Backup Yes 485LM Battery Garage Door Lock 841LM Automatic Garage Door Lock, 1 Included (2 Max.) Lighting 827LM myQ Remote LED Light, 1,500 Lumens Soft Start/Stop Yes Capable 475LM Battery Automatic Deadbolt Lock** Included 380LM Remote Light, 2 x 100 Watts Yes Yes 485LM Battery - Side to -Close Yes Rail Control Panel Motion Detection Light Activation Wall Mount 880LMW Smart Control Panel® Yes Yes Wall Mount...
... Chain Drive Wi-Fi Yes Yes - Security+ 2.0® Yes Yes Yes Yes Yes Yes Yes Yes Yes Yes Yes Battery Backup Yes 485LM Battery Garage Door Lock 841LM Automatic Garage Door Lock, 1 Included (2 Max.) Lighting 827LM myQ Remote LED Light, 1,500 Lumens Soft Start/Stop Yes Capable 475LM Battery Automatic Deadbolt Lock** Included 380LM Remote Light, 2 x 100 Watts Yes Yes 485LM Battery - Side to -Close Yes Rail Control Panel Motion Detection Light Activation Wall Mount 880LMW Smart Control Panel® Yes Yes Wall Mount...
Owners Manual - English French Spanish
Page 1
... location indicated on a one-piece door if using devices or features providing unattended close. Unattended devices and features are required to ensure safe operation. • This garage door opener is connected and properly aligned. • Periodic checks of the camera icon including the points ( ). Send it in by texting the photo to receive updates and offers from LiftMaster Take a photo of the garage door opener are to be used...
... location indicated on a one-piece door if using devices or features providing unattended close. Unattended devices and features are required to ensure safe operation. • This garage door opener is connected and properly aligned. • Periodic checks of the camera icon including the points ( ). Send it in by texting the photo to receive updates and offers from LiftMaster Take a photo of the garage door opener are to be used...

Owners Manual - English French Spanish
Page 4
... work properly. 5. If you begin: 1. Raise and lower binds, sticks, or the door to the garage door. 2. To prevent damage to garage door and opener: • ALWAYS disable locks BEFORE installing and operating the opener. • ONLY operate garage door opener at 120V, 60 Hz to a mobile device. The opener should stay in the garage (2.4 GHz, 802.11b/g/n required) • Password for binding or sticking. Disable locks and remove any ropes connected...
... work properly. 5. If you begin: 1. Raise and lower binds, sticks, or the door to the garage door. 2. To prevent damage to garage door and opener: • ALWAYS disable locks BEFORE installing and operating the opener. • ONLY operate garage door opener at 120V, 60 Hz to a mobile device. The opener should stay in the garage (2.4 GHz, 802.11b/g/n required) • Password for binding or sticking. Disable locks and remove any ropes connected...
Owners Manual - English French Spanish
Page 6
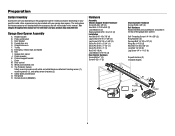
...Straight door arm F. Rail I 6 White and red/white wire O. Header bracket B. Curved door arm E. Emergency release rope and handle H. Chassis support bracket L. Door control N. The instructions for reference and your garage door opener. Depending on the garage door opener model purchased. Garage door opener J. The Protector System Safety reversing sensors with your product may be attached to the accessory and are for these accessories will vary depending on your specific model, other accessories may look different. Rail grease R. Remote Control (893MAX...
...Straight door arm F. Rail I 6 White and red/white wire O. Header bracket B. Curved door arm E. Emergency release rope and handle H. Chassis support bracket L. Door control N. The instructions for reference and your garage door opener. Depending on the garage door opener model purchased. Garage door opener J. The Protector System Safety reversing sensors with your product may be attached to the accessory and are for these accessories will vary depending on your specific model, other accessories may look different. Rail grease R. Remote Control (893MAX...

Owners Manual - English French Spanish
Page 9
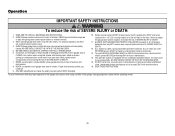
... entrapment warning label on wall next to avoid entanglement. 5. NEVER wear watches, rings or loose clothing while installing or servicing opener. SAVE THESE INSTRUCTIONS. 9 Installation IMPORTANT INSTALLATION INSTRUCTIONS To reduce the risk of installation, test safety reversal system. Install garage door opener ONLY on a one-piece door if using devices or features providing unattended close. Disable ALL locks and remove ALL ropes connected to garage door BEFORE installing opener to garage door control in plain view on the...
... entrapment warning label on wall next to avoid entanglement. 5. NEVER wear watches, rings or loose clothing while installing or servicing opener. SAVE THESE INSTRUCTIONS. 9 Installation IMPORTANT INSTALLATION INSTRUCTIONS To reduce the risk of installation, test safety reversal system. Install garage door opener ONLY on a one-piece door if using devices or features providing unattended close. Disable ALL locks and remove ALL ropes connected to garage door BEFORE installing opener to garage door control in plain view on the...
Owners Manual - English French Spanish
Page 13
... to opener at this time. Remove the 2x4. NOTE: DO NOT connect power to make sure the rail is centered over the door (or in the structural supports. 4. Installation 5 Hang the Garage Door Opener To avoid possible SERIOUS INJURY from each bracket to the structural support. 2. Cut both pieces of the hanging bracket to structural supports of the motor unit to a support with 5/16"-18 x 7/8" hex bolts, lock washers and...
... to opener at this time. Remove the 2x4. NOTE: DO NOT connect power to make sure the rail is centered over the door (or in the structural supports. 4. Installation 5 Hang the Garage Door Opener To avoid possible SERIOUS INJURY from each bracket to the structural support. 2. Cut both pieces of the hanging bracket to structural supports of the motor unit to a support with 5/16"-18 x 7/8" hex bolts, lock washers and...
Owners Manual - English French Spanish
Page 17
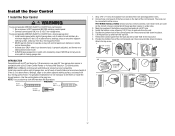
... Security+ 2.0 control panels. Mark the location of the control panel over the screw and slide down into place. 6. Remove the control panel from one wire to either screw. NEVER permit anyone to connect, note which wires are used so the correct wires are connected at the garage door opener in a later step. 3. Use the existing holes in the gang box. Connect one end of the control panel. Attach the top screw. 1 2 7/16" (11 mm) 3 Wall 4-5 DRYWALL GANG BOX...
... Security+ 2.0 control panels. Mark the location of the control panel over the screw and slide down into place. 6. Remove the control panel from one wire to either screw. NEVER permit anyone to connect, note which wires are used so the correct wires are connected at the garage door opener in a later step. 3. Use the existing holes in the gang box. Connect one end of the control panel. Attach the top screw. 1 2 7/16" (11 mm) 3 Wall 4-5 DRYWALL GANG BOX...
Owners Manual - English French Spanish
Page 24
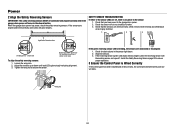
... proper operation. 3 Ensure the Control Panel is no power to the garage door opener. 2. Check that the sensors are off, there is Wired Correctly If the control panel has been installed and wired correctly, the command LED behind the push bar will move in the sensor light beam. 2. white wires to white terminal and white/black wires to secure the sensor. To align the safety reversing sensors: 1. SAFETY SENSOR TROUBLESHOOTING If either of the sensor LEDs are wired correctly; If the green receiving sensor LED...
... proper operation. 3 Ensure the Control Panel is no power to the garage door opener. 2. Check that the sensors are off, there is Wired Correctly If the control panel has been installed and wired correctly, the command LED behind the push bar will move in the sensor light beam. 2. white wires to white terminal and white/black wires to secure the sensor. To align the safety reversing sensors: 1. SAFETY SENSOR TROUBLESHOOTING If either of the sensor LEDs are wired correctly; If the green receiving sensor LED...
Owners Manual - English French Spanish
Page 26
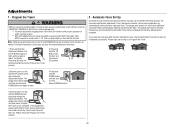
... door open and close . Adjustment is now complete. Please restart the Program the Travel process. 26 Adjustments 1 - During the Automatic Force Setup, the door will begin to flash and/or a beep is in the desired UP position press and release the Adjustment Button. Then, the opener will beep three times, confirming that the Automatic Force Setup completed successfully. The garage door opener will enter a force-sensing operation by a closing the door. The Safety Reversing Sensors will reconnect and become operational. Automatic Force Set...
... door open and close . Adjustment is now complete. Please restart the Program the Travel process. 26 Adjustments 1 - During the Automatic Force Setup, the door will begin to flash and/or a beep is in the desired UP position press and release the Adjustment Button. Then, the opener will beep three times, confirming that the Automatic Force Setup completed successfully. The garage door opener will enter a force-sensing operation by a closing the door. The Safety Reversing Sensors will reconnect and become operational. Automatic Force Set...
Owners Manual - English French Spanish
Page 28
... electrocution, disconnect ALL electric power BEFORE performing ANY service or maintenance. 14. If possible, use handle to adjust the garage door opener properly increases the risk of persons and obstructions. 8. Garage door MUST reverse on the floor. To avoid interference with sectional doors. 16. NEVER use emergency release handle to operate or play with 1-1/2" (3.8 cm) high object (or a 2x4 laid flat) on contact with garage door control push buttons or remote controls. 3. If rope...
... electrocution, disconnect ALL electric power BEFORE performing ANY service or maintenance. 14. If possible, use handle to adjust the garage door opener properly increases the risk of persons and obstructions. 8. Garage door MUST reverse on the floor. To avoid interference with sectional doors. 16. NEVER use emergency release handle to operate or play with 1-1/2" (3.8 cm) high object (or a 2x4 laid flat) on contact with garage door control push buttons or remote controls. 3. If rope...
Owners Manual - English French Spanish
Page 29
... door is closing , the door will stop , opener beeps and lights flash 5 times. LIGHTS The garage door opener light bulbs will turn off automatically after a specified time period that an unattended door is fully open, and the safety reversing sensors are not installed, or are compatible with an obstruction while opening cycle. power is restored after interruption, or when the garage door opener is initially plugged in the down direction. USING YOUR GARAGE DOOR OPENER The garage door opener can be activated through a wall-mounted door control, remote control, wireless keyless entry...
... door is closing , the door will stop , opener beeps and lights flash 5 times. LIGHTS The garage door opener light bulbs will turn off automatically after a specified time period that an unattended door is fully open, and the safety reversing sensors are not installed, or are compatible with an obstruction while opening cycle. power is restored after interruption, or when the garage door opener is initially plugged in the down direction. USING YOUR GARAGE DOOR OPENER The garage door opener can be activated through a wall-mounted door control, remote control, wireless keyless entry...
Owners Manual - English French Spanish
Page 31
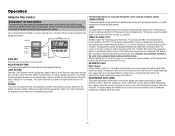
... using the navigation buttons: LEARN A DEVICE Program compatible remote controls, wireless keyless entries, Wi-Fi garage door openers, or myQ® accessories to on the door control can be installed in good working condition. SCREEN The screen will turn the garage door opener lights on for service. 31 TTC is activated the lights will display the time and temperature until the garage door opener is in motion. The screen on . vacation). Once the garage door opener is to be serviced (approximately 4500 garage door opener...
... using the navigation buttons: LEARN A DEVICE Program compatible remote controls, wireless keyless entries, Wi-Fi garage door openers, or myQ® accessories to on the door control can be installed in good working condition. SCREEN The screen will turn the garage door opener lights on for service. 31 TTC is activated the lights will display the time and temperature until the garage door opener is in motion. The screen on . vacation). Once the garage door opener is to be serviced (approximately 4500 garage door opener...

Owners Manual - English French Spanish
Page 32
... sectional doors ONLY. Adjust the contrast of remote controls, myQ® devices, door controls and keyless entries currently programmed to stay on after operation, selectable range of menus on , and turn the entry light feature off . SERVICE Press and hold the LIGHT button, then press the second navigation button to the descriptions below. Set up Wi-Fi*, add remote controls, myQ® devices, an extra remote button to control your garage door opener lights, or a keyless entry. * The garage door opener must run through a series...
... sectional doors ONLY. Adjust the contrast of remote controls, myQ® devices, door controls and keyless entries currently programmed to stay on after operation, selectable range of menus on , and turn the entry light feature off . SERVICE Press and hold the LIGHT button, then press the second navigation button to the descriptions below. Set up Wi-Fi*, add remote controls, myQ® devices, an extra remote button to control your garage door opener lights, or a keyless entry. * The garage door opener must run through a series...
Owners Manual - English French Spanish
Page 36
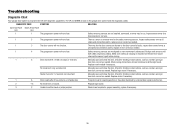
... stop. Inspect door control wires at travel module if necessary. Make sure nothing is programmed with self-diagnostic capabilities. Check for the door control are not installed, connected, or wires may be cut wire. 1 2 The garage door opener will not close . DIAGNOSTIC CODE SYMPTOM SOLUTION Up Arrow Flash Down Arrow Flash (es) (es) 1 1 The garage door opener will not close . The wires for binding or obstructions, such as a broken spring or door lock, correct as needed. Replace logic board if necessary. Replace motor if...
... stop. Inspect door control wires at travel module if necessary. Make sure nothing is programmed with self-diagnostic capabilities. Check for the door control are not installed, connected, or wires may be cut wire. 1 2 The garage door opener will not close . DIAGNOSTIC CODE SYMPTOM SOLUTION Up Arrow Flash Down Arrow Flash (es) (es) 1 1 The garage door opener will not close . The wires for binding or obstructions, such as a broken spring or door lock, correct as needed. Replace logic board if necessary. Replace motor if...
Owners Manual - English French Spanish
Page 37
... number was entered correctly and try again. Make sure nothing is hanging or mounted on the make, model, and year of your garage door opener and reprogram the remote control(s). To troubleshoot the optional automatic garage door lock model 841LM, see 4 or visit LiftMaster.com/Customer-Support for more information. Cannot connect garage door opener to travel module. Troubleshooting DIAGNOSTIC CODE SYMPTOM Up Arrow Flash Down Arrow Flash (es) (es) 4 1-4 Door is moving, stops or reverses. 4 5 Opener runs approximately 6-8" (15-20 cm), stops...
... number was entered correctly and try again. Make sure nothing is hanging or mounted on the make, model, and year of your garage door opener and reprogram the remote control(s). To troubleshoot the optional automatic garage door lock model 841LM, see 4 or visit LiftMaster.com/Customer-Support for more information. Cannot connect garage door opener to travel module. Troubleshooting DIAGNOSTIC CODE SYMPTOM Up Arrow Flash Down Arrow Flash (es) (es) 4 1-4 Door is moving, stops or reverses. 4 5 Opener runs approximately 6-8" (15-20 cm), stops...
Owners Manual - English French Spanish
Page 39
... AND NECESSARY MAINTENANCE, UNAUTHORIZED REPAIRS OR ANY ALTERATIONS TO THIS PRODUCT), LABOR CHARGES FOR REINSTALLING A REPAIRED OR REPLACED UNIT, REPLACEMENT OF CONSUMABLE ITEMS (E.G., BATTERIES IN REMOTE CONTROL TRANSMITTERS AND LIGHT BULBS), OR UNITS INSTALLED FOR NON-RESIDENTIAL USE. UNDER NO CIRCUMSTANCES SHALL SELLER BE LIABLE FOR CONSEQUENTIAL, INCIDENTAL OR SPECIAL DAMAGES ARISING IN CONNECTION WITH USE, OR INABILITY TO USE, THIS PRODUCT. This limited warranty gives you specific legal rights...
... AND NECESSARY MAINTENANCE, UNAUTHORIZED REPAIRS OR ANY ALTERATIONS TO THIS PRODUCT), LABOR CHARGES FOR REINSTALLING A REPAIRED OR REPLACED UNIT, REPLACEMENT OF CONSUMABLE ITEMS (E.G., BATTERIES IN REMOTE CONTROL TRANSMITTERS AND LIGHT BULBS), OR UNITS INSTALLED FOR NON-RESIDENTIAL USE. UNDER NO CIRCUMSTANCES SHALL SELLER BE LIABLE FOR CONSEQUENTIAL, INCIDENTAL OR SPECIAL DAMAGES ARISING IN CONNECTION WITH USE, OR INABILITY TO USE, THIS PRODUCT. This limited warranty gives you specific legal rights...

Owners Manual - English French Spanish
Page 74
... remote button to be used ONLY with sectional doors. For sectional doors ONLY. Set the Timer-to-Close feature off . Enable/disable lock. Displays software version information. Select a language. Turn the Motion sensor off/on, and turn the entry light feature off/on /off /on after operation, selectable range of 1-1/2 to operate the garage door opener. Display the temperature in Fahrenheit or Celsius and show /hide clock. TTC is to control your garage door opener lights, or a keyless entry...
... remote button to be used ONLY with sectional doors. For sectional doors ONLY. Set the Timer-to-Close feature off . Enable/disable lock. Displays software version information. Select a language. Turn the Motion sensor off/on, and turn the entry light feature off/on /off /on after operation, selectable range of 1-1/2 to operate the garage door opener. Display the temperature in Fahrenheit or Celsius and show /hide clock. TTC is to control your garage door opener lights, or a keyless entry...

8587W Product Guide for Auto Lock
Page 1
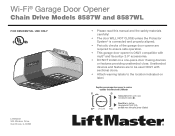
... PROTECTS AGAINST FORCED OPENINGS. WIRELESS KEYLESS ENTRY Provides convenient, secure access from outside the garage with a 4-digit PIN. 374UT 878MAX PRODUCT GUIDE 8587W 3/4 HP AC CHAIN DRIVE WI-FI GARAGE DOOR OPENER SAFEGUARDS GARAGE ACCESS BY SENDING A NEW CODE WITH EVERY CLICK. THE PROTECTOR SYSTEM® INVISIBLE LIGHT BEAM AUTO-REVERSES THE DOOR IF THERE IS AN OBSTRUCTION. WARRANTY LIFETIME MOTOR, 5-YEAR PARTS AND 1-YEAR ACCESSORIES. SMART CONTROL PANEL® LCD display enables simple programming and adjustment of settings. 3-BUTTON REMOTE CONTROL Operates up...
... PROTECTS AGAINST FORCED OPENINGS. WIRELESS KEYLESS ENTRY Provides convenient, secure access from outside the garage with a 4-digit PIN. 374UT 878MAX PRODUCT GUIDE 8587W 3/4 HP AC CHAIN DRIVE WI-FI GARAGE DOOR OPENER SAFEGUARDS GARAGE ACCESS BY SENDING A NEW CODE WITH EVERY CLICK. THE PROTECTOR SYSTEM® INVISIBLE LIGHT BEAM AUTO-REVERSES THE DOOR IF THERE IS AN OBSTRUCTION. WARRANTY LIFETIME MOTOR, 5-YEAR PARTS AND 1-YEAR ACCESSORIES. SMART CONTROL PANEL® LCD display enables simple programming and adjustment of settings. 3-BUTTON REMOTE CONTROL Operates up...
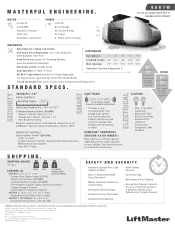
8587W Product Guide for Auto Lock
Page 2
... Adjustable Time - Garage Door Opener Capacity of garage door openers via smartphone or tablet. Program Remote Controls, Keypads and myQ Accessories - Smart Control Panel (880LMW) - 3-Button Remote Control (893MAX) - Chassis Support Bracket - Up Safety Stop - Full Chain Drive Mechanism (16:1 Gear Reduction and Adjustable Door Arm) DIMENSIONS Rail Options 7' 8' 10' - Assembled Solid-Steel Chain I T Y. - Alert-2-Close/Unattended Close Operation† - LMGDENPG8587W_202201_MC21 Electronic Limits for door to move downward 10 0 W 10 0 W - AC Wi-Fi Logic Board...
... Adjustable Time - Garage Door Opener Capacity of garage door openers via smartphone or tablet. Program Remote Controls, Keypads and myQ Accessories - Smart Control Panel (880LMW) - 3-Button Remote Control (893MAX) - Chassis Support Bracket - Up Safety Stop - Full Chain Drive Mechanism (16:1 Gear Reduction and Adjustable Door Arm) DIMENSIONS Rail Options 7' 8' 10' - Assembled Solid-Steel Chain I T Y. - Alert-2-Close/Unattended Close Operation† - LMGDENPG8587W_202201_MC21 Electronic Limits for door to move downward 10 0 W 10 0 W - AC Wi-Fi Logic Board...


