

8587 Manual
Page 3
...x 3/8" (2) Hex Bolts 1/4"-20 x 5/8" (2) Lock Washers (2) Washered Bolt 5/16"-18 x 1/2" (2) Chain Spreader Hardware Screw #8-32 x 3/8" (2) Rail Hardware Washered Bolts and Lock Washer [mounted in this manual. Garage door opener M. Safety labels and literature Q. Chain spreader B. Emergency release rope and handle ... accessories will vary depending on your garage door opener. Safety reversing sensors with your specific model, other accessories may look different. Rail grease M NK J O P Q I . White and red/white wire A B CF G L D E H The Protector System® ...
...x 3/8" (2) Hex Bolts 1/4"-20 x 5/8" (2) Lock Washers (2) Washered Bolt 5/16"-18 x 1/2" (2) Chain Spreader Hardware Screw #8-32 x 3/8" (2) Rail Hardware Washered Bolts and Lock Washer [mounted in this manual. Garage door opener M. Safety labels and literature Q. Chain spreader B. Emergency release rope and handle ... accessories will vary depending on your garage door opener. Safety reversing sensors with your specific model, other accessories may look different. Rail grease M NK J O P Q I . White and red/white wire A B CF G L D E H The Protector System® ...

8587 Manual
Page 4
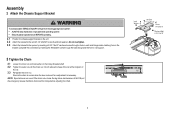
...groove in the garage door opener) NOTE: ONLY use ONLY those bolts/fasteners mounted in the top of the garage door opener. 1.2 Align the rail and the styrofoam over the sprocket. Chain Spreader Washered Bolt 5/16"-18x1/2" Lock Nut Hex Screws 8-32x1" Washers 6-Tooth Chain Spreader Sprocket 8-Tooth... the garage door opener To avoid SERIOUS damage to garage door opener, use the bolts removed from the rail, chain, and styrofoam. 1.3 Fasten the rail with the previously removed washered bolt and lock nut. 1.4 Position the chain around the garage door opener sprocket. 1.5 Attach the chain ...
...groove in the garage door opener) NOTE: ONLY use ONLY those bolts/fasteners mounted in the top of the garage door opener. 1.2 Align the rail and the styrofoam over the sprocket. Chain Spreader Washered Bolt 5/16"-18x1/2" Lock Nut Hex Screws 8-32x1" Washers 6-Tooth Chain Spreader Sprocket 8-Tooth... the garage door opener To avoid SERIOUS damage to garage door opener, use the bolts removed from the rail, chain, and styrofoam. 1.3 Fasten the rail with the previously removed washered bolt and lock nut. 1.4 Position the chain around the garage door opener sprocket. 1.5 Attach the chain ...
8587 Manual
Page 5
...a hole in each side flange and a matching hole in the chain is normal when the door is a 1/2 inch above the base of the rail at the midpoint of sprocket while operating opener. • Securely attach sprocket cover BEFORE operating. 2.1 Position the chassis support bracket on the unit.... 2.2 Attach the bracket to the rail with 1/4"-20x5/8" hex bolts and lock washers. Slack in the bracket. NOTE: Sprocket noise can result if the chain is necessary. Lock Washer...
...a hole in each side flange and a matching hole in the chain is normal when the door is a 1/2 inch above the base of the rail at the midpoint of sprocket while operating opener. • Securely attach sprocket cover BEFORE operating. 2.1 Position the chassis support bracket on the unit.... 2.2 Attach the bracket to the rail with 1/4"-20x5/8" hex bolts and lock washers. Slack in the bracket. NOTE: Sprocket noise can result if the chain is necessary. Lock Washer...

8587 Manual
Page 9
... garage door opener. Secure with the header bracket. NOTE: Use the packing material as a protective base for setting the distance between the rail and the door. The trolley can remain disconnected until instructed. If the ladder is not tall enough you will need help at this point.... 4.2 Fully open the door and place a 2x4 (laid flat) under the rail. Connected Disconnected 9 Insert the clevis pin through the holes in the header bracket and rail. Ring Fastener Clevis Pin 5/16" X 2-3/4" HARDWARE Clevis Pin 5/16" x 2-3/4" Ring Fastener 4 Position the ...
... garage door opener. Secure with the header bracket. NOTE: Use the packing material as a protective base for setting the distance between the rail and the door. The trolley can remain disconnected until instructed. If the ladder is not tall enough you will need help at this point.... 4.2 Fully open the door and place a 2x4 (laid flat) under the rail. Connected Disconnected 9 Insert the clevis pin through the holes in the header bracket and rail. Ring Fastener Clevis Pin 5/16" X 2-3/4" HARDWARE Clevis Pin 5/16" x 2-3/4" Ring Fastener 4 Position the ...

8587 Manual
Page 10
...the door (or in the structural supports. 5.4 Attach one end of the garage. Concrete anchors MUST be different. If the door hits the rail, raise the header bracket. HARDWARE Lock Washer 5/16" Hex Bolt 5/16"- 18x7/8" Nut 5/16"-18 Hanging your garage door opener will vary...finished ceilings (Figure 2), attach a sturdy metal bracket to opener at this time. Hanging brackets should be angled (Figure 1) to make sure the rail is not centered above the door). 5.7 Remove the 2x4. Two representative installations are not provided. Operate the door manually. Instructions below are for ...
...the door (or in the structural supports. 5.4 Attach one end of the garage. Concrete anchors MUST be different. If the door hits the rail, raise the header bracket. HARDWARE Lock Washer 5/16" Hex Bolt 5/16"- 18x7/8" Nut 5/16"-18 Hanging your garage door opener will vary...finished ceilings (Figure 2), attach a sturdy metal bracket to opener at this time. Hanging brackets should be angled (Figure 1) to make sure the rail is not centered above the door). 5.7 Remove the 2x4. Two representative installations are not provided. Operate the door manually. Instructions below are for ...

8587 Manual
Page 32
...ONLY with 3V2016 coin batteries. • DO NOT recharge, disassemble, heat above 212°F (100°C) or incinerate. Dispose of the rail surface where the trolley slides. The door can then be sure door opens and closes fully. Push the battery out of the FCC rulesand...Oil door rollers, bearings and hinges. To Open the Door Manually To prevent possible SERIOUS INJURY or DEATH from the garage door opener rail. Weak or broken springs or unbalanced door could fall. The garage door opener does not require additional lubrication. To prevent possible SERIOUS...
...ONLY with 3V2016 coin batteries. • DO NOT recharge, disassemble, heat above 212°F (100°C) or incinerate. Dispose of the rail surface where the trolley slides. The door can then be sure door opens and closes fully. Push the battery out of the FCC rulesand...Oil door rollers, bearings and hinges. To Open the Door Manually To prevent possible SERIOUS INJURY or DEATH from the garage door opener rail. Weak or broken springs or unbalanced door could fall. The garage door opener does not require additional lubrication. To prevent possible SERIOUS...
8587 Manual
Page 37
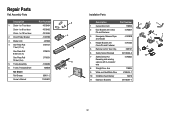
... Parts Description 1 Chain - for 10 foot door 2 Chain Pulley Bracket 3 Master Link 4 One-Piece Rail 7 feet (2.1 m) One-Piece Rail 8 feet (2.4 m) One-Piece Rail 10 feet (3 m) 5 Trolley Assembly 6 Trolley Threaded Shaft Not Shown Rail Grease Owner's Manual Part Number 41D3484 41D3483 41D3485 41A2780 4A1008 3707CH 3708CH 3710CH 41A3489 109B48 83A11-2 114A4622 3 2 4 6 5 1 Installation Parts Description Part...
... Parts Description 1 Chain - for 10 foot door 2 Chain Pulley Bracket 3 Master Link 4 One-Piece Rail 7 feet (2.1 m) One-Piece Rail 8 feet (2.4 m) One-Piece Rail 10 feet (3 m) 5 Trolley Assembly 6 Trolley Threaded Shaft Not Shown Rail Grease Owner's Manual Part Number 41D3484 41D3483 41D3485 41A2780 4A1008 3707CH 3708CH 3710CH 41A3489 109B48 83A11-2 114A4622 3 2 4 6 5 1 Installation Parts Description Part...


