

8587 Manual
Page 1
ELITE Series Chain Drive Garage Door Opener Model 8587 - 3/4 hp FOR RESIDENTIAL USE ONLY ■ Please read this manual and the enclosed safety materials carefully! ■ Fasten the manual near the garage door after installation. ■ The door WILL NOT CLOSE unless the Protector System® is ...connected and properly aligned. ■ Periodic checks of the garage door opener are installing the garage door opener on a one-piece door, visit www.liftmaster.com ...
ELITE Series Chain Drive Garage Door Opener Model 8587 - 3/4 hp FOR RESIDENTIAL USE ONLY ■ Please read this manual and the enclosed safety materials carefully! ■ Fasten the manual near the garage door after installation. ■ The door WILL NOT CLOSE unless the Protector System® is ...connected and properly aligned. ■ Periodic checks of the garage door opener are installing the garage door opener on a one-piece door, visit www.liftmaster.com ...
8587 Manual
Page 2
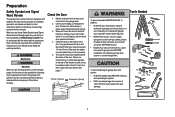
... pulleys, brackets or their hardware, ALL of which are under EXTREME tension. • Disable ALL locks and remove ALL ropes connected to garage door BEFORE installation and operating garage door opener to avoid entanglement. 5/32 3/16 5/16 12 To prevent damage to garage door and opener: • ALWAYS disable locks ... Safety Symbols and Signal Words on the following pages, it will alert you to the possibility of serious injury or death if you see this manual. Check the Door 1. If balanced, it . Any gap between the floor and the bottom of the door. If there is a torsion spring or ...
... pulleys, brackets or their hardware, ALL of which are under EXTREME tension. • Disable ALL locks and remove ALL ropes connected to garage door BEFORE installation and operating garage door opener to avoid entanglement. 5/32 3/16 5/16 12 To prevent damage to garage door and opener: • ALWAYS disable locks ... Safety Symbols and Signal Words on the following pages, it will alert you to the possibility of serious injury or death if you see this manual. Check the Door 1. If balanced, it . Any gap between the floor and the bottom of the door. If there is a torsion spring or ...

8587 Manual
Page 3
... handle K. Safety reversing sensors with your product may be attached to the accessory and are not included in the top of the garage door opener] Installation Hex Bolt 5/16"-18 x 7/8" (4) Lag Screw 5/16"-9 x 1-5/8" (2) Lag Screw 5/16"-18 x 1-5/8" (2) Clevis Pin 5/16" x 2-3/4" (1) ...Bolt 5/16"-18 x 1/2" (2) Chain Spreader Hardware Screw #8-32 x 3/8" (2) Rail Hardware Washered Bolts and Lock Washer [mounted in this manual are for these accessories will vary depending on your specific model, other accessories may look different. Door control E. Straight door arm N. Safety...
... handle K. Safety reversing sensors with your product may be attached to the accessory and are not included in the top of the garage door opener] Installation Hex Bolt 5/16"-18 x 7/8" (4) Lag Screw 5/16"-9 x 1-5/8" (2) Lag Screw 5/16"-18 x 1-5/8" (2) Clevis Pin 5/16" x 2-3/4" (1) ...Bolt 5/16"-18 x 1/2" (2) Chain Spreader Hardware Screw #8-32 x 3/8" (2) Rail Hardware Washered Bolts and Lock Washer [mounted in this manual are for these accessories will vary depending on your specific model, other accessories may look different. Door control E. Straight door arm N. Safety...

8587 Manual
Page 6
... the Timer-to avoid accidental release. 7. Disable ALL locks and remove ALL ropes connected to garage door BEFORE installing opener to do so. 8. Place manual release/safety reverse test label in plain view on wall next to cables, spring assemblies and other hardware MUST be... 2x4 laid flat) on contact with vehicles to -Close functionality if operating either one -piece door, visit www.liftmaster.com for installation instructions. 6 READ AND FOLLOW ALL INSTALLATION WARNINGS AND INSTRUCTIONS. 2. Door MUST reverse on the floor. 13. To avoid SERIOUS PERSONAL INJURY or DEATH from...
... the Timer-to avoid accidental release. 7. Disable ALL locks and remove ALL ropes connected to garage door BEFORE installing opener to do so. 8. Place manual release/safety reverse test label in plain view on wall next to cables, spring assemblies and other hardware MUST be... 2x4 laid flat) on contact with vehicles to -Close functionality if operating either one -piece door, visit www.liftmaster.com for installation instructions. 6 READ AND FOLLOW ALL INSTALLATION WARNINGS AND INSTRUCTIONS. 2. Door MUST reverse on the floor. 13. To avoid SERIOUS PERSONAL INJURY or DEATH from...

8587 Manual
Page 10
Installation 5 Hang the garage door opener To avoid possible ...the rail, raise the header bracket. Two representative installations are not provided. This bracket and fastening hardware are shown. NOTE: DO NOT connect power to ...structural supports before installing the opener. Yours may be angled (Figure 1) to make sure the rail... one end of the garage. Concrete anchors MUST be used if installing ANY brackets into masonry. On finished ceilings (Figure 2), attach a sturdy metal bracket to opener at ...
Installation 5 Hang the garage door opener To avoid possible ...the rail, raise the header bracket. Two representative installations are not provided. This bracket and fastening hardware are shown. NOTE: DO NOT connect power to ...structural supports before installing the opener. Yours may be angled (Figure 1) to make sure the rail... one end of the garage. Concrete anchors MUST be used if installing ANY brackets into masonry. On finished ceilings (Figure 2), attach a sturdy metal bracket to opener at ...
8587 Manual
Page 16
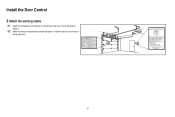
Install the Door Control 3 Attach the warning labels 3.1 Attach the entrapment warning label on the wall near the door control with tacks or staples. 3.2 Attach the manual release/safety reverse test label in a visible location on the inside of the garage door. 16
Install the Door Control 3 Attach the warning labels 3.1 Attach the entrapment warning label on the wall near the door control with tacks or staples. 3.2 Attach the manual release/safety reverse test label in a visible location on the inside of the garage door. 16
8587 Manual
Page 33
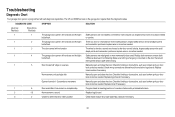
The garage door opener will not close and the light bulbs flash. Inspect sensor wires for the door control are not installed, connected or wires may be cut wire. The wires for a disconnected or cut . Inspect safety sensor wire at travel module for ... reverses. No movement, only a single click. Unable to ensure both sensors to set the travel or retain position. Make sure nothing is faulty. Manually open and close the door. Replace travel to a complete stop. Check for proper assembly, replace if necessary. 33 Program travel module if necessary. ...
The garage door opener will not close and the light bulbs flash. Inspect sensor wires for the door control are not installed, connected or wires may be cut wire. The wires for a disconnected or cut . Inspect safety sensor wire at travel module for ... reverses. No movement, only a single click. Unable to ensure both sensors to set the travel or retain position. Make sure nothing is faulty. Manually open and close the door. Replace travel to a complete stop. Check for proper assembly, replace if necessary. 33 Program travel module if necessary. ...

8587 Manual
Page 34
...time, press the ON button on the make, model, and year of any obstructions. Manually open : The garage door opener is working properly. The garage door opener can be required... been activated through a device or feature such as needed. Close, garage door monitor or LiftMaster Internet Gateway, see page 31 . My neighbor's remote control opens my garage door: Erase... control detects movement in the down direction. • Verify the safety sensors are properly installed, aligned and free of your garage door opener and reprogram the remote control(s). Realign both...
...time, press the ON button on the make, model, and year of any obstructions. Manually open : The garage door opener is working properly. The garage door opener can be required... been activated through a device or feature such as needed. Close, garage door monitor or LiftMaster Internet Gateway, see page 31 . My neighbor's remote control opens my garage door: Erase... control detects movement in the down direction. • Verify the safety sensors are properly installed, aligned and free of your garage door opener and reprogram the remote control(s). Realign both...
8587 Manual
Page 37
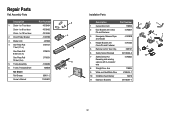
...-Piece Rail 8 feet (2.4 m) One-Piece Rail 10 feet (3 m) 5 Trolley Assembly 6 Trolley Threaded Shaft Not Shown Rail Grease Owner's Manual Part Number 41D3484 41D3483 41D3485 41A2780 4A1008 3707CH 3708CH 3710CH 41A3489 109B48 83A11-2 114A4622 3 2 4 6 5 1 Installation Parts Description Part Number 1 Curved Door Arm 178B35 2 Door Bracket with Clevis Pin and Fastener 41A5047 3 Emergency Release...
...-Piece Rail 8 feet (2.4 m) One-Piece Rail 10 feet (3 m) 5 Trolley Assembly 6 Trolley Threaded Shaft Not Shown Rail Grease Owner's Manual Part Number 41D3484 41D3483 41D3485 41A2780 4A1008 3707CH 3708CH 3710CH 41A3489 109B48 83A11-2 114A4622 3 2 4 6 5 1 Installation Parts Description Part Number 1 Curved Door Arm 178B35 2 Door Bracket with Clevis Pin and Fastener 41A5047 3 Emergency Release...

