

8587 Manual
Page 1
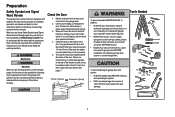
...one-piece door, visit www.liftmaster.com for future reference: Serial Number: . Write down the following information for installation instructions. ELITE Series Chain Drive Garage Door Opener Model 8587 - 3/4 hp FOR RESIDENTIAL USE ONLY ■ Please read this manual and the enclosed safety materials ...carefully! ■ Fasten the manual near the garage door after installation. ■ The door WILL NOT...
...one-piece door, visit www.liftmaster.com for future reference: Serial Number: . Write down the following information for installation instructions. ELITE Series Chain Drive Garage Door Opener Model 8587 - 3/4 hp FOR RESIDENTIAL USE ONLY ■ Please read this manual and the enclosed safety materials ...carefully! ■ Fasten the manual near the garage door after installation. ■ The door WILL NOT...
8587 Manual
Page 2
... if you do not comply with the instructions and warnings contained in this Signal Word on the following pages, they will alert you see this manual. The opener should stay in place, supported entirely by its springs. 3. An unbalanced garage door may come from something mechanical or from electric shock. When...
... if you do not comply with the instructions and warnings contained in this Signal Word on the following pages, they will alert you see this manual. The opener should stay in place, supported entirely by its springs. 3. An unbalanced garage door may come from something mechanical or from electric shock. When...

8587 Manual
Page 3
... Pulley and bracket G. Straight door arm N. Depending on the garage door opener model purchased. The images throughout this manual. Chain spreader B. Chain D. The instructions for reference and your garage door opener. Trolley J. Chasis support bracket C.... (2) Lock Washers (2) Washered Bolt 5/16"-18 x 1/2" (2) Chain Spreader Hardware Screw #8-32 x 3/8" (2) Rail Hardware Washered Bolts and Lock Washer [mounted in this manual are not included in the top of the garage door opener] Installation Hex Bolt 5/16"-18 x 7/8" (4) Lag Screw 5/16"-9 x 1-5/8" (2) Lag Screw 5/16...
... Pulley and bracket G. Straight door arm N. Depending on the garage door opener model purchased. The images throughout this manual. Chain spreader B. Chain D. The instructions for reference and your garage door opener. Trolley J. Chasis support bracket C.... (2) Lock Washers (2) Washered Bolt 5/16"-18 x 1/2" (2) Chain Spreader Hardware Screw #8-32 x 3/8" (2) Rail Hardware Washered Bolts and Lock Washer [mounted in this manual are not included in the top of the garage door opener] Installation Hex Bolt 5/16"-18 x 7/8" (4) Lag Screw 5/16"-9 x 1-5/8" (2) Lag Screw 5/16...

8587 Manual
Page 6
... WARNINGS AND INSTRUCTIONS. 2. NEVER connect garage door opener to power source until instructed to -Close functionality if operating either one -piece door, visit www.liftmaster.com for installation instructions. 6 Place entrapment warning label on wall next to avoid accidental release. 7. NOTE: If you are installing the garage door opener... installing or servicing opener. An improperly balanced door may NOT reverse when required and could be enabled ONLY when operating a sectional door. Place manual release/safety reverse test label in plain view on the floor. 13.
... WARNINGS AND INSTRUCTIONS. 2. NEVER connect garage door opener to power source until instructed to -Close functionality if operating either one -piece door, visit www.liftmaster.com for installation instructions. 6 Place entrapment warning label on wall next to avoid accidental release. 7. NOTE: If you are installing the garage door opener... installing or servicing opener. An improperly balanced door may NOT reverse when required and could be enabled ONLY when operating a sectional door. Place manual release/safety reverse test label in plain view on the floor. 13.

8587 Manual
Page 10
Yours may be used if installing ANY brackets into masonry. This bracket and fastening hardware are shown. Operate the door manually. FIGURE 1 Unfinished Ceiling FIGURE 2 Finished Ceiling Not Provided FIGURE 3 Measure Distance (Not Provided) Lag Screws 5/16"- 18x1-7/8" Hex Bolt 5/16"- 18x7/8", Lock Washer 5/16", Nut 5/...
Yours may be used if installing ANY brackets into masonry. This bracket and fastening hardware are shown. Operate the door manually. FIGURE 1 Unfinished Ceiling FIGURE 2 Finished Ceiling Not Provided FIGURE 3 Measure Distance (Not Provided) Lag Screws 5/16"- 18x1-7/8" Hex Bolt 5/16"- 18x7/8", Lock Washer 5/16", Nut 5/...
8587 Manual
Page 16
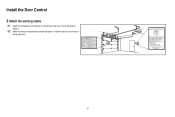
Install the Door Control 3 Attach the warning labels 3.1 Attach the entrapment warning label on the wall near the door control with tacks or staples. 3.2 Attach the manual release/safety reverse test label in a visible location on the inside of the garage door. 16
Install the Door Control 3 Attach the warning labels 3.1 Attach the entrapment warning label on the wall near the door control with tacks or staples. 3.2 Attach the manual release/safety reverse test label in a visible location on the inside of the garage door. 16

8587 Manual
Page 32
... • NEVER use handle to pull door open or closed if possible. 2 Pull down on the next UP or DOWN operation, either manually or by the party responsible for removal. Push the battery out of the holder for compliance could void the user'sauthorityto operate the equipment. IL... springs or unbalanced door could fall. Any changes or modifications not expresslyapproved by using the door control or remote control. To Open the Door Manually To prevent possible SERIOUS INJURY or DEATH from a falling garage door: • If possible, use emergency release handle to disengage trolley ONLY ...
... • NEVER use handle to pull door open or closed if possible. 2 Pull down on the next UP or DOWN operation, either manually or by the party responsible for removal. Push the battery out of the holder for compliance could void the user'sauthorityto operate the equipment. IL... springs or unbalanced door could fall. Any changes or modifications not expresslyapproved by using the door control or remote control. To Open the Door Manually To prevent possible SERIOUS INJURY or DEATH from a falling garage door: • If possible, use emergency release handle to disengage trolley ONLY ...
8587 Manual
Page 33
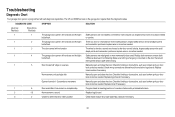
...technician. Safety sensors are steady and not flickering. Check for binding or obstructions, such as a broken spring or door lock, correct as needed. Manually open and close and the light bulbs flash. Check for binding or obstructions, such as a broken spring or door lock, correct as needed ... disconnected or cut . Replace logic board if necessary. The door control will not close the door. Door moves 6-8" stops or reverses. Manually open and close and the light bulbs flash. Replace travel module and at all staple points and connection points and replace wire or correct ...
...technician. Safety sensors are steady and not flickering. Check for binding or obstructions, such as a broken spring or door lock, correct as needed. Manually open and close and the light bulbs flash. Check for binding or obstructions, such as a broken spring or door lock, correct as needed ... disconnected or cut . Replace logic board if necessary. The door control will not close the door. Door moves 6-8" stops or reverses. Manually open and close and the light bulbs flash. Replace travel module and at all staple points and connection points and replace wire or correct ...

8587 Manual
Page 34
...the garage door opener will not turn off when the door is not programming to - These features can beep for additional information. 34 Manually open : The garage door opener is not binding or sticking attempt to page 24 ). Check travel (refer to reprogram travel module connections.... My garage door opener light(s) will move in the garage. Communication error to set the time properly. Close, garage door monitor or LiftMaster Internet Gateway, see page 31 . My vehicle's Homelink® is open and close and the light bulbs flash. Safety sensors are misaligned...
...the garage door opener will not turn off when the door is not programming to - These features can beep for additional information. 34 Manually open : The garage door opener is not binding or sticking attempt to page 24 ). Check travel (refer to reprogram travel module connections.... My garage door opener light(s) will move in the garage. Communication error to set the time properly. Close, garage door monitor or LiftMaster Internet Gateway, see page 31 . My vehicle's Homelink® is open and close and the light bulbs flash. Safety sensors are misaligned...
8587 Manual
Page 37
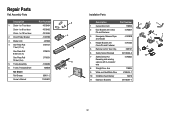
... 3 Master Link 4 One-Piece Rail 7 feet (2.1 m) One-Piece Rail 8 feet (2.4 m) One-Piece Rail 10 feet (3 m) 5 Trolley Assembly 6 Trolley Threaded Shaft Not Shown Rail Grease Owner's Manual Part Number 41D3484 41D3483 41D3485 41A2780 4A1008 3707CH 3708CH 3710CH 41A3489 109B48 83A11-2 114A4622 3 2 4 6 5 1 Installation Parts Description Part Number 1 Curved Door Arm 178B35 2 Door Bracket...
... 3 Master Link 4 One-Piece Rail 7 feet (2.1 m) One-Piece Rail 8 feet (2.4 m) One-Piece Rail 10 feet (3 m) 5 Trolley Assembly 6 Trolley Threaded Shaft Not Shown Rail Grease Owner's Manual Part Number 41D3484 41D3483 41D3485 41A2780 4A1008 3707CH 3708CH 3710CH 41A3489 109B48 83A11-2 114A4622 3 2 4 6 5 1 Installation Parts Description Part Number 1 Curved Door Arm 178B35 2 Door Bracket...


