8550W Users Guide Manual
Page 14
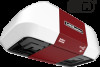
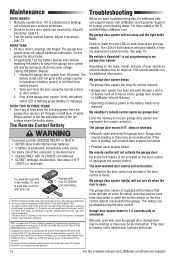
... Use a rag to the top and underside of white lithium grease to wipe away the existing grease from the garage door opener rail. Reapply a small layer of the rail surface where the trolley slides. The LEDs in a way where a minimum 8" (20 cm) distance is swallowed, immediately notify ...garage door. This feature can beep for 1-2 seconds with visor clip. My vehicle's Homelink® is subject to Wi-Fi, visit WiFiHelp.LiftMaster.com. Pry open the case first in the garage door opener. Maintenance Troubleshooting EVERY MONTH • Manually operate door. Son utilisation ...
... Use a rag to the top and underside of white lithium grease to wipe away the existing grease from the garage door opener rail. Reapply a small layer of the rail surface where the trolley slides. The LEDs in a way where a minimum 8" (20 cm) distance is swallowed, immediately notify ...garage door. This feature can beep for 1-2 seconds with visor clip. My vehicle's Homelink® is subject to Wi-Fi, visit WiFiHelp.LiftMaster.com. Pry open the case first in the garage door opener. Maintenance Troubleshooting EVERY MONTH • Manually operate door. Son utilisation ...
8550W Owners Manual
Page 6
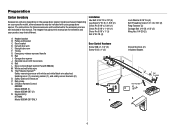
...P. Trolley G. Garage door opener J. White and red/white wire N. The Protector System® Safety reversing sensors with hex screws K. Keyless Entry 877MAX Model 8550W-267 ONLY Door Control Hardware Screw 6AB x 1-1/4" (2) Screw 6-32 x 1" (2) AB CF G D E N Q Lock Washer 5/16"-16 (4) Self... Clevis Pin 5/16" x 1-1/4" (1) Clevis Pin 5/16" x 1" (1) Nut 5/16"-18 (4) A. Depending on the garage door opener model purchased. Rail grease Q. 3-Button Remote Control 893MAX Model 8550W (1) Model 8550W-267 (2) R. Header bracket B. Pulley and bracket C. Door bracket D. Curved door arm E.
...P. Trolley G. Garage door opener J. White and red/white wire N. The Protector System® Safety reversing sensors with hex screws K. Keyless Entry 877MAX Model 8550W-267 ONLY Door Control Hardware Screw 6AB x 1-1/4" (2) Screw 6-32 x 1" (2) AB CF G D E N Q Lock Washer 5/16"-16 (4) Self... Clevis Pin 5/16" x 1-1/4" (1) Clevis Pin 5/16" x 1" (1) Nut 5/16"-18 (4) A. Depending on the garage door opener model purchased. Rail grease Q. 3-Button Remote Control 893MAX Model 8550W (1) Model 8550W-267 (2) R. Header bracket B. Pulley and bracket C. Door bracket D. Curved door arm E.
8550W Owners Manual
Page 7
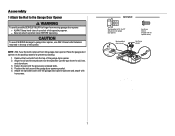
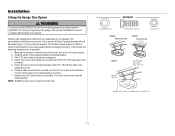
... clear of sprocket while operating opener. HARDWARE Washered Bolt 5/16"-18x1/2" (Mounted in the top of the opener. Assembly 1 Attach the Rail to the Garage Door Opener To avoid possible SERIOUS INJURY to finger from the top of the garage door opener. 2. Fasten the...to prevent scratching. 1. l Securely attach sprocket cover BEFORE operating. NOTE: ONLY use ONLY those bolts/fasteners mounted in the garage door opener) Model 8550W Washered Bolt 5/16"-18x1/2" Hex Screw #8x3/8" (Packed with the previously removed bolts. 4. Attach the sprocket cover over the sprocket. Cut the ...
... clear of sprocket while operating opener. HARDWARE Washered Bolt 5/16"-18x1/2" (Mounted in the top of the opener. Assembly 1 Attach the Rail to the Garage Door Opener To avoid possible SERIOUS INJURY to finger from the top of the garage door opener. 2. Fasten the...to prevent scratching. 1. l Securely attach sprocket cover BEFORE operating. NOTE: ONLY use ONLY those bolts/fasteners mounted in the garage door opener) Model 8550W Washered Bolt 5/16"-18x1/2" Hex Screw #8x3/8" (Packed with the previously removed bolts. 4. Attach the sprocket cover over the sprocket. Cut the ...
8550W Owners Manual
Page 12
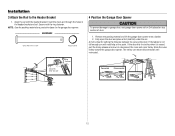
... door hits the trolley when it is ideal for the garage door opener. Insert the clevis pin through the holes in the header bracket and rail. HARDWARE Clevis Pin 5/16" x 2-3/4" Ring Fastener 4 Position the Garage Door Opener To prevent damage to the Header Bracket 1. Slide the ... not tall enough you will need help at this point. Align the rail with the ring fastener. Ring Fastener Clevis Pin 5/16" X 2-3/4" Connected Disconnected 12 Installation 3 Attach the Rail to garage door, rest garage door opener rail on 2x4 placed on top section of door. 1. Remove the packing ...
... door hits the trolley when it is ideal for the garage door opener. Insert the clevis pin through the holes in the header bracket and rail. HARDWARE Clevis Pin 5/16" x 2-3/4" Ring Fastener 4 Position the Garage Door Opener To prevent damage to the Header Bracket 1. Slide the ... not tall enough you will need help at this point. Align the rail with the ring fastener. Ring Fastener Clevis Pin 5/16" X 2-3/4" Connected Disconnected 12 Installation 3 Attach the Rail to garage door, rest garage door opener rail on 2x4 placed on top section of door. 1. Remove the packing ...
8550W Owners Manual
Page 13
...distance from a falling garage door opener, fasten it SECURELY to structural supports of the hanging bracket to required lengths. 3. If the door hits the rail, raise the header bracket. This bracket and fastening hardware are shown. Remove the 2x4. Cut both pieces of the garage. Check to make sure ...the rail is centered over the door (or in the structural supports. 4. Drill 3/16" pilot holes in line with 5/16"-18x7/8" hex bolts, lock washers and ...
...distance from a falling garage door opener, fasten it SECURELY to structural supports of the hanging bracket to required lengths. 3. If the door hits the rail, raise the header bracket. This bracket and fastening hardware are shown. Remove the 2x4. Cut both pieces of the garage. Check to make sure ...the rail is centered over the door (or in the structural supports. 4. Drill 3/16" pilot holes in line with 5/16"-18x7/8" hex bolts, lock washers and ...
8550W Owners Manual
Page 37
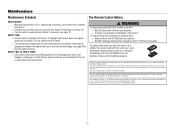
Dispose of the rail surface where the trolley slides. NOTICE: To comply with 3V CR2032 coin batteries. Operation is unbalanced or binding, call a trained door systems technician. l Check to ... classe B est conforme a la norme NMB-003 du Canada. 37 If it is subject to wipe away the existing grease from the garage door opener rail. Adjust if necessary, see page 27. l Test the safety reversal system. EVERY YEAR l Oil door rollers, bearings and hinges. Insert replacement battery positive side up...
Dispose of the rail surface where the trolley slides. NOTICE: To comply with 3V CR2032 coin batteries. Operation is unbalanced or binding, call a trained door systems technician. l Check to ... classe B est conforme a la norme NMB-003 du Canada. 37 If it is subject to wipe away the existing grease from the garage door opener rail. Adjust if necessary, see page 27. l Test the safety reversal system. EVERY YEAR l Oil door rollers, bearings and hinges. Insert replacement battery positive side up...
8550W Owners Manual
Page 42
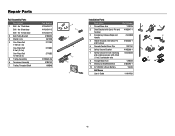
... Parts Description 1 Belt - for 8 foot door Belt - for 7 foot door Belt - for 10 foot door 2 Belt Pulley Bracket 3 Master Link 4 One-Piece Rail 7 feet (2.1 m) One-Piece Rail 8 feet (2.4 m) One-Piece Rail 10 feet (3 m) 5 Trolley Assembly 6 Tensioner Assembly 7 Trolley Threaded Shaft Part Number 41A5434-11 41A5434-13 41A5434-14 41B5424 4A1008 2777BD 2778BD 2770BD...
... Parts Description 1 Belt - for 8 foot door Belt - for 7 foot door Belt - for 10 foot door 2 Belt Pulley Bracket 3 Master Link 4 One-Piece Rail 7 feet (2.1 m) One-Piece Rail 8 feet (2.4 m) One-Piece Rail 10 feet (3 m) 5 Trolley Assembly 6 Tensioner Assembly 7 Trolley Threaded Shaft Part Number 41A5434-11 41A5434-13 41A5434-14 41B5424 4A1008 2777BD 2778BD 2770BD...
8550W Sell Sheet - English Manual
Page 2
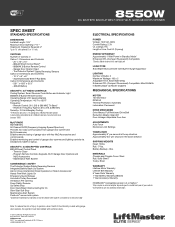
...Battery Backup: 4 lbs. Visit homelink.com for additional information. Enables monitoring and control of your vehicle. Rail: 17 lbs. Timer-to 150°F Frequency: - 8550W DC BATTERY BACKUP BELT DRIVE WI-FI GARAGE DOOR OPENER SPEC SHEET STANDARD SPECIFICATIONS DIMENSIONS Installed Length: 125"... functionality cannot be installed with sectional doors. © 2015 LiftMaster All Rights Reserved 845 Larch Ave., Elmhurst, IL 60126 LiftMaster.com Wi-Fi® is backwards compatible to all LiftMaster openers manufactured since January 1993. Garage Door Opener Head - MATERIALS...
...Battery Backup: 4 lbs. Visit homelink.com for additional information. Enables monitoring and control of your vehicle. Rail: 17 lbs. Timer-to 150°F Frequency: - 8550W DC BATTERY BACKUP BELT DRIVE WI-FI GARAGE DOOR OPENER SPEC SHEET STANDARD SPECIFICATIONS DIMENSIONS Installed Length: 125"... functionality cannot be installed with sectional doors. © 2015 LiftMaster All Rights Reserved 845 Larch Ave., Elmhurst, IL 60126 LiftMaster.com Wi-Fi® is backwards compatible to all LiftMaster openers manufactured since January 1993. Garage Door Opener Head - MATERIALS...
Garage Door Opener Comparison Chart Manual
Page 1
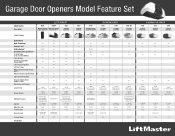
Garage Door Openers Model Feature Set Model Number Description ELITE SERIES® 8500 8550W 8587 DC Battery Backup DC Battery Backup Capable Wall Mount Belt Drive Wi-Fi® 3/4 HP AC Chain Drive 8557 3/4 HP AC Belt Drive ...2 x 100 watts, Remote Fixture Lifetime 5-Year 893MAX 3-Button Remote Control 485LM Battery 2 x 100 watts, Side to Side Lifetime 5-Year 895MAX 3-Button Elite Remote Control I-Beam Rail System, 2-Speed Sprocket, Sensor Extension Brackets, Chassis Support Bracket 2 x 100 watts, Side to Side Lifetime 5-Year 895MAX 3-Button Elite Remote Control 2 x 100 watts, Side to...
Garage Door Openers Model Feature Set Model Number Description ELITE SERIES® 8500 8550W 8587 DC Battery Backup DC Battery Backup Capable Wall Mount Belt Drive Wi-Fi® 3/4 HP AC Chain Drive 8557 3/4 HP AC Belt Drive ...2 x 100 watts, Remote Fixture Lifetime 5-Year 893MAX 3-Button Remote Control 485LM Battery 2 x 100 watts, Side to Side Lifetime 5-Year 895MAX 3-Button Elite Remote Control I-Beam Rail System, 2-Speed Sprocket, Sensor Extension Brackets, Chassis Support Bracket 2 x 100 watts, Side to Side Lifetime 5-Year 895MAX 3-Button Elite Remote Control 2 x 100 watts, Side to...


