
8355 Manual
Page 3
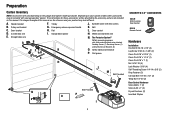
... vary depending on your specific model, other accessories may look different. Trolley G. Safety labels and literature P. Garage door opener K J. Rail grease H L M Not Provided J Not Provided N O P I . Curved door arm E. Sprocket cover with white and white/black... Carton Inventory NOTE: Accessories will be included with your garage door opener. Depending on the garage door opener model purchased. Door bracket D. Rail I SECURITY✚ 2.0TM ACCESSORIES 882LM Multi-Function Door Control 893LM Remote Control Hardware Installation Hex Bolt 5/16"-18 x 7/8" (4) Lag ...
... vary depending on your specific model, other accessories may look different. Trolley G. Safety labels and literature P. Garage door opener K J. Rail grease H L M Not Provided J Not Provided N O P I . Curved door arm E. Sprocket cover with white and white/black... Carton Inventory NOTE: Accessories will be included with your garage door opener. Depending on the garage door opener model purchased. Door bracket D. Rail I SECURITY✚ 2.0TM ACCESSORIES 882LM Multi-Function Door Control 893LM Remote Control Hardware Installation Hex Bolt 5/16"-18 x 7/8" (4) Lag ...
8355 Manual
Page 4
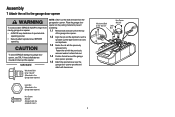
...garage door opener on the packing material to prevent scratching. 1.1 Remove bolt and lock nut from the rail, belt, and styrofoam. 1.3 Fasten the rail with hex screws. Assembly 1 Attach the rail to the garage door opener To avoid possible SERIOUS INJURY to finger from the garage door opener. To... washer bolt and lock nut. 1.4 Position the belt around the garage door opener sprocket. 1.5 Attach the sprocket cover over the sprocket. Fasten the rail with the sprocket cover) 4 Washered Bolt 5/16"-18x1/2" Hex Screw #8x3/8" Lock Nut Lock Nut (Mounted in the top of sprocket while operating...
...garage door opener on the packing material to prevent scratching. 1.1 Remove bolt and lock nut from the rail, belt, and styrofoam. 1.3 Fasten the rail with hex screws. Assembly 1 Attach the rail to the garage door opener To avoid possible SERIOUS INJURY to finger from the garage door opener. To... washer bolt and lock nut. 1.4 Position the belt around the garage door opener sprocket. 1.5 Attach the sprocket cover over the sprocket. Fasten the rail with the sprocket cover) 4 Washered Bolt 5/16"-18x1/2" Hex Screw #8x3/8" Lock Nut Lock Nut (Mounted in the top of sprocket while operating...
8355 Manual
Page 9
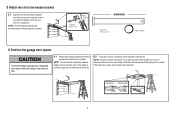
... 9 NOTE: Use the packing material as a protective base for setting the distance between the rail and the door. Slide the outer trolley toward the garage door opener. 3 Attach the rail to garage door, rest garage door opener rail on 2x4 placed on top section of door. 4.1 Remove the packing material and lift the... trolley when it is not tall enough you will need help at this point. 4.2 Fully open the door and place a 2x4 (laid flat) under the rail. NOTE: A 2x4 is ideal for the garage door opener. Insert the clevis pin through the holes in the header bracket and...
... 9 NOTE: Use the packing material as a protective base for setting the distance between the rail and the door. Slide the outer trolley toward the garage door opener. 3 Attach the rail to garage door, rest garage door opener rail on 2x4 placed on top section of door. 4.1 Remove the packing material and lift the... trolley when it is not tall enough you will need help at this point. 4.2 Fully open the door and place a 2x4 (laid flat) under the rail. NOTE: A 2x4 is ideal for the garage door opener. Insert the clevis pin through the holes in the header bracket and...
8355 Manual
Page 10
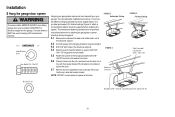
...provided). 5.5 Fasten the opener to the hanging brackets with 5/16"- 18x7/8" hex bolts, lock washers and nuts. 5.6 Check to make sure the rail is not centered above the door). 5.7 Remove the 2x4. Two representative installations are not provided. Hanging brackets should be angled (Figure 1) to ...Cut both pieces of the hanging bracket to structural supports before installing the opener. Concrete anchors MUST be different. If the door hits the rail, raise the header bracket. HARDWARE Lock Washer 5/16" Hex Bolt 5/16"- 18x7/8" Hanging your garage door opener will vary depending on ...
...provided). 5.5 Fasten the opener to the hanging brackets with 5/16"- 18x7/8" hex bolts, lock washers and nuts. 5.6 Check to make sure the rail is not centered above the door). 5.7 Remove the 2x4. Two representative installations are not provided. Hanging brackets should be angled (Figure 1) to ...Cut both pieces of the hanging bracket to structural supports before installing the opener. Concrete anchors MUST be different. If the door hits the rail, raise the header bracket. HARDWARE Lock Washer 5/16" Hex Bolt 5/16"- 18x7/8" Hanging your garage door opener will vary depending on ...
8355 Manual
Page 32
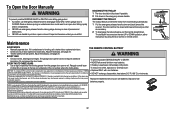
.... THERE • Replace ONLY with only coin cell batteries. Operation issubject to disengage trolley ONLY when garage door is clear of the rail surface where the trolley slides. Replace the batteries with coin batteries. IL N'EXISTE AUCUNEPIÈCESUSCEPTIBLED'ÊTREENTRETENUEPAR L'UTILISATEUR. Son utilisation est... the emergency release handle. To reduce risk of white lithium grease to wipe away the existing grease from the garage door opener rail. Weak or broken springs or unbalanced door could result in an open or closed if possible. 2 Pull down and back (toward...
.... THERE • Replace ONLY with only coin cell batteries. Operation issubject to disengage trolley ONLY when garage door is clear of the rail surface where the trolley slides. Replace the batteries with coin batteries. IL N'EXISTE AUCUNEPIÈCESUSCEPTIBLED'ÊTREENTRETENUEPAR L'UTILISATEUR. Son utilisation est... the emergency release handle. To reduce risk of white lithium grease to wipe away the existing grease from the garage door opener rail. Weak or broken springs or unbalanced door could result in an open or closed if possible. 2 Pull down and back (toward...
8355 Manual
Page 37
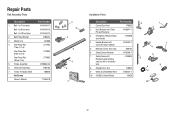
for 8 foot door Belt - for 10 foot door 2 Belt Pulley Bracket 3 Master Link 4 One-Piece Rail 7 feet (2.1 m) One-Piece Rail 8 feet (2.4 m) One-Piece Rail 10 feet (3 m) 5 Trolley Assembly 6 Tensioner Assembly 7 Trolley Threaded Shaft Not Shown Owner's Manual Part Number 41A5434-11 41A5434-13 41A5434-14 41B5424 4A1008 2777BD 2778BD ... sending sensors with 2-conductor wire 41A5034 8 Straight Door Arm 178B34 9 White and Red/White Wire 41B4494-1 10 3V2032 Lithium Battery 10A20 3 1 2 7 4 6 8 5 9 10 37 Repair Parts Rail Assembly Parts Description 1 Belt - for 7 foot door Belt -
for 8 foot door Belt - for 10 foot door 2 Belt Pulley Bracket 3 Master Link 4 One-Piece Rail 7 feet (2.1 m) One-Piece Rail 8 feet (2.4 m) One-Piece Rail 10 feet (3 m) 5 Trolley Assembly 6 Tensioner Assembly 7 Trolley Threaded Shaft Not Shown Owner's Manual Part Number 41A5434-11 41A5434-13 41A5434-14 41B5424 4A1008 2777BD 2778BD ... sending sensors with 2-conductor wire 41A5034 8 Straight Door Arm 178B34 9 White and Red/White Wire 41B4494-1 10 3V2032 Lithium Battery 10A20 3 1 2 7 4 6 8 5 9 10 37 Repair Parts Rail Assembly Parts Description 1 Belt - for 7 foot door Belt -


