3585 Elite Series Manual
Page 1
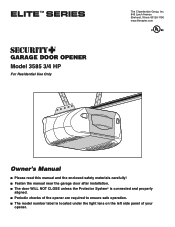
® GARAGE DOOR OPENER Model 3585 3/4 HP For Residential Use Only The Chamberlain Group, Inc. 845 Larch Avenue Elmhurst, Illinois 60126-1196 www.liftmaster.com Owner's Manual ■ Please read this manual and the enclosed safety materials carefully! ■ Fasten the manual near the garage door after installation. ■ The door WILL NOT CLOSE unless the Protector System...
® GARAGE DOOR OPENER Model 3585 3/4 HP For Residential Use Only The Chamberlain Group, Inc. 845 Larch Avenue Elmhurst, Illinois 60126-1196 www.liftmaster.com Owner's Manual ■ Please read this manual and the enclosed safety materials carefully! ■ Fasten the manual near the garage door after installation. ■ The door WILL NOT CLOSE unless the Protector System...
3585 Elite Series Manual
Page 2
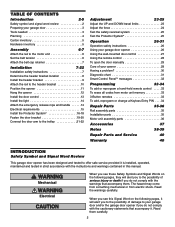
...parts 36 Accessories 37 Notes 38-39 Repair Parts and Service 40 Warranty 40 INTRODUCTION Safety Symbol and Signal Word Review This garage door opener has been designed and tested to offer safe service provided it is installed, operated, maintained and tested in strict accordance ... 25 Operation 26-31 Operation safety instructions 26 Using your garage door opener 26 Using the wall-mounted door control 27 Using the remote control 28 To open the door manually 29 Care of your garage door and/or the garage door opener if you do not comply with the warnings that accompany ...
...parts 36 Accessories 37 Notes 38-39 Repair Parts and Service 40 Warranty 40 INTRODUCTION Safety Symbol and Signal Word Review This garage door opener has been designed and tested to offer safe service provided it is installed, operated, maintained and tested in strict accordance ... 25 Operation 26-31 Operation safety instructions 26 Using your garage door opener 26 Using the wall-mounted door control 27 Using the remote control 28 To open the door manually 29 Care of your garage door and/or the garage door opener if you do not comply with the warnings that accompany ...

3585 Elite Series Manual
Page 3
...adjustment of balance, call a trained door systems technician if garage door binds, sticks, or is out of which are under EXTREME tension. • Disable ALL locks and remove ALL ropes connected to garage door BEFORE installing and operating garage door opener to see if there is not ...lower the door to avoid entanglement. To prevent damage to garage door and opener: • ALWAYS disable locks BEFORE installing and operating the opener. • ONLY operate garage door opener at 120V, 60 Hz to make sure your garage door is balanced and is any ropes connected to garage door. •...
...adjustment of balance, call a trained door systems technician if garage door binds, sticks, or is out of which are under EXTREME tension. • Disable ALL locks and remove ALL ropes connected to garage door BEFORE installing and operating garage door opener to see if there is not ...lower the door to avoid entanglement. To prevent damage to garage door and opener: • ALWAYS disable locks BEFORE installing and operating the opener. • ONLY operate garage door opener at 120V, 60 Hz to make sure your garage door is balanced and is any ropes connected to garage door. •...
3585 Elite Series Manual
Page 5
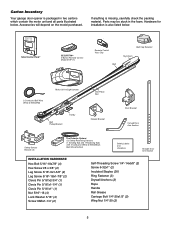
...Bell Wire White & White/Red Motor Unit w/Light Lenses Belt Pulley Bracket Trolley One-Piece Rail CEILING MOUNT ONLY UP Header Bracket Door Bracket Curved Door Arm Section Safety Sensor Bracket (2) The Protector System® (2) Safety Reversing Sensors (1 Sending Eye and 1 Receiving Eye) with...20 (2) 5 Parts may be stuck in two cartons which contain the motor unit and all parts illustrated below . Carton Inventory Your garage door opener is packaged in the foam. Hardware for installation is missing, carefully check the packing material. If anything is also listed below . ...
...Bell Wire White & White/Red Motor Unit w/Light Lenses Belt Pulley Bracket Trolley One-Piece Rail CEILING MOUNT ONLY UP Header Bracket Door Bracket Curved Door Arm Section Safety Sensor Bracket (2) The Protector System® (2) Safety Reversing Sensors (1 Sending Eye and 1 Receiving Eye) with...20 (2) 5 Parts may be stuck in two cartons which contain the motor unit and all parts illustrated below . Carton Inventory Your garage door opener is packaged in the foam. Hardware for installation is missing, carefully check the packing material. If anything is also listed below . ...
3585 Elite Series Manual
Page 6
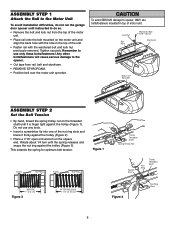
ASSEMBLY STEP 1 Attach the Rail to the Motor Unit To avoid installation difficulties, do not run the garage door opener until instructed to do so. • Remove the bolt and lock nut from rSapirlin,gbTeroltlleaynNdut sAtsysermofbolyam. 3/5/92 - 5/16 /92 - 5/21/92 - 6/2/92 ...unit sprocket. Rotate about 1/4 turn until it firmly against the trolley (Figure 2). • Place a 7/16" open end wrench on the square end. Tighten securely. The Chamberlain Group, Inc. Liftmaster Synchro Drive • Cut tape from the top of the motor unit. • Place rail onto the bolt mounted...
ASSEMBLY STEP 1 Attach the Rail to the Motor Unit To avoid installation difficulties, do not run the garage door opener until instructed to do so. • Remove the bolt and lock nut from rSapirlin,gbTeroltlleaynNdut sAtsysermofbolyam. 3/5/92 - 5/16 /92 - 5/21/92 - 6/2/92 ...unit sprocket. Rotate about 1/4 turn until it firmly against the trolley (Figure 2). • Place a 7/16" open end wrench on the square end. Tighten securely. The Chamberlain Group, Inc. Liftmaster Synchro Drive • Cut tape from the top of the motor unit. • Place rail onto the bolt mounted...
3585 Elite Series Manual
Page 7
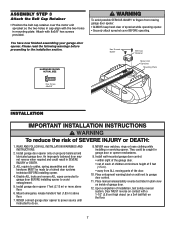
...or a 2x4 laid flat) on properly balanced and garage door or opener mechanisms. lubricated garage door. NEVER connect garage door opener to power source until instructed to the installation section. installing or servicing opener. An improperly balanced door may 9. Please read the following warnings before proceeding to...label on inside of installation, test safety reversal system. You have now finished assembling your garage door opener. hardware MUST be caught in mounting plate. Install garage door opener 7 feet (2.13 m) or more above floor. • away from moving parts of...
...or a 2x4 laid flat) on properly balanced and garage door or opener mechanisms. lubricated garage door. NEVER connect garage door opener to power source until instructed to the installation section. installing or servicing opener. An improperly balanced door may 9. Please read the following warnings before proceeding to...label on inside of installation, test safety reversal system. You have now finished assembling your garage door opener. hardware MUST be caught in mounting plate. Install garage door opener 7 feet (2.13 m) or more above floor. • away from moving parts of...
3585 Elite Series Manual
Page 11
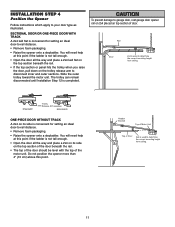
...this point if the ladder is not tall enough. • Open the door all the way and place a 2x4 on its side on the trolley release arm to garage door, rest garage door opener rail on 2x4 placed on its side is not tall enough. • Open the door all the way and place a 2x4 laid flat on the... top section beneath the rail. • If the top section or panel hits the trolley when you raise the door, pull down on...
...this point if the ladder is not tall enough. • Open the door all the way and place a 2x4 on its side on the trolley release arm to garage door, rest garage door opener rail on 2x4 placed on its side is not tall enough. • Open the door all the way and place a 2x4 laid flat on the... top section beneath the rail. • If the top section or panel hits the trolley when you raise the door, pull down on...
3585 Elite Series Manual
Page 12
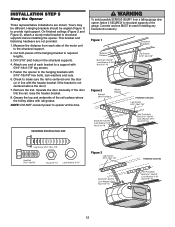
... Bolt 5/16"-18x7/8" Lock Washer 5/16" Nut 5/16"-18 12 This bracket and fastening hardware are shown. Measure the distance from a falling garage door opener, fasten it SECURELY to structural supports of the rail surface where the trolley slides with 5/16"-18x7/8" hex bolts, lock washers and nuts. ...6. Drill 3/16" pilot holes in line with 5/16"-18x1-7/8" lag screws. 5. If the door hits the rail, raise the header bracket. 8. Grease the top and underside of the garage. To avoid possible SERIOUS INJURY from each bracket to the hanging brackets with rail grease. Remove the...
... Bolt 5/16"-18x7/8" Lock Washer 5/16" Nut 5/16"-18 12 This bracket and fastening hardware are shown. Measure the distance from a falling garage door opener, fasten it SECURELY to structural supports of the rail surface where the trolley slides with 5/16"-18x7/8" hex bolts, lock washers and nuts. ...6. Drill 3/16" pilot holes in line with 5/16"-18x1-7/8" lag screws. 5. If the door hits the rail, raise the header bracket. 8. Grease the top and underside of the garage. To avoid possible SERIOUS INJURY from each bracket to the hanging brackets with rail grease. Remove the...
3585 Elite Series Manual
Page 13
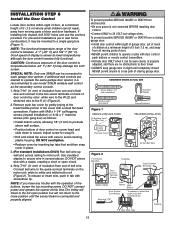
...top mounting screw. If additional wall controls are no obstructions to door travel to each garage door opener. Fasten with a small flat-head screwdriver. NOTE: If you have any trouble with care to operate the same garage door opener, it may damage the LCD screen. NEVER permit anyone to the... R (1) (Figure 2). 2. INSTALLATION STEP 6 Install the Door Control Locate door control within sight of garage door, out of reach of children at a minimum height of...
...top mounting screw. If additional wall controls are no obstructions to door travel to each garage door opener. Fasten with a small flat-head screwdriver. NOTE: If you have any trouble with care to operate the same garage door opener, it may damage the LCD screen. NEVER permit anyone to the... R (1) (Figure 2). 2. INSTALLATION STEP 6 Install the Door Control Locate door control within sight of garage door, out of reach of children at a minimum height of...

3585 Elite Series Manual
Page 14
Then the lights will turn OFF. • Reverse the procedure to close the lens. • Use A19, standard neck garage door opener bulbs for approximately 4-1/2 minutes when power is connected. Ensure that the rope and handle clear the tops of the endpanel or light socket: • ... • Thread the other end of persons and obstructions. • NEVER use handle to the opener: • DO NOT use bulbs larger than 100W. • ONLY use emergency release handle to disengage trolley ONLY when garage door is necessary to cut the rope, heat seal the cut end with an overhand knot.
Then the lights will turn OFF. • Reverse the procedure to close the lens. • Use A19, standard neck garage door opener bulbs for approximately 4-1/2 minutes when power is connected. Ensure that the rope and handle clear the tops of the endpanel or light socket: • ... • Thread the other end of persons and obstructions. • NEVER use handle to the opener: • DO NOT use bulbs larger than 100W. • ONLY use emergency release handle to disengage trolley ONLY when garage door is necessary to cut the rope, heat seal the cut end with an overhand knot.

3585 Elite Series Manual
Page 15
... the cover aside. • Remove the attached 3-prong cord. • Connect the black (line) wire to install the proper outlet. Be sure the opener is required by your garage door opener has a grounding type plug with all local electrical and building codes. • NEVER use an extension cord, 2-wire adapter, or change plug in...
... the cover aside. • Remove the attached 3-prong cord. • Connect the black (line) wire to install the proper outlet. Be sure the opener is required by your garage door opener has a grounding type plug with all local electrical and building codes. • NEVER use an extension cord, 2-wire adapter, or change plug in...

3585 Elite Series Manual
Page 16
...the wall framing. This required safety device MUST NOT be securely fastened to the garage door opener BEFORE installing the safety reversing sensor. If an obstruction breaks the light beam while the door is not connected to a solid surface such as the sun never shines directly ...necessary. The invisible light beam path must be connected and aligned correctly before the garage door opener will detect an obstacle in masonry if repositioning is NO HIGHER than 6" (15 cm) above garage floor. IMPORTANT INFORMATION ABOUT THE SAFETY REVERSING SENSOR When properly connected and aligned, ...
...the wall framing. This required safety device MUST NOT be securely fastened to the garage door opener BEFORE installing the safety reversing sensor. If an obstruction breaks the light beam while the door is not connected to a solid surface such as the sun never shines directly ...necessary. The invisible light beam path must be connected and aligned correctly before the garage door opener will detect an obstacle in masonry if repositioning is NO HIGHER than 6" (15 cm) above garage floor. IMPORTANT INFORMATION ABOUT THE SAFETY REVERSING SENSOR When properly connected and aligned, ...
3585 Elite Series Manual
Page 25
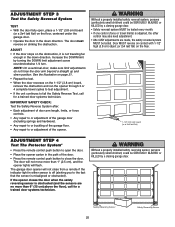
... the DOWN limit by a closing garage door. • Safety reversal system MUST be SERIOUSLY INJURED or KILLED by turning the DOWN limit adjustment screw counterclockwise 1/4 turn. ADJUST • If the door stops on striking the obstruction. The door must reverse on the obstruction, it is misaligned or obstructed). The garage door opener will flash. Safety Reversing Sensor...
... the DOWN limit by a closing garage door. • Safety reversal system MUST be SERIOUSLY INJURED or KILLED by turning the DOWN limit adjustment screw counterclockwise 1/4 turn. ADJUST • If the door stops on striking the obstruction. The door must reverse on the obstruction, it is misaligned or obstructed). The garage door opener will flash. Safety Reversing Sensor...
3585 Elite Series Manual
Page 26
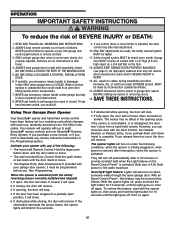
...play with each use . when the opener is misaligned, the door won't close . An improperly balanced door may not reverse when required and could result in an open garage door. Using Your Garage Door Opener Your Security✚® opener and hand-held Remote Control: Hold... becomes untied, you can be seen clearly, it will reverse. Garage door MUST reverse on contact with the safety reversing sensor correctly installed and aligned) 1. Activate your opener with your garage door opener, it will stop . 4. WARNING OPERATION IMPORTANT SAFETY INSTRUCTIONS WARNING ...
...play with each use . when the opener is misaligned, the door won't close . An improperly balanced door may not reverse when required and could result in an open garage door. Using Your Garage Door Opener Your Security✚® opener and hand-held Remote Control: Hold... becomes untied, you can be seen clearly, it will reverse. Garage door MUST reverse on contact with the safety reversing sensor correctly installed and aligned) 1. Activate your opener with your garage door opener, it will stop . 4. WARNING OPERATION IMPORTANT SAFETY INSTRUCTIONS WARNING ...

3585 Elite Series Manual
Page 30
... adjustment for balance or any obstructions. Refer to Programming. • If remote will not turn off when door is open: • The garage door opener is equipped with the door, pull the Emergency Release Rope to Adjustment Step 1, Adjust the UP and DOWN Travel Limits. This relieves the...light on my motor unit: The safety reversing sensor must be connected and aligned correctly before the garage door opener will not activate the door: • Verify your door, check diagnostic LED for the force and limit settings is blinking, deactivate the Lock Mode following the...
... adjustment for balance or any obstructions. Refer to Programming. • If remote will not turn off when door is open: • The garage door opener is equipped with the door, pull the Emergency Release Rope to Adjustment Step 1, Adjust the UP and DOWN Travel Limits. This relieves the...light on my motor unit: The safety reversing sensor must be connected and aligned correctly before the garage door opener will not activate the door: • Verify your door, check diagnostic LED for the force and limit settings is blinking, deactivate the Lock Mode following the...
3585 Elite Series Manual
Page 31
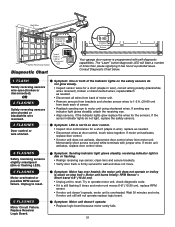
Consult Diagnostic Chart below. 1 FLASH Safety reversing sensors wire open (broken or disconnected). OR 2 FLASHES Safety reversing sensors wire shorted or black/white wire reversed. 3 FLASHES Door control or wire shorted. 4 FLASHES Safety reversing sensors slightly misaligned (dim or flashing LED). ... 3 5 5 KG KG Motor Unit Safety Reversing Sensor "Learn" Button LED or Diagnostic LED Diagnostic Chart Installed Safety Reversing Sensor Your garage door opener is programmed with jumper wire. Symptom: Motor unit doesn't operate. • Replace logic board because motor rarely fails. 31
Consult Diagnostic Chart below. 1 FLASH Safety reversing sensors wire open (broken or disconnected). OR 2 FLASHES Safety reversing sensors wire shorted or black/white wire reversed. 3 FLASHES Door control or wire shorted. 4 FLASHES Safety reversing sensors slightly misaligned (dim or flashing LED). ... 3 5 5 KG KG Motor Unit Safety Reversing Sensor "Learn" Button LED or Diagnostic LED Diagnostic Chart Installed Safety Reversing Sensor Your garage door opener is programmed with jumper wire. Symptom: Motor unit doesn't operate. • Replace logic board because motor rarely fails. 31

3585 Elite Series Manual
Page 33
... code transmitter to circumvent that technical measure. Your garage door opener has already been programmed at the factory to operate with your garage door opener, the large button is operated with a non-rolling code transmitter, the technical measure in the garage door opener does not authorize the purchaser or supplier of the garage door opener, which provides security against code-theft devices...
... code transmitter to circumvent that technical measure. Your garage door opener has already been programmed at the factory to operate with your garage door opener, the large button is operated with a non-rolling code transmitter, the technical measure in the garage door opener does not authorize the purchaser or supplier of the garage door opener, which provides security against code-theft devices...
3585 Elite Series Manual
Page 34
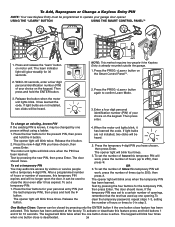
...the ENTER button. 2. To set the number of hours this temporary PIN expires and will be heard. Press the four buttons for your garage door opener. The opener light will blink twice when the one person without using a ladder. 1. The keypad will blink three times. Press the new 4-digit ...PIN you have chosen, then press Enter. If light bulbs are not installed, two clicks will no longer open the door. The opener light will be heard. 2. If the temporary PIN was set the number of times this feature press and hold the ✽ button...
...the ENTER button. 2. To set the number of hours this temporary PIN expires and will be heard. Press the four buttons for your garage door opener. The opener light will blink twice when the one person without using a ladder. 1. The keypad will blink three times. Press the new 4-digit ...PIN you have chosen, then press Enter. If light bulbs are not installed, two clicks will no longer open the door. The opener light will be heard. 2. If the temporary PIN was set the number of times this feature press and hold the ✽ button...

3585 Elite Series Manual
Page 37
...temporary password can add a temporary password for a garage with an additional LiftMaster Security✚® remote. Tells you are away from home and turn on a lamp, television or other appliance from their car with their garage door opener remote or from outside by disengaging trolley. 373W...strip. 377LM 395LM 378LM Wireless Keyless Entry with Security✚®: Enables homeowner to protect LiftMaster® garage door openers against damage from the door control. 975LM Laser Park Assist: Laser enables homeowners to precisely park vehicles in their home with NO ...
...temporary password can add a temporary password for a garage with an additional LiftMaster Security✚® remote. Tells you are away from home and turn on a lamp, television or other appliance from their car with their garage door opener remote or from outside by disengaging trolley. 373W...strip. 377LM 395LM 378LM Wireless Keyless Entry with Security✚®: Enables homeowner to protect LiftMaster® garage door openers against damage from the door control. 975LM Laser Park Assist: Laser enables homeowners to precisely park vehicles in their home with NO ...
3585 Elite Series Manual
Page 40
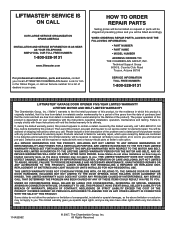
... LIMITED WARRANTY ALSO DOES NOT COVER ANY PROBLEMS CAUSED BY INTERFERENCE. Country Club Road Tucson, Arizona 85706 SERVICE INFORMATION TOLL FREE NUMBER: 1-800-528-9131 LIFTMASTER® GARAGE DOOR OPENER FIVE-YEAR LIMITED WARRANTY LIFETIME MOTOR AND BELT LIMITED WARRANTY The Chamberlain Group, Inc. ("Seller") warrants to you may not apply to the first...
... LIMITED WARRANTY ALSO DOES NOT COVER ANY PROBLEMS CAUSED BY INTERFERENCE. Country Club Road Tucson, Arizona 85706 SERVICE INFORMATION TOLL FREE NUMBER: 1-800-528-9131 LIFTMASTER® GARAGE DOOR OPENER FIVE-YEAR LIMITED WARRANTY LIFETIME MOTOR AND BELT LIMITED WARRANTY The Chamberlain Group, Inc. ("Seller") warrants to you may not apply to the first...

